Recipe: Hatch Green Chile and Summer Corn Cheesy Tart

This savory cheesy custard tart is loaded with summer corn and one of my favorite savory ingredients—roasted Hatch green chiles from New Mexico.

Don’t go calling this tart a quiche, though. When I think of the texture of a quiche filling, I think of something distinctly eggy and a bit spongy. The texture of this filling is much more like a savory custard. If you are familiar with the classic Chinese steamed egg or Japanese chawanmushi, this is more like that. Compared to quiche, the filling of this savory tart is so silky and creamy and delicate. This is because the filling has a much higher cheese to egg ratio than a quiche would. I actually use the base recipe for this filling—which combines ricotta, goat cheese, and some sort of shredded block cheese like cheddar, with egg—all the time to make various savory tarts, but this combination of fresh corn and roasted Hatch chiles was so good that it finally motivated me to type up the recipe so that others could enjoy it too.

There is just something about these two ingredients together that tastes like summer to me and is so satisfying; maybe it’s how the sweetness of the corn balances with the smoky spicy flavor of the chiles? I don’t know how to explain it but I love it. Last year, I was lucky enough to visit Hatch, New Mexico right during the season for their famous green chiles. The big green chiles gleamed in the sun while sitting in big baskets and the smell of the fresh chiles tumbling in huge roasting machines was everywhere, and I had the best cheeseburger of my life—the Hatch Green Chile Cheeseburger from Sparky’s. And of course I picked up a big jar of the roasted chile peppers to bring home. I’ve been hoarding that jar until last week when I finally decided that this tart would be worth opening it up for. (Real Hatch chiles are very limited in season and availability but you can definitely sub with those canned roasted green chiles that are common to any US grocery store. Note that the ones from the Hatch Chile Company are not necessarily made from the variety grown in Hatch, NM but they are a good substitute.)

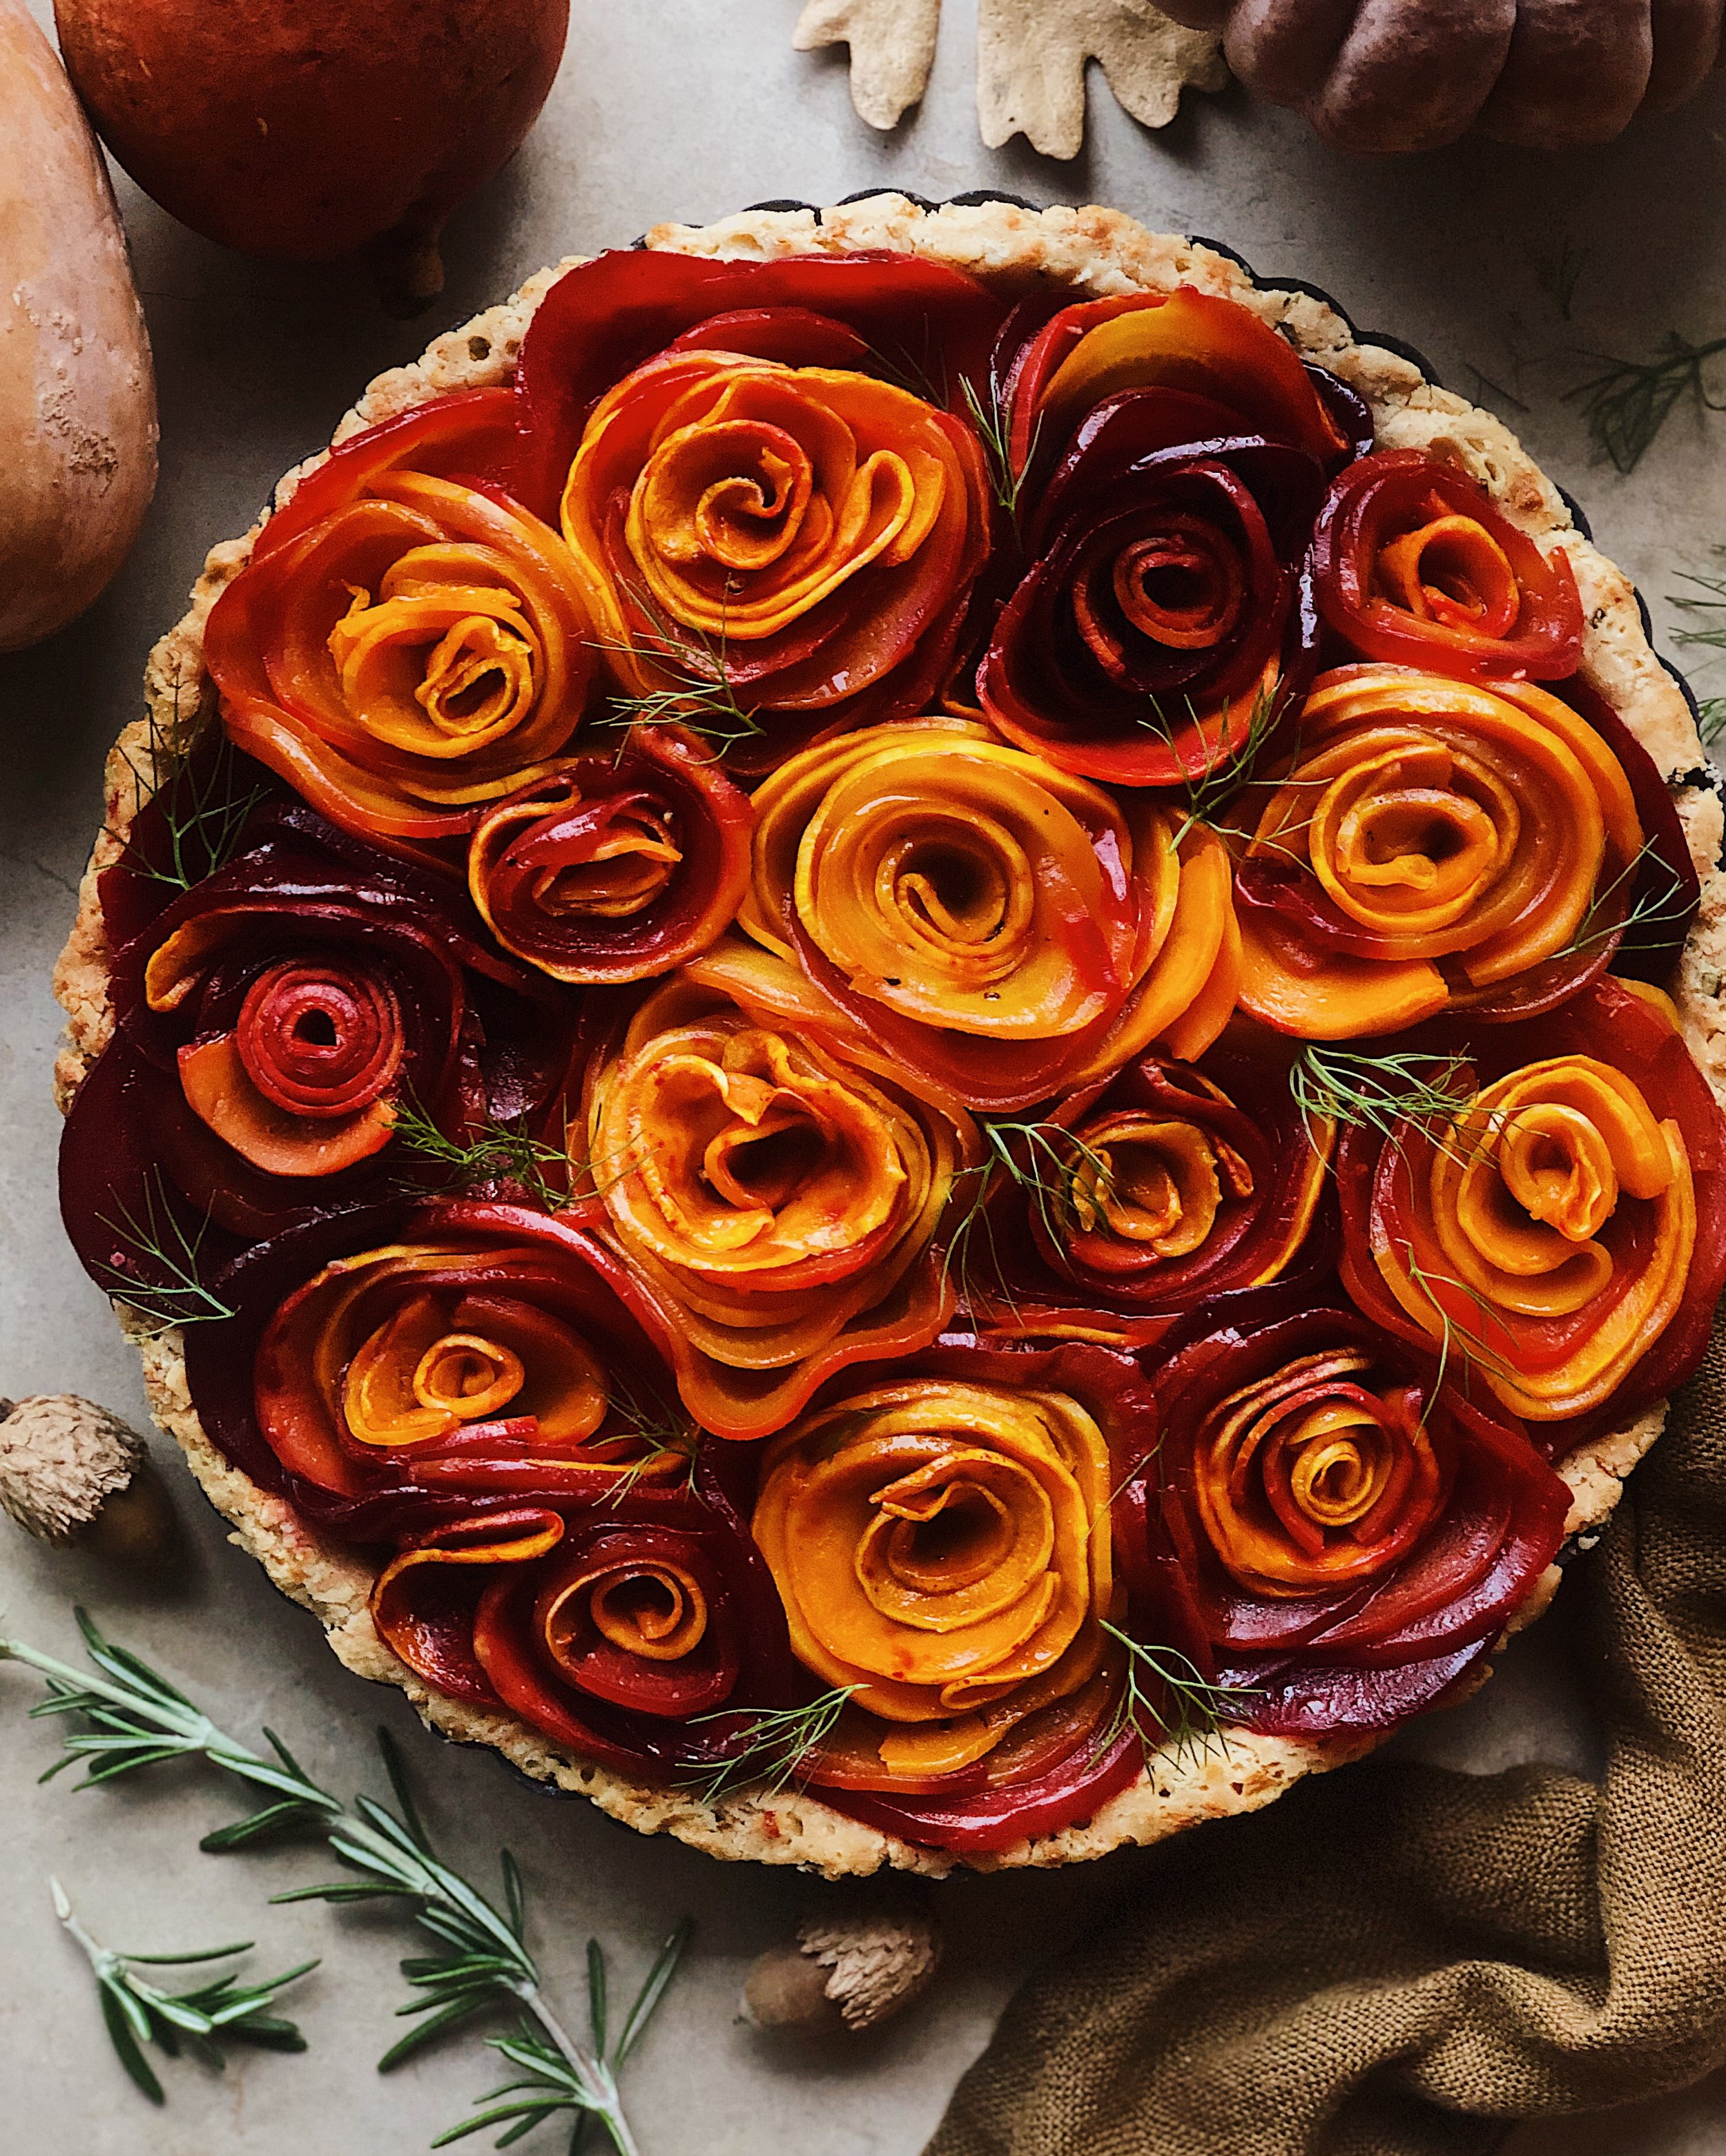
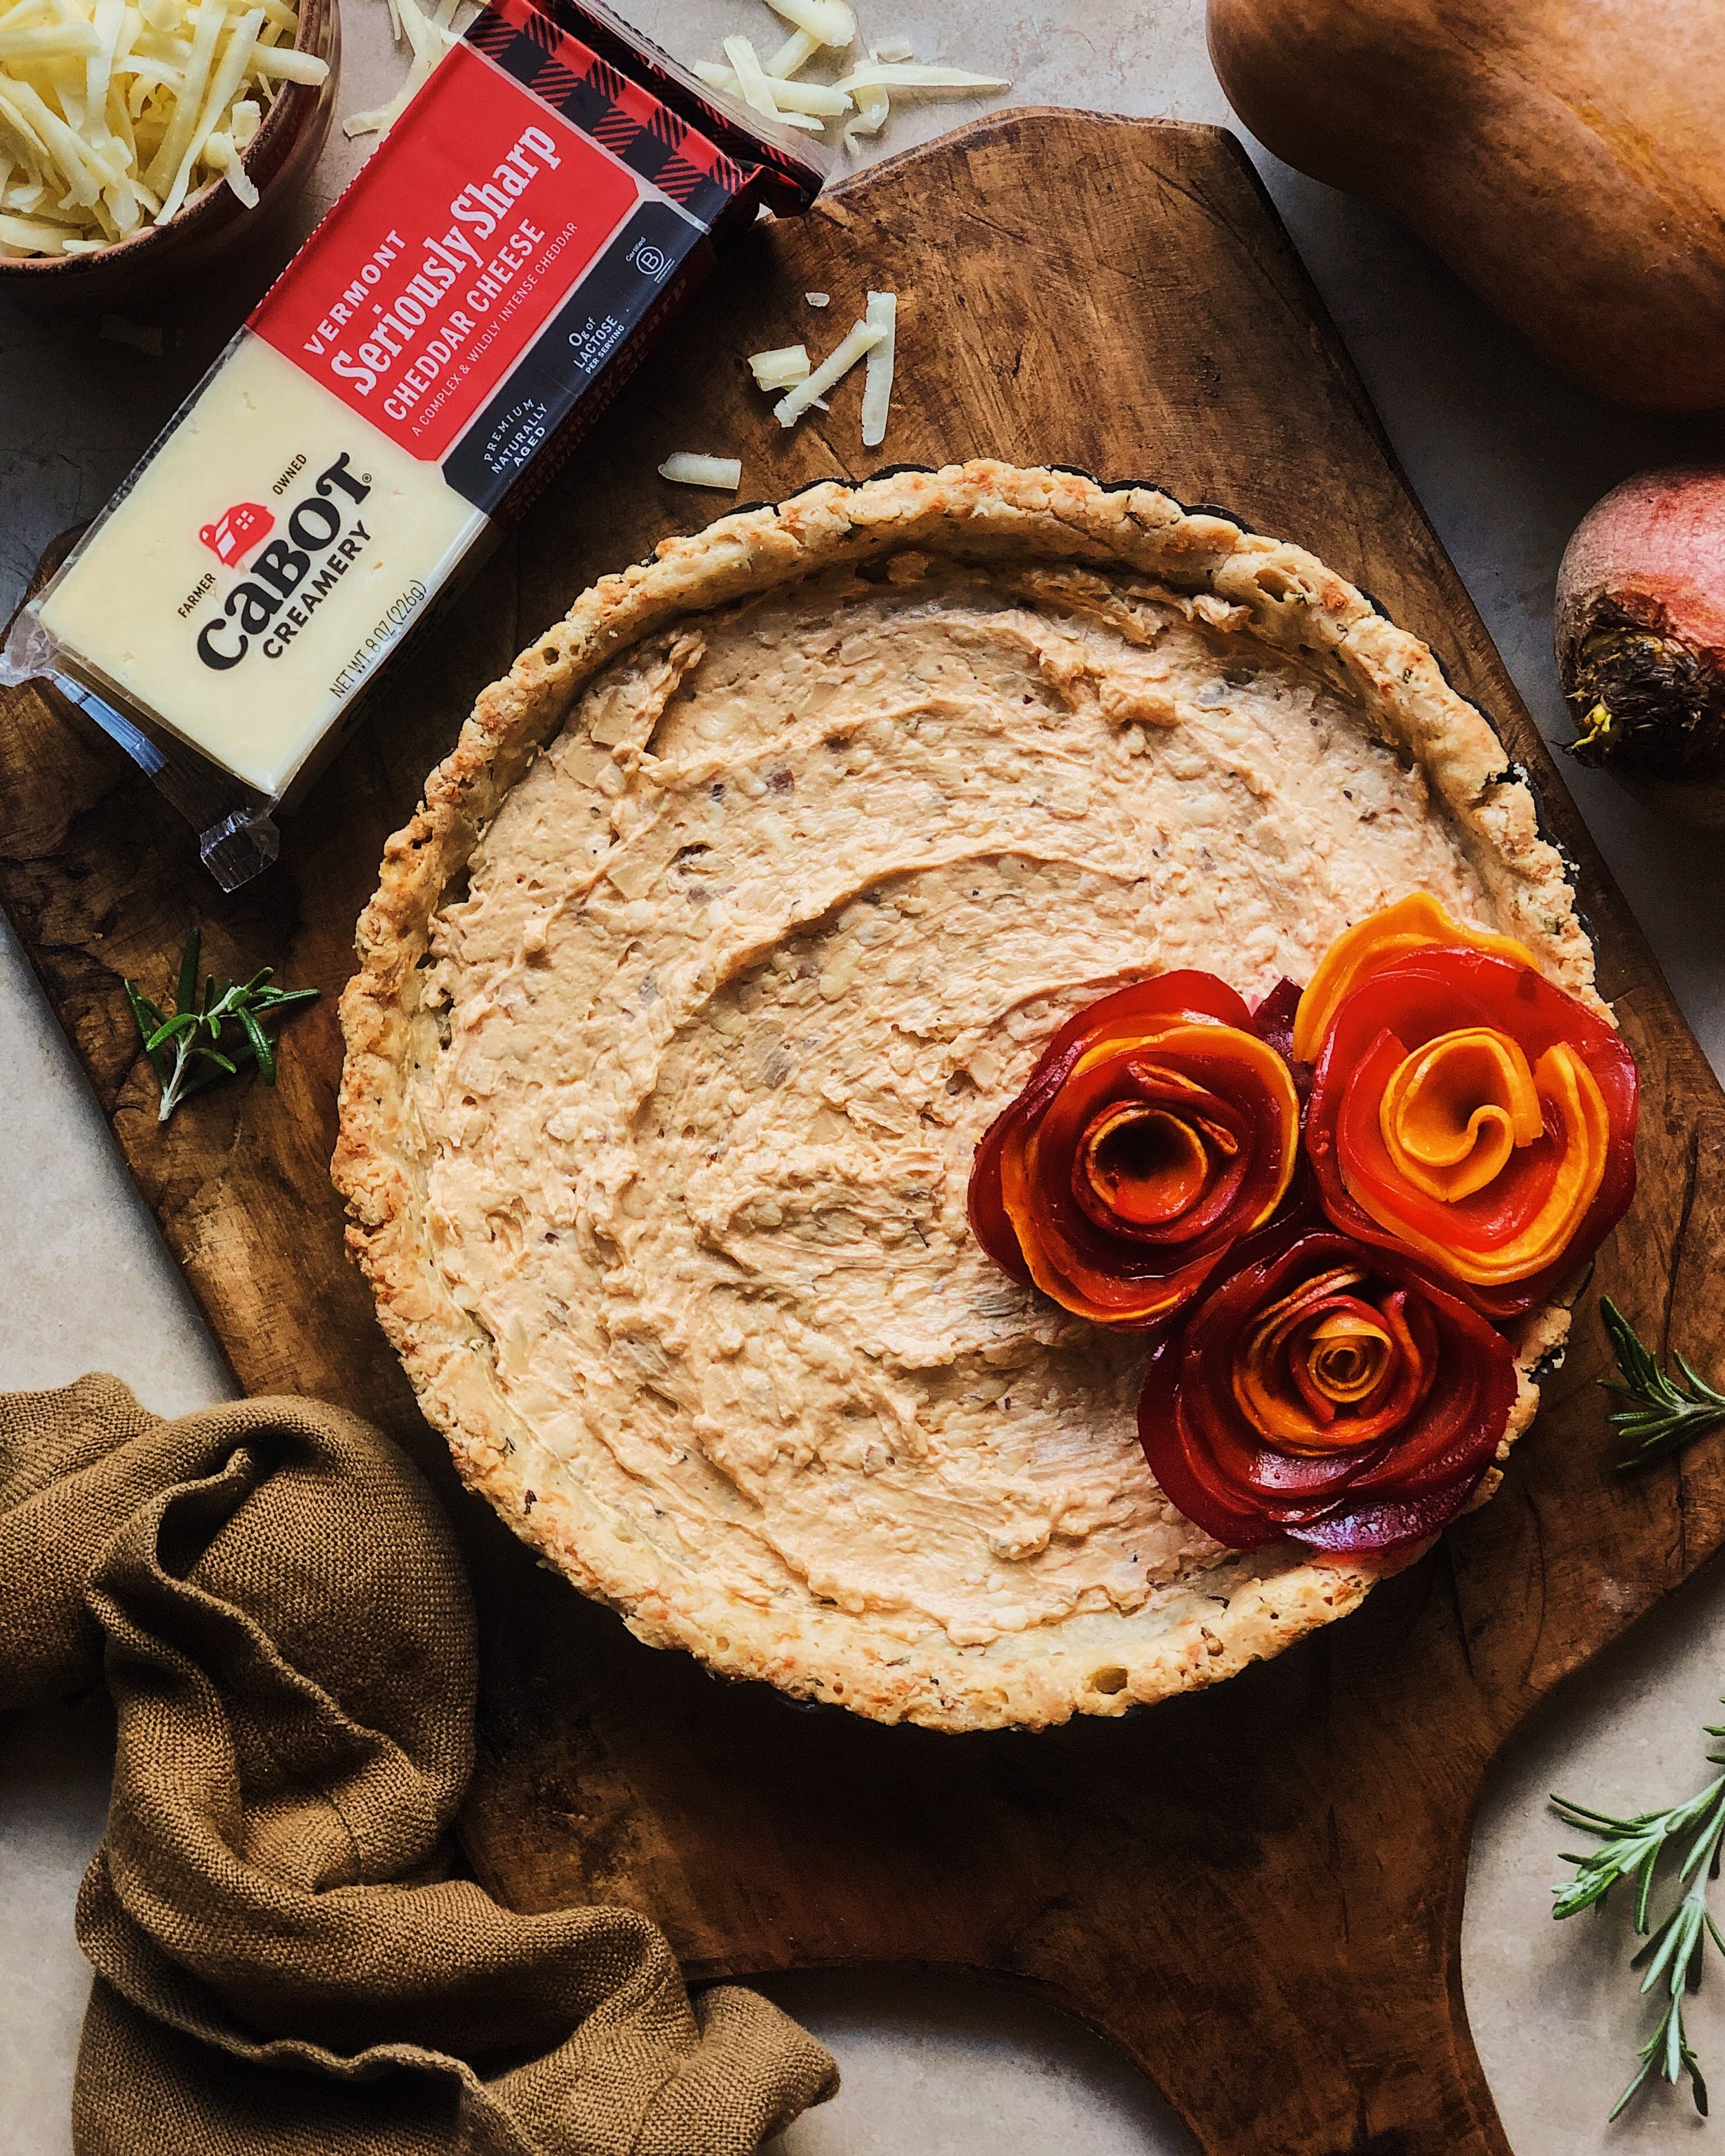
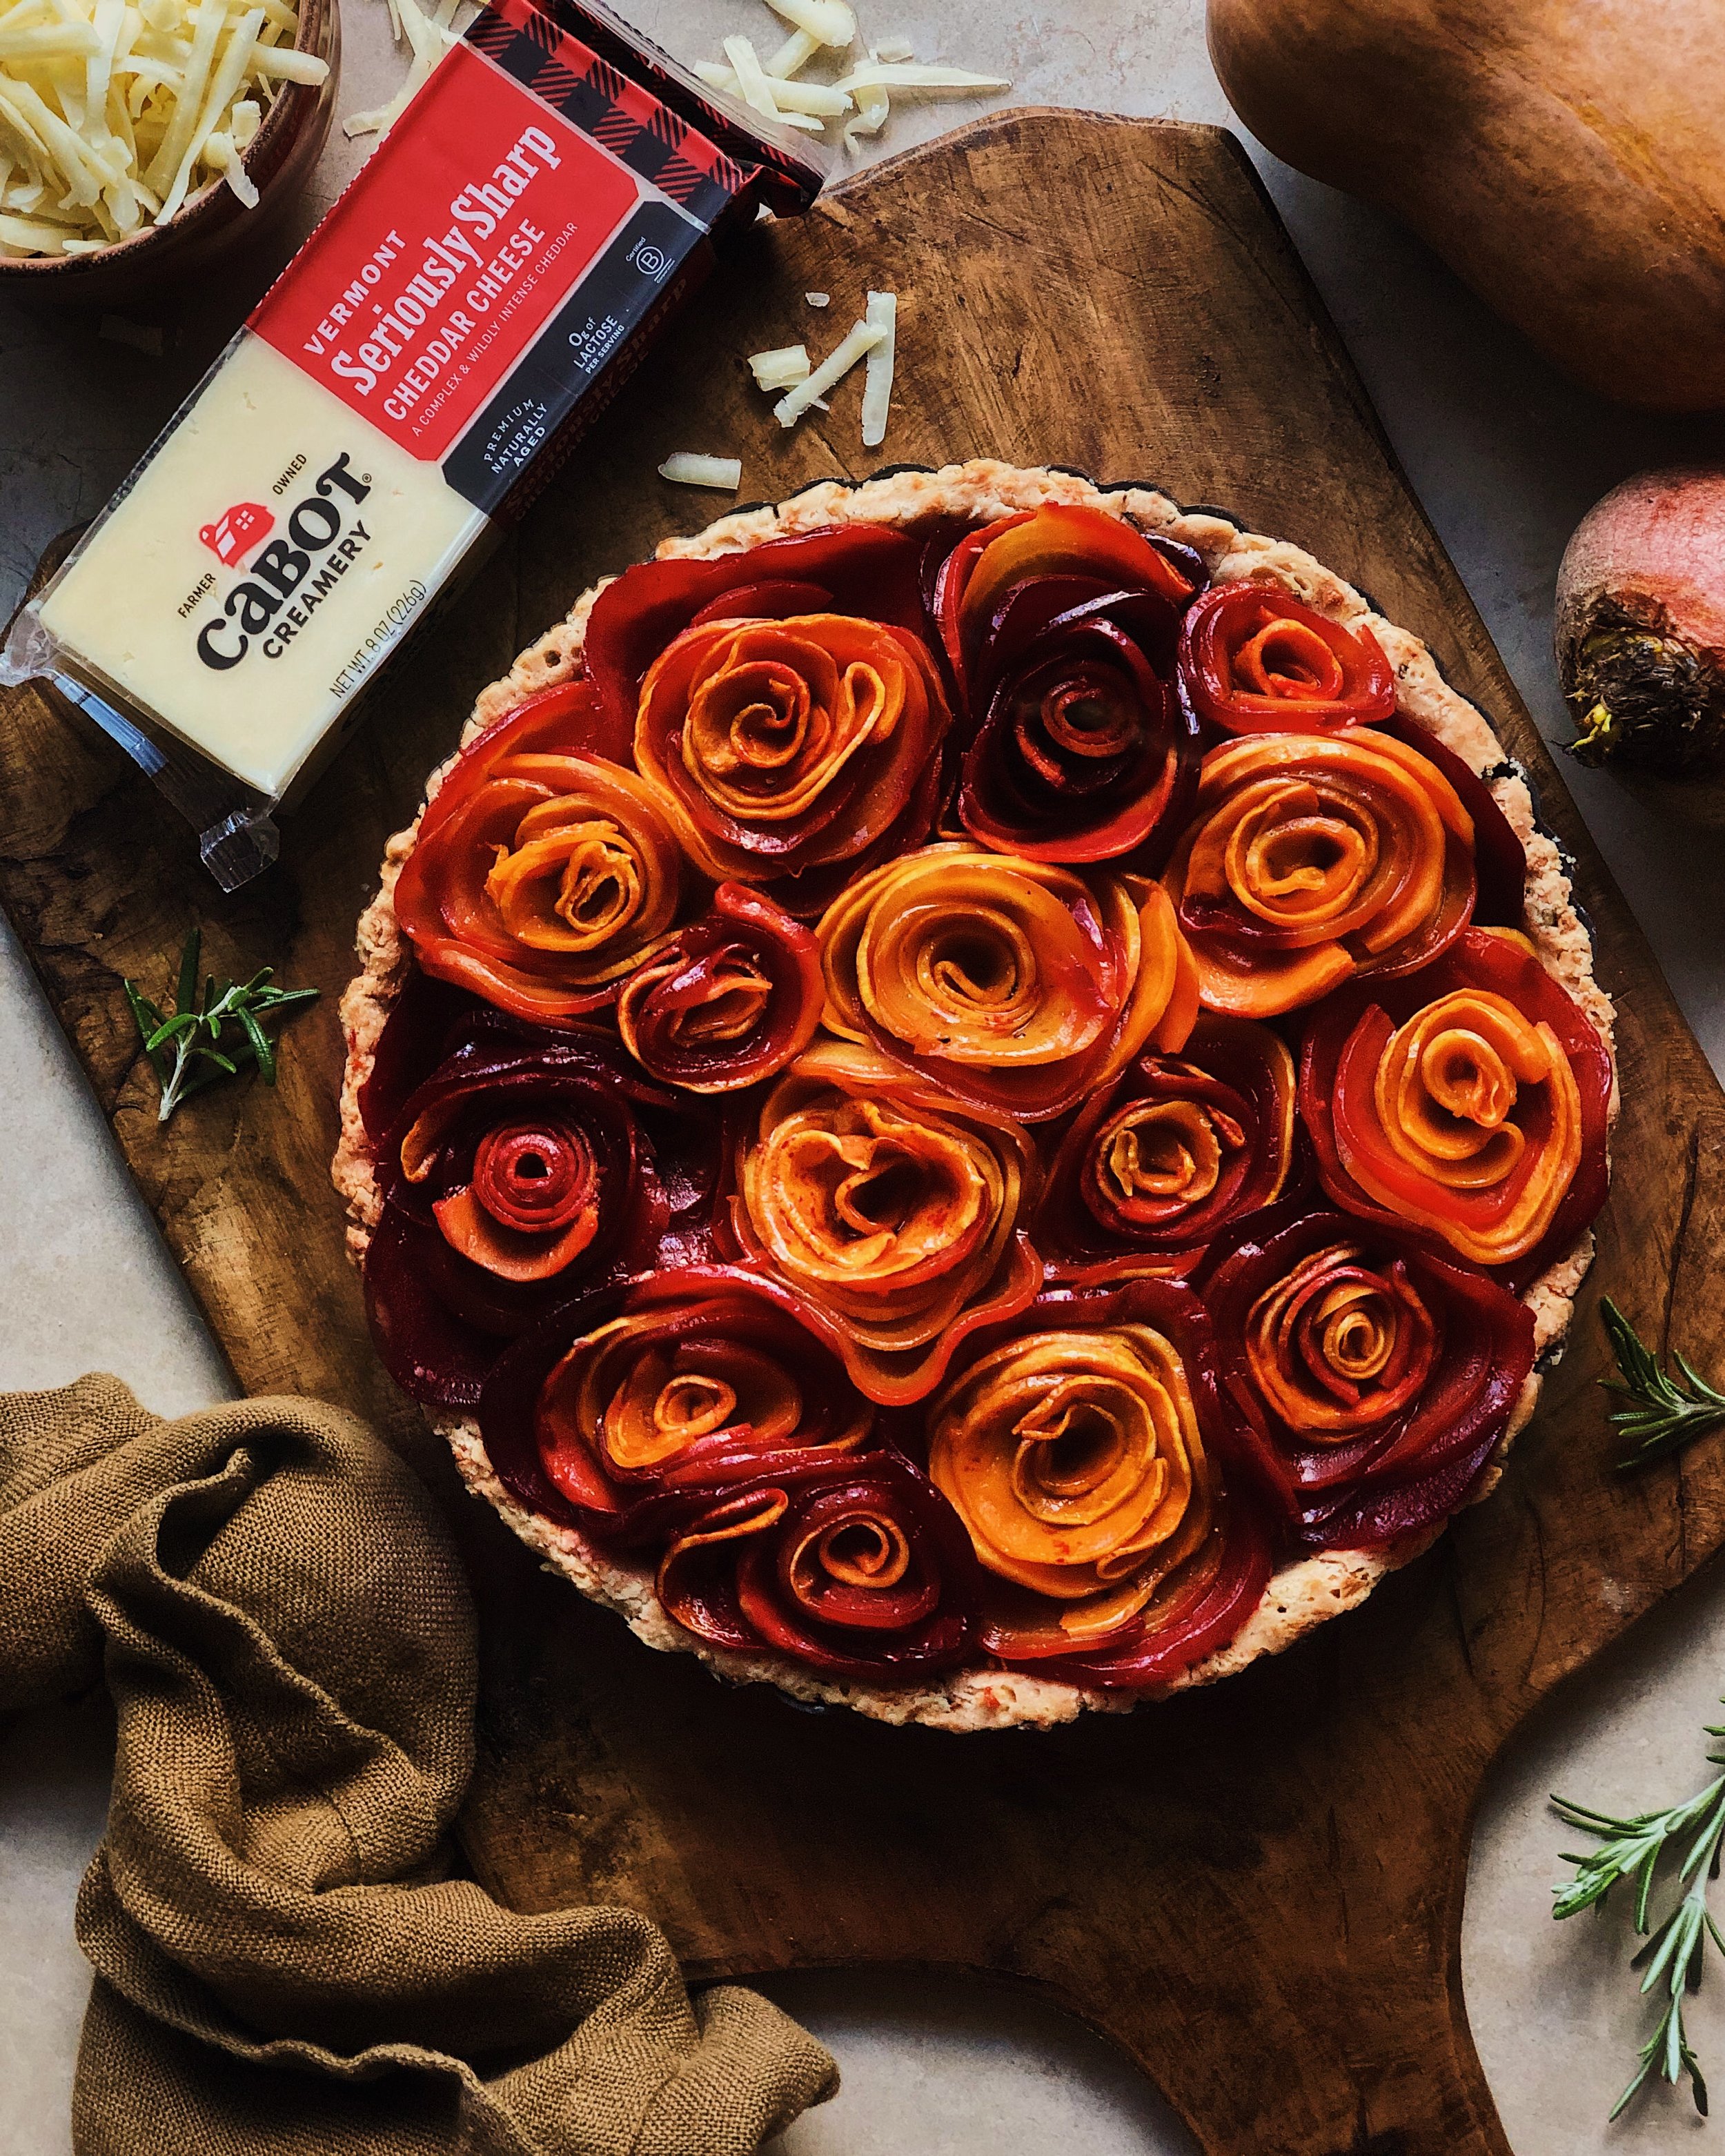
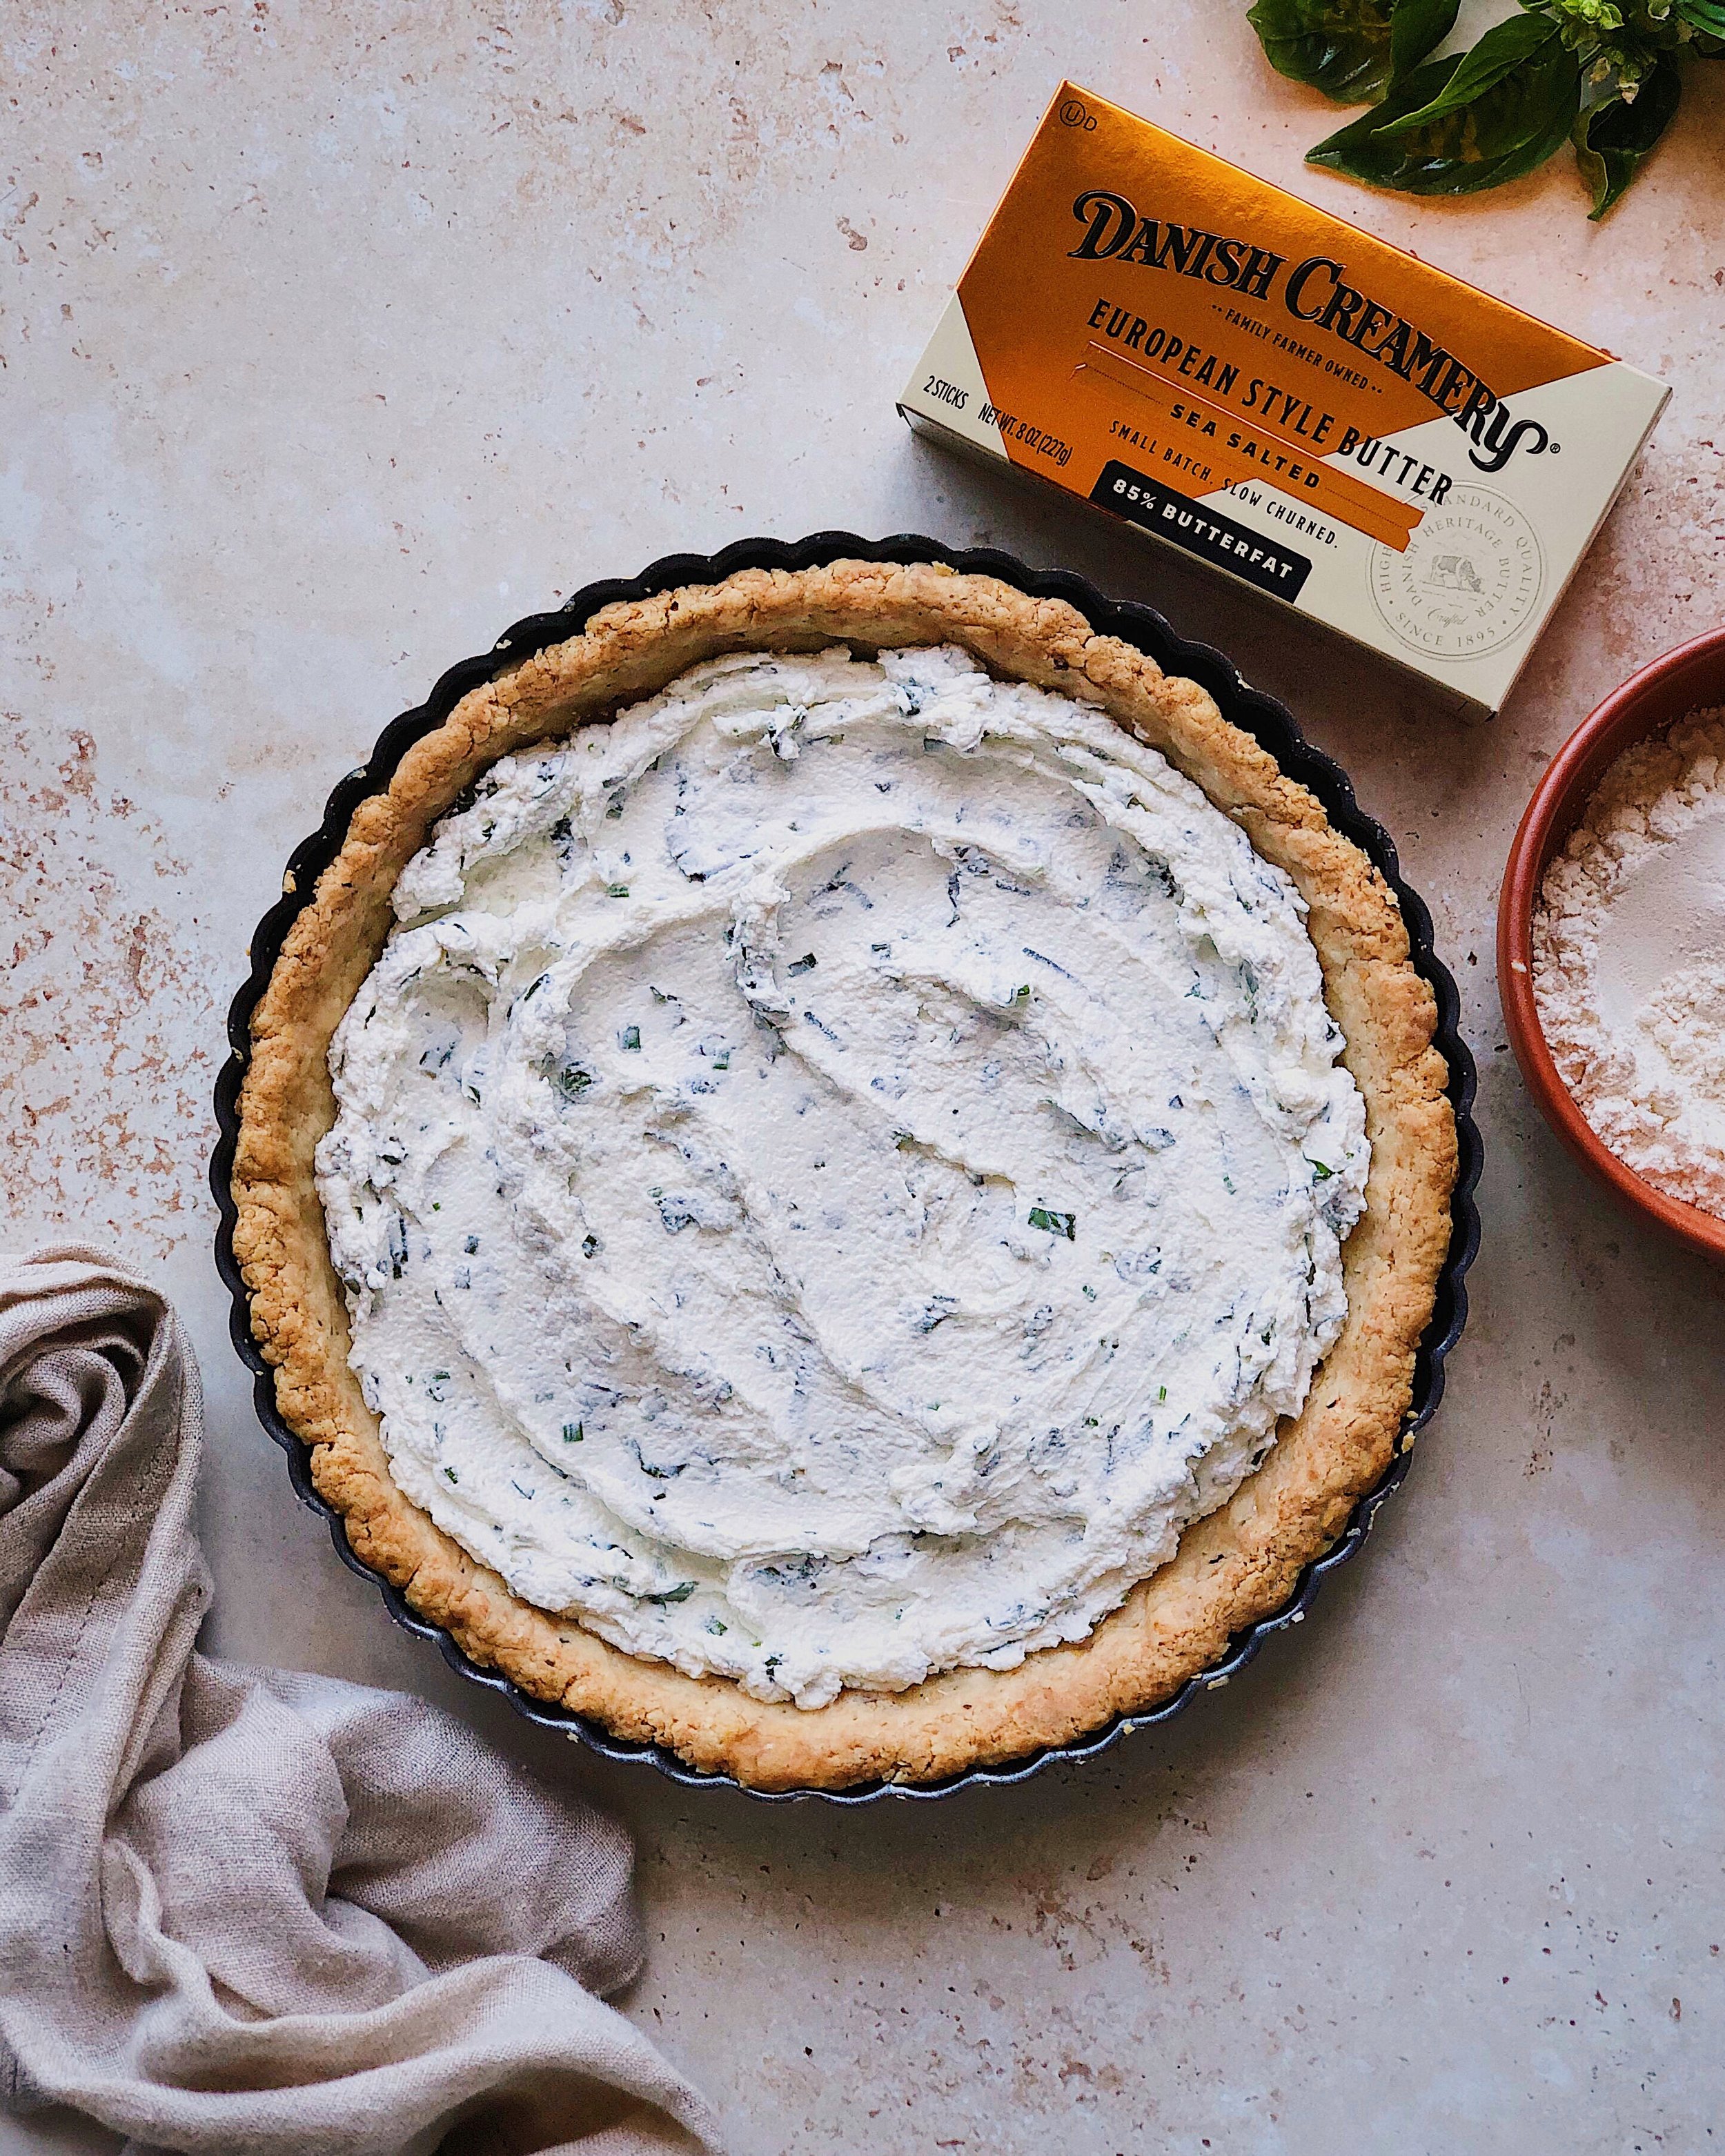
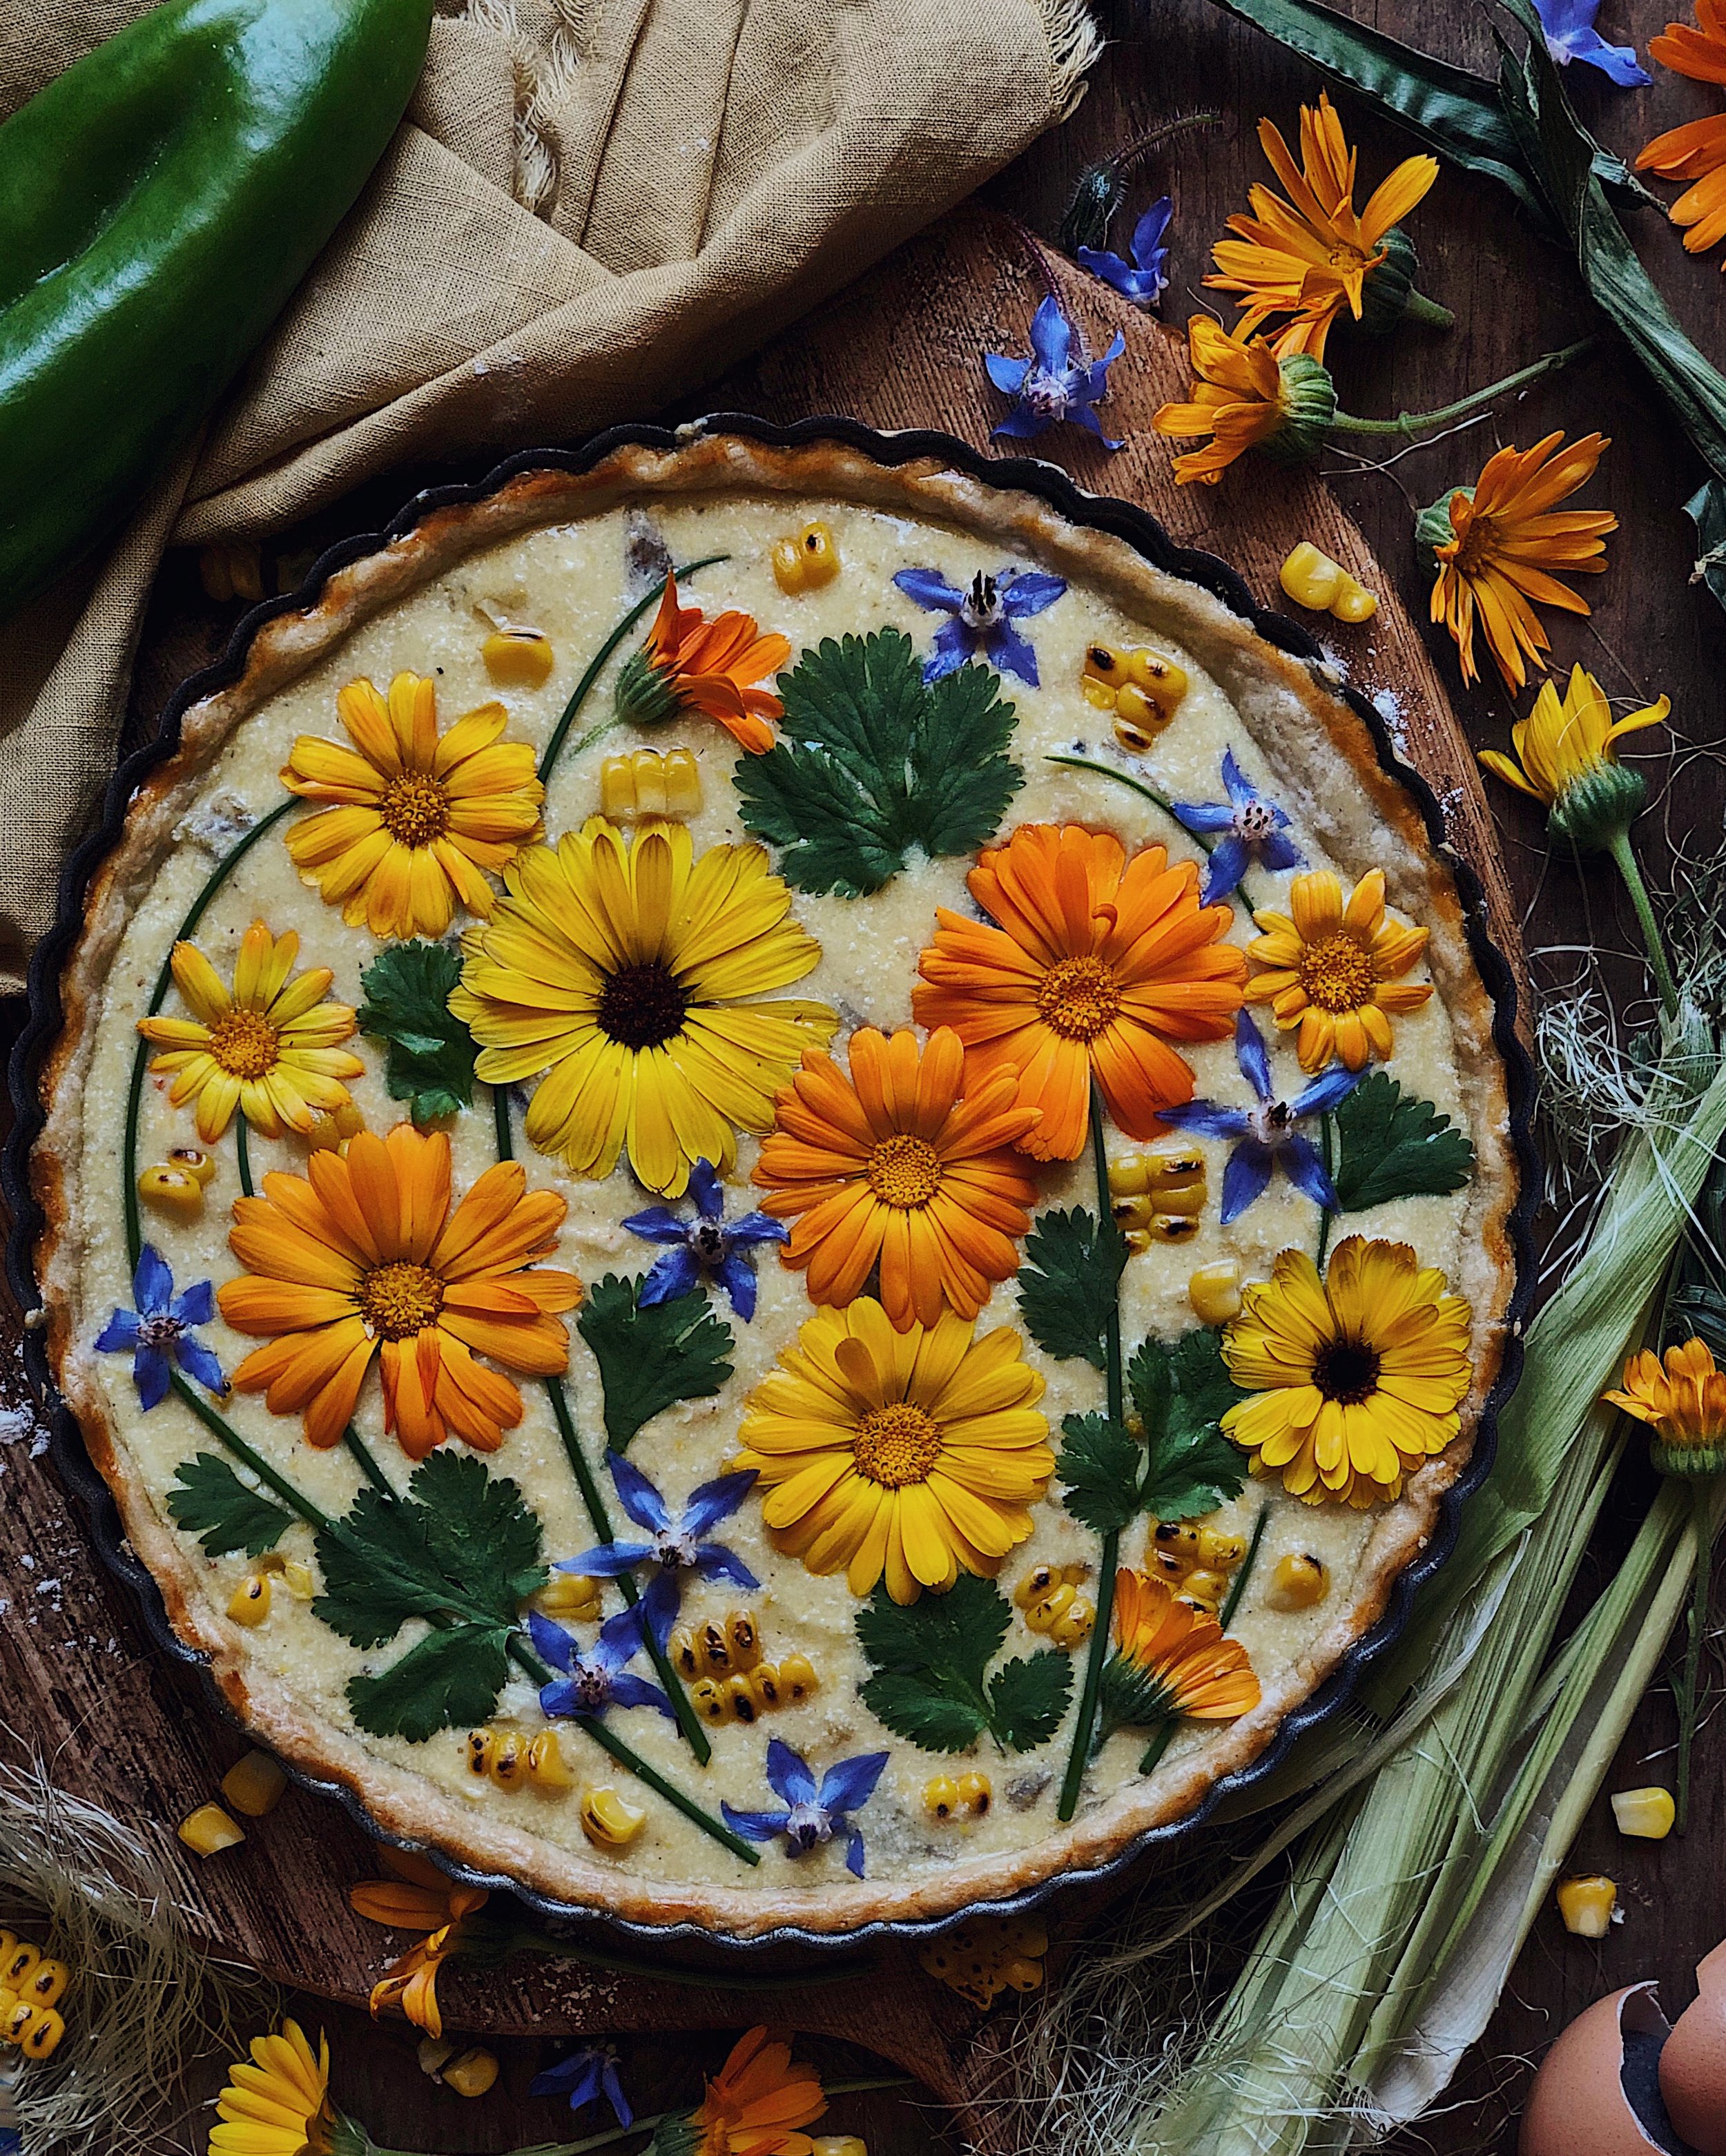
I decorated my green chile and corn tart with calendula and borage flowers, as well as some chives and cilantro. You can see what the unbaked version looked like below. Feel free to skip this elaborate decorating step and simply reserve a little bit of extra corn to sprinkle on top, along with a few cilantro leaves.

How to Make a Hatch Green Chile and Summer Corn Cheesy Tart

Ingredients

1 sheet ready-made pie dough, room temp
1 egg yolk, beaten, for crust eggwash (optional)
1 ear corn, husked
1/2 cup ricotta, drained of excess water
1/4 cup goat cheese, room temp
3 eggs
1–3 dashes habanero hot sauce (optional)
1/4 cup canned roasted green chilies, drained
3/4 packed cup sharp cheddar, grated
cilantro leaves, for decorating
edible flowers, for decorating (optional)
olive oil (optional)

Procedure

Preheat oven according to the instructions on the box of your ready-made pie dough. Press pie dough into a 9-inch tart pan with a removable bottom. Chill in the freezer for 3–5 minutes. Dock the dough with a fork. Brush with eggwash if desired for a more shiny, darker crust. Then bake according to the package instructions for a blind-baked crust, using pie weights if required in the instructions.

In the meantime, prepare the filling of the tart:

Bring a pot of water to a boil. Boil the corn for 5 minutes, or until tender. (If desired, use a culinary blowtorch or gas stove to char the surface of the corn to give it a more roasted flavor.) Cut kernels from the corn cob and set them aside.

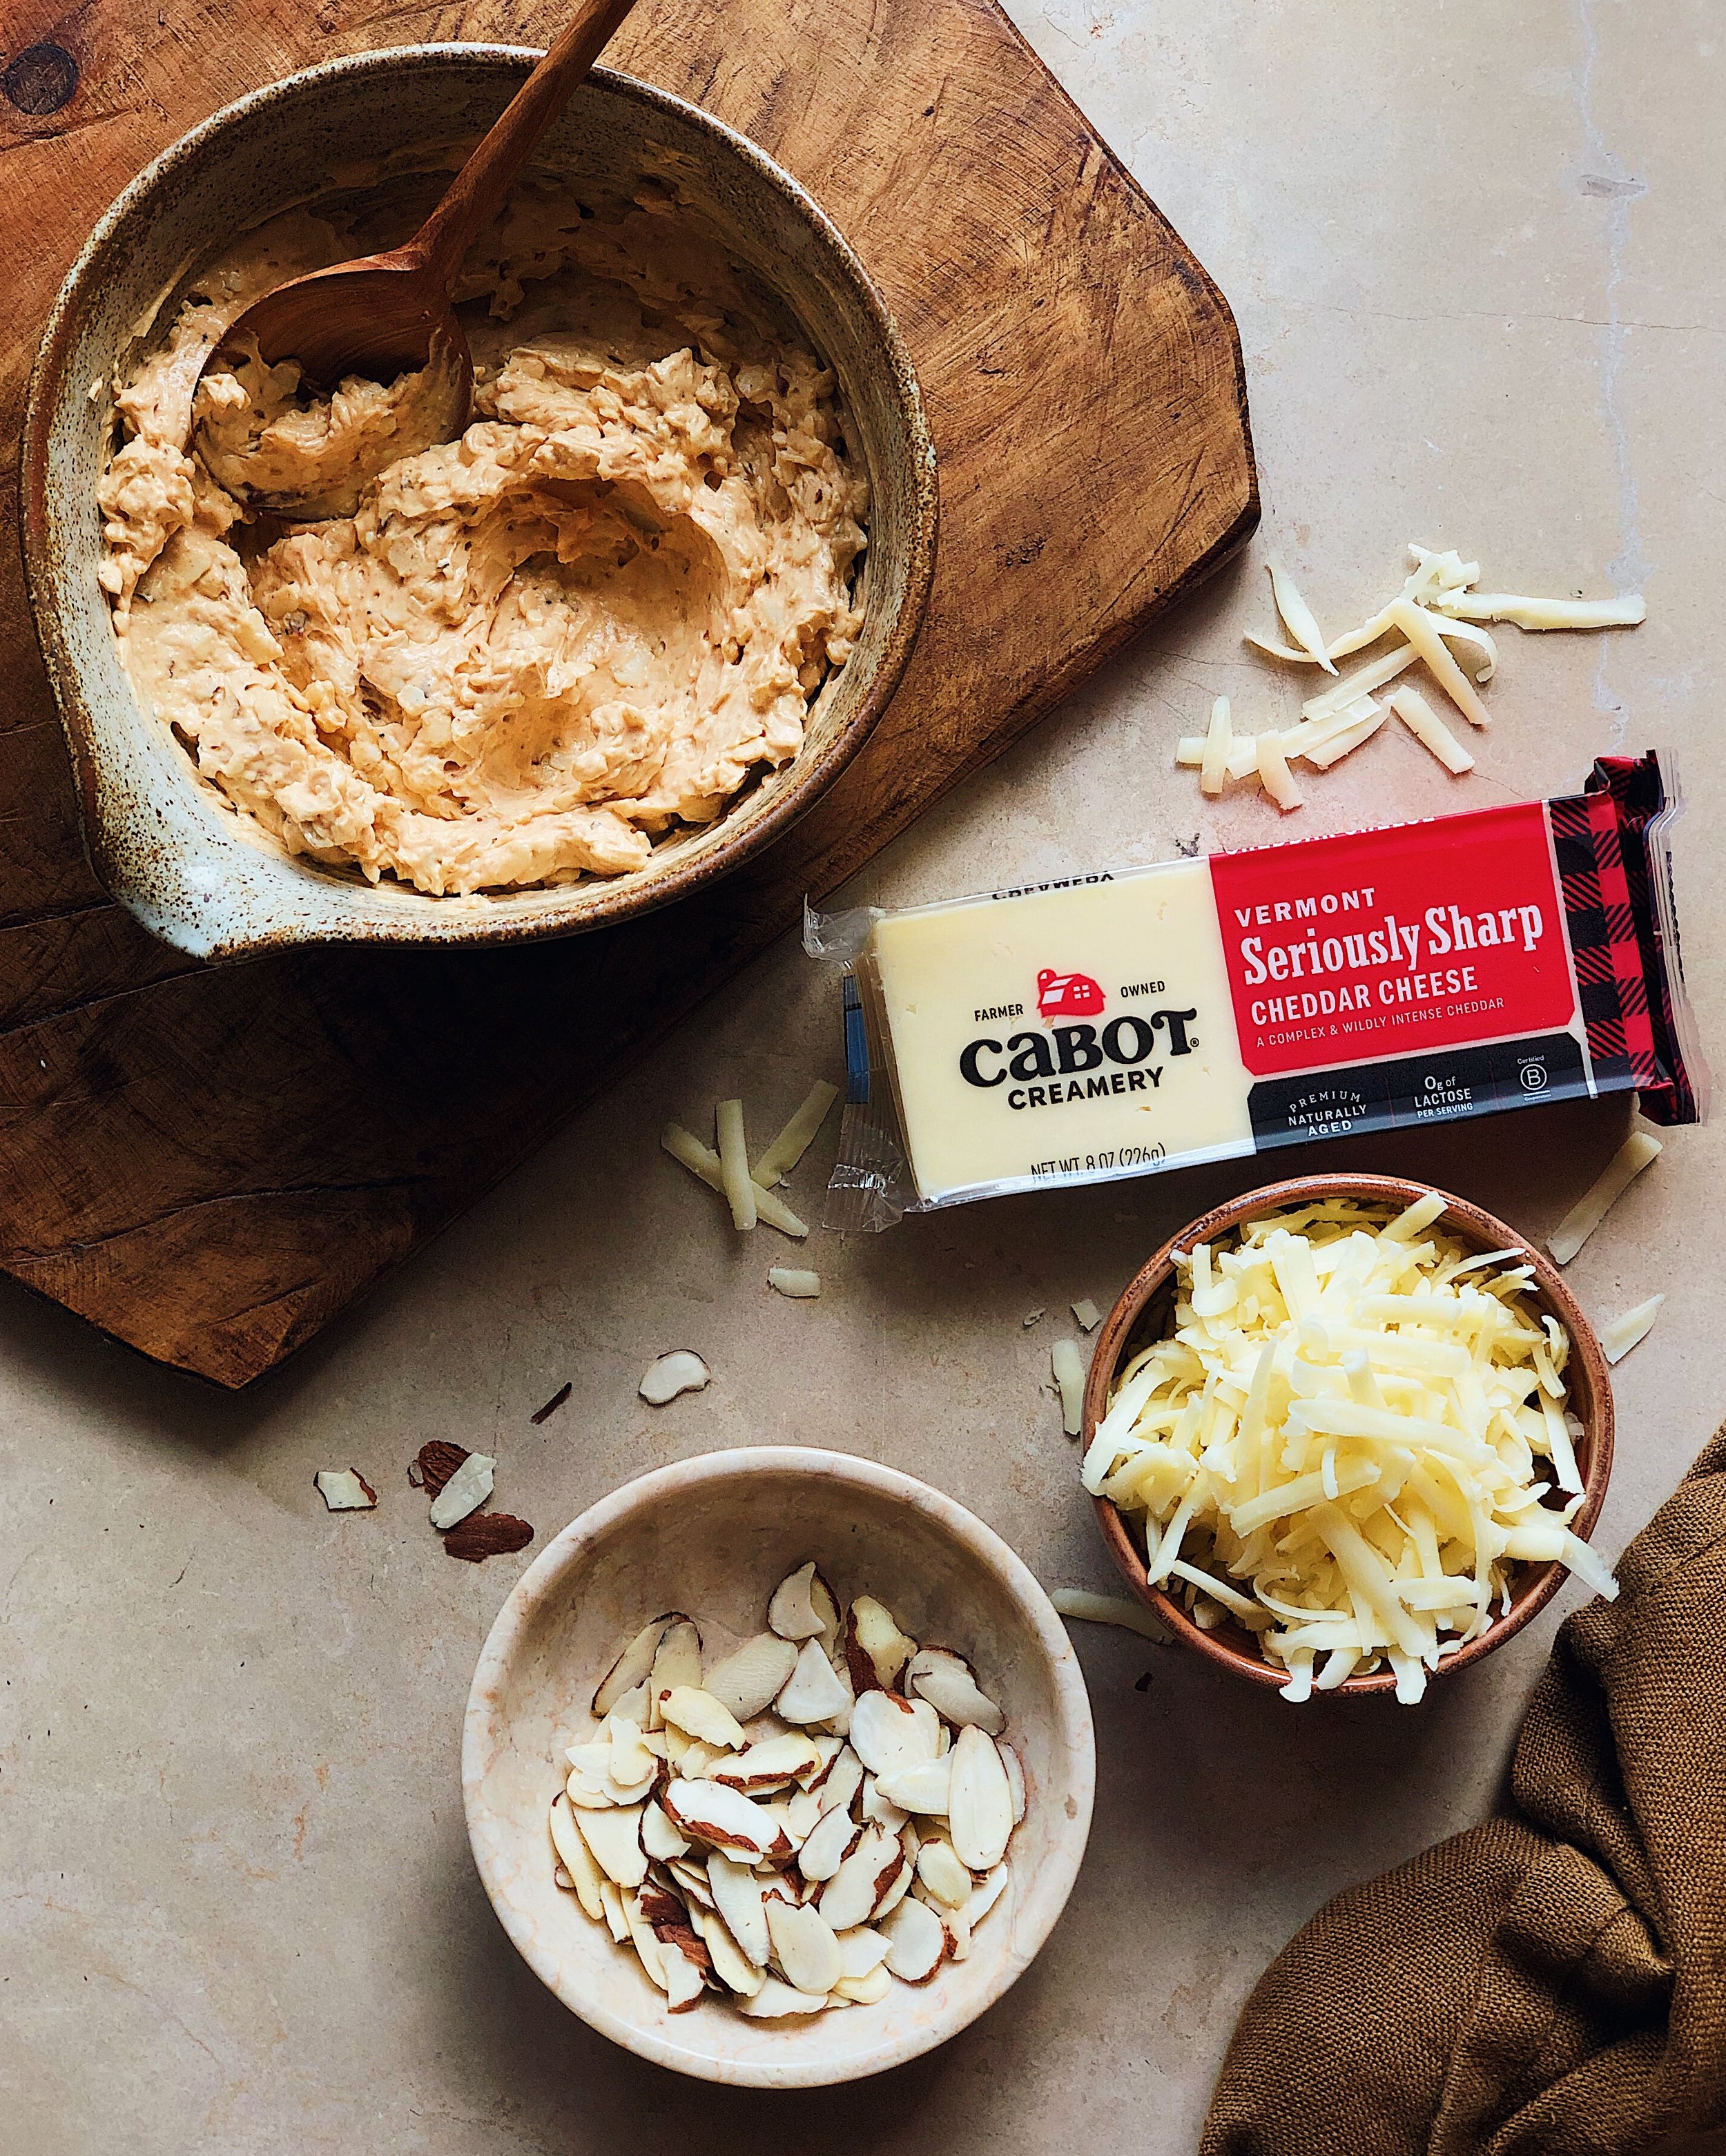
In a large mixing bowl, whisk together ricotta, goat cheese, eggs, and hot sauce (if using). Fold in the majority of the corn kernels, keeping just a small amount aside for the end. Fold in green chiles and half of the shredded cheese.

Remove crust from oven when it is blind-baked. Set the oven to 350°F.

Sprinkle the remaining shredded cheese into the prepared crust. Pour the prepared filling on top and make sure the surface is even and smooth.

Working quickly the prevent the crust getting soggy, place cilantro leaves* onto the surface of the filling and sprinkle on the remaining corn. Bake at 350°F for 30 minutes or until the filling is soft but set. Allow to rest of 10 minutes before cutting and serving.

*If decorating with edible flowers, maximize contact with the filling as you press them into the tart. Brush them with olive oil to help preserve their shape and color.

Recipe: Cheddar Tart with Beets and Fall Squash

savory fall tart

For this recipe, I partnered with Cabot Creamery to create a cheesy tart that would be lovely to serve at fall gatherings. This tart features Cabot Seriously Sharp Cheddar in two ways: a snappy cheesy rosemary shortcrust that smells so good when it’s baking in the oven, as well as the filling that goes inside it, which is a flavorful layer of a cheddar and almond spread reminiscent of an old-school party staple, the cheese ball. This smoky, tangy, creamy filling helps to hold in place the topping for the tart—marinated roasted beets and honeynut squash that have been thinly sliced and rolled into rosettes. The edible bouquet in an autumnal palette is likely to impress your guests; but the great thing is, so much of it can be made ahead!

cheese ball spread with cheddar and almonds

When I was a kid, I remember being completely wowed by the flavor combos from those cheese balls covered in nuts that would always be present at holiday parties with my parents’ friends. So, the filling in this tart is a tribute to that combo. It’s indulgently creamy and tangy from the Cabot Seriously Sharp Cheddar, super savory, a little smoky with the addition of paprika, and has such a satisfying texture thanks to the inclusion of sliced almonds. 

I think I loved that combo so much because back then, my family did not keep cheese around very much in our fridge. In fact, up until probably middle school, I thought that the powdery stuff in the green can and the plasticky American cheese slices were the only cheeses that could be purchased directly for cooking at home. That’s why it still makes me so excited that, as a grown-up, I can now get Cabot Creamery’s delicious naturally-aged, rich-flavored cheddars to cook and bake with to my heart’s content. Cabot is a co-operative owned by farm families throughout New England & New York and 100% of profits go back to the farmers. Having access to such high-quality cheeses with that level of freshness would’ve rocked Kid Me’s world. Now, being able to make my own cheese spread at home, just how I like it, brings me so much joy—and I hope it does for you, too!

Here’s what you need to know about the key ingredients for making my Cheddar Tart with Beets and Fall Squash:

  • Cheddar: The cheddar gets used in both the crust and the filling, so it’s gotta be a great one. I used Cabot Seriously Sharp Cheddar which is so good for those of us cheddar lovers who enjoy an intense, sharp flavor. I always like to go for their cheese bars and grate the cheese fresh right before I need it.

  • Butter: Cutting the butter into cubes and freezing it is a major contributor to keeping the crust snappy and buttery without feeling greasy. I used Cabot Salted Butter for this recipe to bring extra rich savoriness to the tart shell.

  • Vodka: Using vodka instead of water to bring the crust ingredients together is my other trick for keeping the tart shell super crispy! I have tested this crust recipe with just chilled water and I do not recommend this substitution.

  • Beets: For this recipe, whole beets are first roasted until tender. The skins come right off after roasting. Then, the beets need to be chilled so they can easily be sliced into thin “petals” with a mandoline. The slices get marinated in a simple, bright vinaigrette before being rolled into rosettes. The autumnal colors of this tart are achieved by roasting 1 red beet and 3 golden beets together. The red beet slices are a deep maroon, while areas of the golden beets that come in contact with the red beet become a more vibrant red shade. To keep some slices at their natural bright golden color, keep them separated from the red beet.

  • Squash: I used a honeynut squash for this recipe but butternut squash would work just as well. Unlike the beets, I peeled and sliced the squash before roasting. Keep the squash slices separate from the red beet if you want them to stay solid orange.

This recipe is great for gatherings because much of it can be done the night before. In fact, it is even recommended that you get the components prepped well in advance, for an easy low-key assembly when you are ready to serve.

Considerations for prepping ahead:

  • For best results, make your pastry dough the night before and let it chill, molded into the tart pan, overnight. Then all you have to do is pop it in the oven the following day.

  • The cheddar and almond filling can be made the night before and stored in a sealed container in the refrigerator. The day-of, just take it out and allow it to come to a spreadable consistency while the tart shell bakes.

  • The roasted beets need to be chilled slightly in order to be sliced by the mandoline, so do plan ahead for this. I recommend doing all the prep for the beet and squash rosettes ahead of time. I used a mini muffin tin to hold the rosettes together before I arranged them all on top of the tart filling. You could do this the night before so the rosettes are ready to just pop onto the tart before serving!

If you need an additional shortcut:

  • This tart can be simplified by using a ready-made pie dough for the crust. The overall flavor of the tart will be less complex and less cheesy but there is still a lot of flavor in the cheese and almond filling and the roasted veggie topping. If you choose to pursue this shortcut, mold the pie dough to the tart container and then follow the package instructions to fully bake the crust before following the recipe for filling the tart.

One thing that can be scary about baking for guests is that a lot can happen in an oven! You put your lovingly-prepared dough, batter, or pastry in but you can’t truly be certain what it will look like coming out. This is why I like to make tarts where the shell is baked completely through first; the filling and topping here do not require additional bake time. The tart can be served at room temperature so it’s one less thing to worry about keeping warm while you are enjoying the conversation of your dining companions.

savory fall tart with roses made of beets and squash

How to Make a Cheddar Tart with Beets and Fall Squash

(Makes one 9-inch tart)

Ingredients for the Crust*

1/2 cup (1 stick) Cabot Salted Butter, cut into small cubes then frozen
1 1/2 cups AP flour
1 oz (about 1/4 cup) Cabot Seriously Sharp Cheddar, grated then chilled
1/2 tsp kosher salt
1 tbsp fresh rosemary, finely chopped
4–6 tbsp vodka, chilled

Ingredients for the Topping

1 medium (about 1/2 lb) red beet, trimmed and cleaned
3 medium (about 1/2 lb each) golden beets, trimmed and cleaned
1 medium (about 1 1/2 lbs) honeynut or butternut squash, peeled and cored
4–8 tbsp extra virgin olive oil, divided
kosher salt
black pepper
3 tsp apple cider vinegar
1 tsp sugar
fennel fronds, for garnish (optional)

Ingredients for the Filling

4 oz cream cheese, at room temperature
2 oz (about 1/2 cup) Cabot Seriously Sharp Cheddar, grated
1/4 cup Greek yogurt
1 tsp worcestershire sauce
1/4 tsp garlic powder
1 1/2 tsp smoked paprika
1/8 tsp black pepper
1/4 cup sliced almonds, roughly chopped


* For a shortcut version, see notes above about substituting a ready-made pie crust.

Procedure

To make the crust: Add the flour, Cabot Seriously Sharp Cheddar, salt, and rosemary to a food processor. Pulse briefly to combine. Scatter in frozen Cabot Salted Butter cubes and pulse until the texture resembles wet sand. Add 1 tablespoon of vodka and pulse a couple of times; repeat vodka step, adding 1 tablespoon at a time and pulsing briefly after each, until the mixture looks like it is just barely starting to form clumps. Dump the mixture into a 9-inch tart pan and use a spoon to quickly press the mixture evenly against the bottom and sides, keeping everything as cold as possible. (A sheet of wax paper could also aid in smoothing out the mixture). Chill the unbaked tart shell in the freezer for 20 minutes or in the refrigerator for 1 hour or up to overnight.

To make the topping: Preheat oven to 400°F. (Beets and squash can be baked simultaneously; just keep an eye on separate bake times.)

Coat beets lightly with olive oil and season lightly with salt and pepper. Tightly wrap beets in foil, place in a baking dish, and bake for 1 hour or until tender. (If you wish to keep some of the golden beet completely yellow, wrap and bake those separately from the red beet.) When beets are cool enough to handle, gently rub off the skins. Then, place in the refrigerator to cool completely. 

Use a mandoline to thinly slice the squash. Coat slices lightly with olive oil. Arrange evenly onto a parchment-lined baking sheet and season lightly with salt and pepper.  Bake at 400°F for 15 minutes. 

Slice cooled beets thinly with a mandoline and lay slices out on a baking sheet. Overlap red beet slices on gold beet slices to dye them as desired to create color variation, or keep some gold beet slices on a separate tray to preserve their color.

Whisk together apple cider vinegar, sugar, a pinch of kosher salt, and 2 teaspoons olive oil. Drizzle evenly over the trays of beet and squash slices and allow to marinade for at least 5 minutes.

Roll the beet and squash slices into rosettes. Start with a small slice of squash, and roll into a tight spiral (the squash  can usually be rolled into a tighter spiral than the beet). Fold or cut subsequent slices in half and keep wrapping them around to mimic the appearance of rose petals. For best results, place rosettes into a mini muffin tin to keep them together, and pre-assemble all the rosettes before placing them on the tart. (This can be done a day ahead.)

To make the filling: Add cream cheese, Cabot Seriously Sharp Cheddar, Greek yogurt, worcestershire sauce, garlic powder, smoked paprika, and pepper to a large bowl. Use a hand mixer to whip ingredients together until combined. Fold in almonds. (This filling can be made ahead. Store in a sealed container in the refrigerator and allow to soften outside the refrigerator before spreading.)

To bake the tart shell: Dock the chilled shell with a fork to prevent it from puffing while baking. Line the inside with parchment paper or foil and fill with pie weights (or dry beans). Place the tart pan on a baking sheet and bake in the 400°F oven for 20 minutes. Remove the lining and weights, then bake for an additional 20 minutes, or until golden brown. Allow to cool slightly before filling.

To assemble the tart: Spread the filling evenly inside the baked tart shell. Gently press the veggie rosettes into the filling; extra beet and squash slices can be used to fill in empty spaces after the initial rosettes are placed. If desired, garnish with a few fennel fronds, or fresh herbs of your choice. Be sure to use a nice sharp knife when slicing, and enjoy!

Thank you so much to Cabot Creamery for sponsoring this recipe! Visit their website to find out where you can get their delicious cheeses, such as their naturally-aged cheddars, near you!

Recipe: Apricot and Brie Tart

I wanted to make a bunch of apricot rosettes and what better way to display them than in a sweet and savory tart?

Once I have finished working on a recipe I really am happy with, I try to get as much out of it by riffing on it and using it in different contexts. Recipe testing is time consuming, and I am determined to get my time’s worth by using that recipe over again. For this tart, I made the same cheesy, savory short crust shell that I developed for a sponsor for this mixed stone fruit and goat cheese tart here. I love this crust recipe because it’s cheesy and peppery and unlike what you’d expect for a fruit tart. It has a serious snap to it, and enough flavor that it could really stand alone, but it is also perfect for tarts that have a savory cheese filling. The dough comes together very easily in a food processor, though you do have to plan ahead a bit and freeze the cubed butter. The actual labor involved is low, though, so you can save your energy for rolling up those pretty apricot roses!

In reality though, this is still going to taste good if you just cut up your apricots into little pieces and dump them onto the tart. I am completely willing to admit that slicing up a bunch of apricots and then wrapping the slices round and round each other to form a bunch of rosettes is not a normal way for someone to spend a summer afternoon. But would you have clicked on this recipe if the tart didn’t look this pretty? I personally find it sort of therapeutic to focus on delicately handing tiny pieces of produce for a bit, and at this time of year, I’ll find any excuse to immerse myself in stone fruit.

Here is a detailed walkthrough of how to make this apricot and brie tart:

  • Make the tart shell/crust: You will need to plan ahead here, because you’ll need to cut butter into small cubes, freeze them, make the dough, press it into the tart tin, and then let that chill. This tart utilized the tart crust recipe found here. Follow the “ingredients for crust” section and the first step of the procedure and that will take you up to the point where you have your chilled raw crust that is ready for baking action. That’s where the story picks up over here with a different filling, this time celebrating the beautiful delicate combo of brie and apricots.

  • Bake the crust and brie: First, you will blind bake just the raw crust for 20 minutes with some sort of pie weights to keep its shape and prevent it from puffing up in the tin. (I line my crust with foil and then use dried beans as a cheap alternative to buying pie weights.) Then you will bake the crust until it is nearly golden brown and pretty much fully baked. For the last 5 minutes, you’ll add slices of brie to melt across the bottom. I used this goats milk brie, but a more traditional version will be just as tasty. Just make sure you are getting as even of a layer as you can when you are slicing and placing the cheese; it doesn’t matter if the pieces of cheese look weird because they will get fully covered.

  • Spread the jam: After the brie has been melted, it will cover the bottom of the shell more evenly. Then you’ll want to add a layer of apricot jam or preserves. Feel free to swap for a different flavor but I wanted to keep the flavors simple in this one so I stuck with apricot. This sticky jam layer is going to be what holds the apricot roses in place.

  • Make and place the apricot rosettes: To make the rosettes, I first cut the apricots lengthwise into thin slices. I’ll use the thinnest pieces for the centers of the rosettes, rolling them into as tight of a spiral as I can, and then I will wrap a few pieces around it before placing it into the jam layer. Then I will tuck a few more pieces around it until I am happy with the size and fullness of the rosette. Keep doing that until all the big gaps are filled.

  • Glaze the apricots: Whisk together a little honey and water to form a glaze; microwave the mixture a little if needed to help dissolve the honey. When the glaze is back to room temp, brush this over the apricots. It will give them a shiny look and prevent them from browning if you are making this a bit ahead of serving.

  • Fill in the gaps with herbs: If you wish to, you can fill in any gaps in between the rosettes with fresh herb leaves to give the tart a very full and finished look. I used oregano here because I had a lot in my garden, but small basil or mint leaves would honestly be a better flavor pairing. You could also fill the gaps with pitted cherries—I think that’d look lovely. I also sprinkled a little bit of lemon thyme on the tart, which added a nice herbal aroma.

  • Cut in with a very sturdy, sharp knife and enjoy!: The crust is quite short and snappy so you’ll need a good knife to press through for cutting clean wedges. It may feel like a shame to cut into it after making all those roses, but food—even pretty food—is meant to be eaten!

How to Make the Apricot & Brie Tart

Ingredients

1 chilled, unbaked cheesy shortcrust from this recipe
5 oz brie cheese, cut into 1/8"-inch slices
5–6 tbsp apricot jam or preserves
3–4 apricots, thinly sliced
1/2 tsp honey
1 tsp warm water
fresh herbs for garnish (optional)

Special Equipment

food processor
tart pan with removable bottom
dry beans or pie weights

Procedure

Preheat oven to 400°F. 

Dock chilled shell with a fork to prevent it from warping and puffing while baking. Line with parchment paper or foil and fill with dry beans or pie weights. Place the tart pan on a baking sheet and bake for 20 minutes.

Gently remove the lining and weights, then bake for an additional 15 minutes.

Add brie in an even layer over the bottom of the tart shell. Bake for an additional 5 minutes, or until brie is melted and crust is golden brown.

Spread apricot jam or preserves in an even layer over the brie.

Form rosettes with the slices of apricots and arrange them in the tart. The apricot jam will help hold them in place.

Whisk together honey and water and brush over the apricot rosettes to give them a shiny, glazed look.

Garnish with fresh herbs if desired. Oregano, mint, or basil leaves could be used to fill in gaps between the rosettes.

Recipe: Stone Fruit & Herbed Goat Cheese Tart with Cheesy Crust & Hot Honey Butter

For this recipe, I partnered with Danish Creamery to celebrate my favorite time of the year—stone fruit season! I came up with the idea for this tart because I love making hybrid baked goods in the summer that feature raw seasonal produce in all of their peak-flavor glory. I still want the satisfaction of crafting and baking some kind of base or crust—something where I can proudly say “I made this from scratch!”—but when fruits are already ripe and bursting with their natural juices, I think baking them is honestly a waste, so I add them at the end to be enjoyed fresh.

So, this tart features a snappy cheesy buttery shortcrust, which gets baked solo and then gets filled by a creamy blend of whipped goat cheese and fresh herbs and topped with fresh, raw stone fruit before getting finished off with a drizzle of hot honey butter. Because my taste preferences are always leaning towards savory, I love to experiment with combining sweet fruit with savory ingredients and I think that the balance is just wonderful; it allows for savoring the natural sweetness of a beautifully ripe fruit without limiting the result to something that can only be served as a dessert. Instead, I recommend that this sweet-savory beauty be considered for your next al fresco brunch or picnic potluck; it holds up well when made a bit ahead so it would certainly be a low-stress addition to any sun-soaked gathering where smiles and good vibes are the objective.

Though the nectarines, apricots, and pluots are obviously the star here, don’t sleep on this cheesy crust! I am so proud of how much flavor I was able to pack into something that is often overlooked or perceived as just a vessel when it comes to tart making, and it is definitely a recipe that I will be using as a base for more than just the fruit tart idea you see here. Loaded with asiago cheese and high-quality butter, this savory shortcrust is so snappy and yummy that it would even be delicious broken up into chunks and eaten alone as a snack! This sturdy shortcrust is what helps make this tart a good menu item for summer gatherings, and the munchable texture is a result of keeping all the ingredients super cold while putting together the dough and keeping the moisture content to a minimum. Using Danish Creamery European Style Sea Salted Butter, which has a higher butterfat content than most other European butters, is one trick I used getting the right texture and flavor for the crust. A good butter is key for a shortbread or shortcrust, and Danish Creamery’s  butter is made with just high-quality cream and a touch of sea salt, slow churned for a rich flavor that really sets this shortcrust dough recipe up for durable and delicious success.

I also used Danish Creamery’s European Style Sea Salted Butter in the hot honey butter drizzle that serves as the finishing touch for this tart. This creation is something akin to drizzling a dessert with salted caramel at the end, but I think the hint of spicy chili mixed with the honey and the salted butter is the perfect way to really bring together this combination of sweet and savory flavors. You will end up making more than you need for the tart when following the recipe below, and I recommend saving the extra to drizzle on toasts, pizza, or anything where a little spicy indulgence is welcomed.

This stone fruit and herbed goat cheese tart is made up for the following components:

  • Cheesy Shortcrust: A durable tart shell is what holds all the magic together, but it also brings plenty of its own flavor. I start by cutting Danish Creamery European Style Sea Salted Butter into small cubes and then freezing them—keeping the crust ingredients super cold is what gives you a short, crisp, snappy texture instead of a dreaded soggy bottom, so planning a little ahead and giving the cubes of butter time to freeze will make that goal easier. The rich, creamy butter, made with cream from healthy grass-fed California cows, becomes the savory foundation that gets supplemented with asiago cheese and black pepper to give the crust its addictive flavor. While using high-quality butter should be a given for a crust like this, there’s also an unexpected ingredient: vodka. Using vodka instead of water further ensures that this crust does not get bogged down by moisture; it brings together all the dry ingredients but evaporates quickly in the bake, along with any concerns about having alcohol in your pastry. These ingredients get pulsed together in the food processor and then pressed into the tart pan, so you don’t even have to bother with rolling. 

  • Herbed Goat Cheese: Whip together room temp chèvre with Greek yogurt and fresh chopped herbs to form the first layer of filling that goes inside the cheesy tart shell. Not only does the mixture help hold the stone fruit in place if you choose to arrange it in a decorative manner, but the tangy, creamy goat cheese and herbs are such a lovely flavor complement. You can really use any soft herbs of your choosing here but I opted for chives, basil, and thyme.

  • Stone Fruit: This is the main event! In case you didn’t know,  the term “stone fruit” refers to fruits like peaches and apricots that have a singular stone-like pit inside to house the seed. Feel free to use a medley of nectarines, apricots, and pluots like I did, or whatever is your personal fave. When selecting your stone fruit for this tart, seek ones that are fragrant but still have some firmness to them, so that they are easy to slice and will keep well on top of the tart. You can either slice them thinly and arrange them like I did, or opt for chunkier wedges that you can just dump into a somewhat-even layer on top.

  • Hot Honey Butter: This finishing touch brings a unique spicy kick to the sweet-savory creation and helps to unite all the other flavors. A mix of gochugaru (Korean red chili flakes) and red chili pepper flakes are given a chance to bloom in a bit of velvety Danish Creamery European Style Sea Salted Butter before being combined with honey. This recipe yields more than what is needed for the tart; save the extra in a microwave-safe jar and heat for a few seconds to improve viscosity for drizzling on other creations afterward.

How to Make the Stone Fruit & Herbed Goat Cheese Tart

Ingredients for Crust

1 stick Danish Creamery European Style Sea Salted Butter, cut into 1/4”-inch cubes then frozen
1 1/4 cup all purpose flour
1/2 cup asiago, grated then chilled
1/2 tsp kosher salt
1/2 tsp freshly cracked black pepper
4–6 tbsp vodka, chilled

Ingredients for Filling

5 oz goat cheese/chèvre, at room temperature
4 tbsp Greek yogurt, drained
1/2 tsp chives, finely chopped
1 1/2 tsp thyme leaves
2 tbsp basil leaves, finely chopped
2–3 stone fruits, sliced
fresh herbs and edible flowers, for garnish (optional)

Ingredients for Honey Butter

1 tbsp Danish Creamery European Style Sea Salted Butter
1 tsp gochugaru/Korean chili flakes
1/2 tsp red pepper flakes
3 tbsp honey

Special Equipment

food processor
tart pan with removable bottom
dry beans or pie weights

Procedure

To make the crust, add flour, asiago, salt, and pepper to a food processor and pulse briefly to combine. Scatter in frozen butter cubes and pulse until the texture resembles wet sand. Add 1 tablespoon of vodka and pulse a couple of times; repeat, adding 1 tablespoon of vodka at a time and pulsing briefly after each, until the mixture looks like it is just barely starting to form clumps. Dump mixture into tart pan and use a spoon to quickly press mixture evenly against the bottom and sides, keeping everything as cold as possible. (A sheet of wax paper could also aid in smoothing out the mixture). Chill unbaked tart shell in the freezer for 20 minutes or in the refrigerator for 1 hour or up to overnight.

Preheat oven to 400°F. 

Dock chilled shell with a fork to prevent it from warping and puffing while baking. Line with parchment paper or foil and fill with dry beans or pie weights. Place the tart pan on a baking sheet and bake for 20 minutes. Gently remove the lining and weights, then bake for an additional 20 minutes, or until the crust is golden brown. Allow to cool to room temperature before filling.

In the meantime, combine goat cheese, yogurt, and chopped herbs in a mixing bowl. Using a hand mixer, whip together until incorporated and fluffy. Set aside.

When the tart shell is cooled, spread the goat cheese mixture in an even layer. Arrange sliced stone fruits on top. 

To make the hot honey butter, add butter to a small stainless steel pot and heat on medium-low. When the butter is completely melted, reduce heat to low and add gochugaru and pepper flakes; stir continuously with a silicone spatula for 1–2 minutes, allowing the spices to bloom and the mixture to get completely foamy. Add honey and keep stirring until the mixture becomes completely foamy again. Remove from heat and once the bubbling resides, drizzle hot honey butter immediately over the tart, to taste. 

If desired, garnish with pretty edible flowers and herbs.

Thank you so much to Danish Creamery for sponsoring this recipe! Visit their website to learn more about their legacy of carefully-crafted Old World-quality butter made with milk from family farms since 1895.

Mini Pickle Galettes

I love how every culture seems to have its own version of pickles but today we are going to be talking about the “kosher” dill pickle. These are the sour pickles made with small cucumbers, and with garlic and dill added to a salt brine, and according to Wikipedia they are so called because they originate from Jewish pickle makers in New York City (but they are not always actually Kosher). I am a big fan of this type of pickle, and have yet to really encounter an application of them that I did not like. For example, when I first learned about pickleback shots, my mind was blown… You mean it’s socially acceptable to just straight up drink the pickle brine??? Please count me in.

And then I found out about pickle pizza from this video on YouTube. There is a place in New York that started making pickle pizzas and by that, I mean they are really going all in with pretty much just pickles and cheese as the toppings. It sounded so interesting to me, and it inspired me think about what else I could make to celebrate such a beloved food. Pizza is awesome, but wouldn’t it be fun to take this humblest of ingredients (which was borne entirely out of the necessity of food preservation) and really celebrate its complexity of flavor by putting it in something a little fancy? I decided to make mini galettes because they are like somewhere between a pizza and a fancy pastry, and they are so easy to make with some storebought pie dough.

The filling of these galettes has three major components:

  • Sauce: a garlic-infused béchamel that helps to serve as a creamy bridge between the pastry and the pickles. I think I saw some recipes for pickle pizzas online that used ranch, and ranch is obviously amazing with pickles, but I wanted to do something a little unexpected. I thought it would be kinda twisted to go for a French mother sauce and use it in a thing so radical as a pastry full of pickles. I went really heavy on the sauce in these and it gave them an almost alfredo-y vibe that complimented the brininess of the pickles really well, since thick creamy fatty things and tart things balance each other out.

  • Cheese: I just used good ol’ shredded skim mozzarella here, inspired by the pickle pizza. Please grate your own because it will melt more smoothly than the packaged stuff.

  • Pickle slices: You could go as much or as little as you want here. I like to buy these individually wrapped pickles by Oh Snap and keep them stashed in my fridge because they are a manageable size and I can cut them up however I like. I probably used about 1.5 of these 3-ounce pickles for my three mini galettes.

The result was something so balanced between creamy and briny. It felt like something that could be served at a cute cafe or brunch place but at the same time harkened to weird fair food. Just as I had hoped, these turned out to be a playful celebration of contrasts and breaking expectations. If you are a pickle fan, I hope my rough “recipe” is enough to help you give them a go.

(For other easy galette recipes, you can check out this everything but the bagel galette with cold smoked salmon, this scallion galette that is sort of my twist on scallion pancakes, and my fresh strawberry galette.)

Awkwardly Vague instructions for Mini Pickle Galettes

Ingredients

4 tbsp salted butter
garlic, minced, to taste
2 tbsp AP flour
milk
freshly cracked black pepper, to taste
1 sheet ready-made pie dough, room temp
~ 1 1/2 cups dry skim mozzarella cheese, freshly grated
1–2 small dill pickles, thinly sliced
1 egg, beaten
everything seasoning (optional)
fresh dill, for garnish

Procedure

To make the sauce, combine butter and garlic in a small saucepan set on low heat. Allow the butter to slowly melt and for the garlic to cook gently and infuse. Once the garlic is fragrant, turn up the heat to medium-low. When it starts to bubble, whisk in flour. Cook, mixing continuously until there is a slightly golden paste. Whisk in milk, 1/4 cup at a time, until the sauce is thick but no longer paste-like (the consistency should be thicker than a traditional béchamel). Whisk in pepper then set aside.

Preheat oven to 450°F. On a floured surface, divide the pie crust evenly into 3 pieces. Shape each piece into a round disk and then roll out into a thin circle, about 6–7 inches in diameter. Place each on a piece of parchment paper.

Fill each piece of pie dough: Spread a generous amount of sauce in the middle of one piece, leaving a 3/4–1-inch empty border all the way around. Fill the middle with cheese, lay on a layer of pickle slices, add a light sprinkle of cheese on top, and then add more pickle slices if desired.

Brush the border with some beaten egg and fold small sections over the filling to form a galette-style crust. Brush the pleated crust thoroughly with egg wash, making sure to get it in all the folds and crannies. If using, sprinkle everything seasoning all over the crust. Repeat with the remaining 2 pieces of pie dough.

Slide parchment papers and galettes onto baking trays and bake for 20 minutes on the middle rack, rotating once halfway.

Top with fresh dill for garnish.

Recipe: The Easiest Strawberry Galette

strawberry-galette.JPG

This is for sure the easiest strawberry galette recipe because the very first time I made it was under pretty stressful circumstances, and I still managed to pull it off on the fly; it turned out so well despite my totally just winging it that I decided to make it again to write the recipe down and share it with you guys.

The first time I made this strawberry galette was for my friend’s big 30th birthday bash in Palm Springs. His husband had gone all out organizing a gorgeous multi-casita private resort rental for our group of 10 for a long weekend and it was everyone’s first post-vaccination group outing so we were all a little giddy with the culture shock of spending time with other humans again. Prior to the event, all the planning was coordinated through a group chat on Instagram and during our first meal all together, I learned that most of the party had already checked out (stalked) each other’s Instagram accounts, and were very intrigued as to why one of the party members (ME) had thousands of followers. Everyone was incredibly kind and curious to learn about my career as a food blogger, but of course in my mind the pressure was on for the brunch that I had planned to contribute to a couple days later. THEN, I learned that the plan for the entire group to contribute to said brunch was scrapped and that there was no backup plan other than my enthusiasm (which, thankfully, was shared by one other party-goer who wanted to cook too). My original plan has been to make my Everything But the Bagel Galette for the group cookout, but since no one but myself and one other person would be cooking, I knew I had to make another dish, and I tried to come up with something as easy as possible that would still look beautiful on a brunch table. And this is what I came up with!

Despite the ease with which I can describe myself cooking, I get pretty dang nervous cooking for anyone but my spouse and my family. So when I found myself in an AirBnB kitchen I had never used before, cooking for more people than I had ever cooked for before at any one time, and with a reputation to uphold—can you see why I said the circumstances were stressful? And yet, I was still really happy with how the galette turned out! If I could pull it off then, I think you can pull it off now.

strawberry-galette-unbaked1.JPG
strawberry-galette-unbaked2.JPG

This recipe is also super riffable (I hate that word) in that you can follow the same steps but switch up the fruit or the cheese for completely different flavors. You can change up the toppings for the crust, or add nothing at all if you want it keep things the absolute simplest. Strawberries are in season now and that is something I get very excited about, but I am eager to try this out with other fruits too.

Here are the simple steps to fruit and cheese galette glory:

  • Prep the ingredients: Move a ready-made frozen pie dough sheet to the fridge the night before to thaw, and then leave it on the kitchen counter to warm up for 30 minutes before rolling it out. (Or, if you didn’t plan ahead, leave the frozen pie crust out for 1–2 hours until it’s malleable.) You’ll also want to macerate the strawberries for that same amount of time. Macerating means adding sugar to the berries to draw out some of the liquid and sort of marinate in the sugar at the same time.

  • Roll out the dough: I use the frozen pie dough from Trader Joe’s and they crack 100% of the time when I unroll them. But this is no big deal! I just ball it all up together and roll it out again.

  • Spread the cheese: This tart is such a crowd pleaser because it’s a little sweet and a little savory at the same time. But on a practical level, the cheese layer helps protect the pastry, preventing the juices of the strawberries from making the crust soggy. I recommend chèvre (young goat cheese) for this, and you can even get a flavored one if you want to add another note to the galette—here I used this black truffle chèvre and it was soooo good! Other spreadable cheeses could work here too, like a well-strained ricotta or some feta. Whatever you use, you can pop it in the microwave for a few seconds first to get it to spread easily.

  • Add the fruit: Strain out the excess liquid that you don’t want to make the crust soggy, then pile the fruit in the middle.

  • Fold the crust: Galettes are meant to be rustic as far as I can tell, so don’t worry about making a perfect circle or anything. Just fold up little sections of dough all the way around.

  • Add finishing touches to the crust: You will want to eggwash the crust to get it to look golden brown but it’s not even close to the end of the world if you don’t have an egg and want to skip that. I think it is always nice to add a little something to the crust of a galette for more flavor and texture too, but it will still taste good if you choose not to add the sliced almonds and extra sugar like I did.

  • Bake: The pastry is so thin that it doesn’t take long but you will want to look out for it being golden brown on the top and crispy on the bottom.

Since the dough is meant for pies and the fruit is packed in there, don’t plan on being able to toss this gal like a frisbee, but other than that, I think it is a pretty unfussy recipe. The next time I find myself spontaneously having to cook brunch for a crowd, I know I’ll be making this again.

strawberry-galette.JPG

How to Make a Strawberry & Cheese Galette

Ingredients for the Galette

1 sheet ready-made pie dough, thawed in the fridge overnight*
1 pint strawberries, stems and leaves removed
2 tbsp granulated sugar (white or raw turbinado)
1/2 tsp flour, plus extra for dusting
5+ oz goat cheese, at room temp
1 egg, beaten

InGredients for the Optional Parts

a few sprigs of thyme, leaves picked
1/3 cup sliced almonds
1 1/2 tsp turbinado sugar
1 tbsp honey
1/2 tsp water

* If unable to plan the night before, leave the frozen crust out on the counter until malleable, about 1–2 hours

Procedure

Remove the pie dough from the fridge and allow to come to room temperature for about 30–40 minutes.

In the meantime, slice the strawberries—halve small ones and cut larger ones into slices so that everything is about equal thickness. Combine the sliced strawberries and granulated sugar in a bowl and toss gently to combine. Allow the strawberries to macerate until the sugar is completely dissolved and a noticeable amount of liquid has been released, about 30 minutes.

Preheat oven to 450°F.

Form a round disk with the pie dough. On a floured surface, roll out the dough to a 12-inch circle. Transfer the dough circle to a piece of parchment paper.

If needed, microwave the cheese in a small bowl for 10 seconds to get a spreadable consistency. Spread the cheese in the middle, leaving an empty 1-inch border all the way around. Optionally, sprinkle thyme leaves over the cheese.

Drain the excess liquid from the strawberries. Add the flour and toss to coat. Pile the strawberries in the middle of the cheese layer, leaving an empty 1-inch border of cheese all the way around (see image above).

Brush the dough border with beaten egg and fold small sections over the filling to form a galette-style crust. Brush the pleated crust thoroughly with egg, making sure to get it in all the folds and crannies.

Optional step: Combined sliced almonds with about 1 tbsp of the remaining beaten egg (or more as needed for all the almond slices to be very thinly coated in egg). Gently pat the almonds onto the crust. Then, sprinkle the turbinado sugar evenly over the crust.

Slide parchment paper onto an inverted baking tray and bake the galette on the middle rack for 20–25 minutes, rotating once halfway.

Optional step: Combine honey and water in a small bowl and microwave for 10 seconds. Stir together to make a glaze, and brush the glaze over the fruit when the galette comes out of the oven.

Allow the galette to rest for 10 minutes before cutting and serving.

Recipe: Scallion and Cheese Galette

scallion-galette.JPG

Lately I have been really into binge-watching old seasons of Guy’s Grocery Games on Hulu. The general premise is that Guy Fieri gives contestants a theme for a dish they have to create, and then some sort of challenging constraint that they have to work within (“I want you to make me a 5-star dinner, but you have to incorporate popsicles!”); they then have 30 minutes to race through “Flavortown Market”—a fantasy grocery story that seems to have everything from gas station to luxury grocery items—to grab their ingredients and make their dish for a panel of judges. I like thinking about what I would make if I were given those challenges, and I think it helps keep the culinary creativity juices flowing in my brain. In one episode, I saw a contestant make a cheat version of scallion pancakes with a frozen pastry dough, and that stuck with me as a great hack. That idea planted the seed for this scallion galette.

After my success with my Everything But the Bagel galette, I once again found myself with an extra sheet of Trader Joe’s pie crust dough in my freezer and thought about how I could turn it into something inspired by Chinese scallion pancakes. I started to think about other pastries that utilize an excess of scallions as a major flavor component too, and my thoughts drifted to those scallion and cheese buns at the Taiwanese bakeries, as well as shaobing—flatbreads encrusted with sesame seeds; at Taiwanese breakfast places I see them stuffed with scallions, pork floss, and other flavorsome delights. So, this galette is my fusion-y take on combining all those things into a fun brunch pastry.

scallion-galette-unbaked1.JPG
scallion-galette-unbaked2.JPG

The ingredient list for this is super minimal and it is so easy to put together! You will need:

  • a ready-to-go pie crust: I’m happy with the one from Trader Joe’s so that’s what I keep using. It comes pre-rolled into a nice circle that cracks and falls apart 100% of the time for me as I unroll it. But don’t worry—I squish it all together into a ball and roll it back out, and it still turns out light and flaky after baking.

  • lots of chopped scallions: I used 4 full scallions to stuff inside the galette, but sprinkled some more fresh ones on after baking as well. Feel free to go big; I think their flavor becomes quite mild after baking.

  • grated cheese: Use mozzarella if you want to call back to those Taiwanese buns from the bakery, but I used sharp white cheddar for a more complex flavor.

  • sesame seeds: Really pack them onto the crust for those shaobing vibes!

I think that this galette is simple and elegant as-is, but it can also be topped with what you would typically like to stuff inside your shaobing or other Taiwanese breakfast treats! After pulling it out of the oven, I topped mine with pork floss and some Lao Gan Ma chili crisp** before slicing up and serving.

scallion-galette-cut.JPG

How to Make a Scallion & Cheese Galette

Ingredients

1 sheet ready-made pie dough, room temp
6 oz mozzarella or white cheddar, grated
4 scallions, chopped
1 egg, beaten
~ 3 tbsp sesame seeds

Toppings (optional)

pork floss
chili crisp

Procedure

Preheat oven to 450°F. On a floured surface, roll out the pie crust to a 14-inch circle. Transfer to a piece of parchment paper.

Sprinkle the grated cheese evenly in the middle, leaving an empty 1-inch border all the way around. Top with chopped scallions.

Brush the border with beaten egg and fold small sections over the filling to form a galette-style crust. Brush the pleated crust thoroughly with egg, making sure to get it in all the folds and crannies. Generously sprinkle sesame seeds all over the crust. Slide parchment paper onto an inverted baking tray and bake for 20 minutes on the middle rack, rotating once halfway.

If desired, top with pork floss and chili crisp before serving.