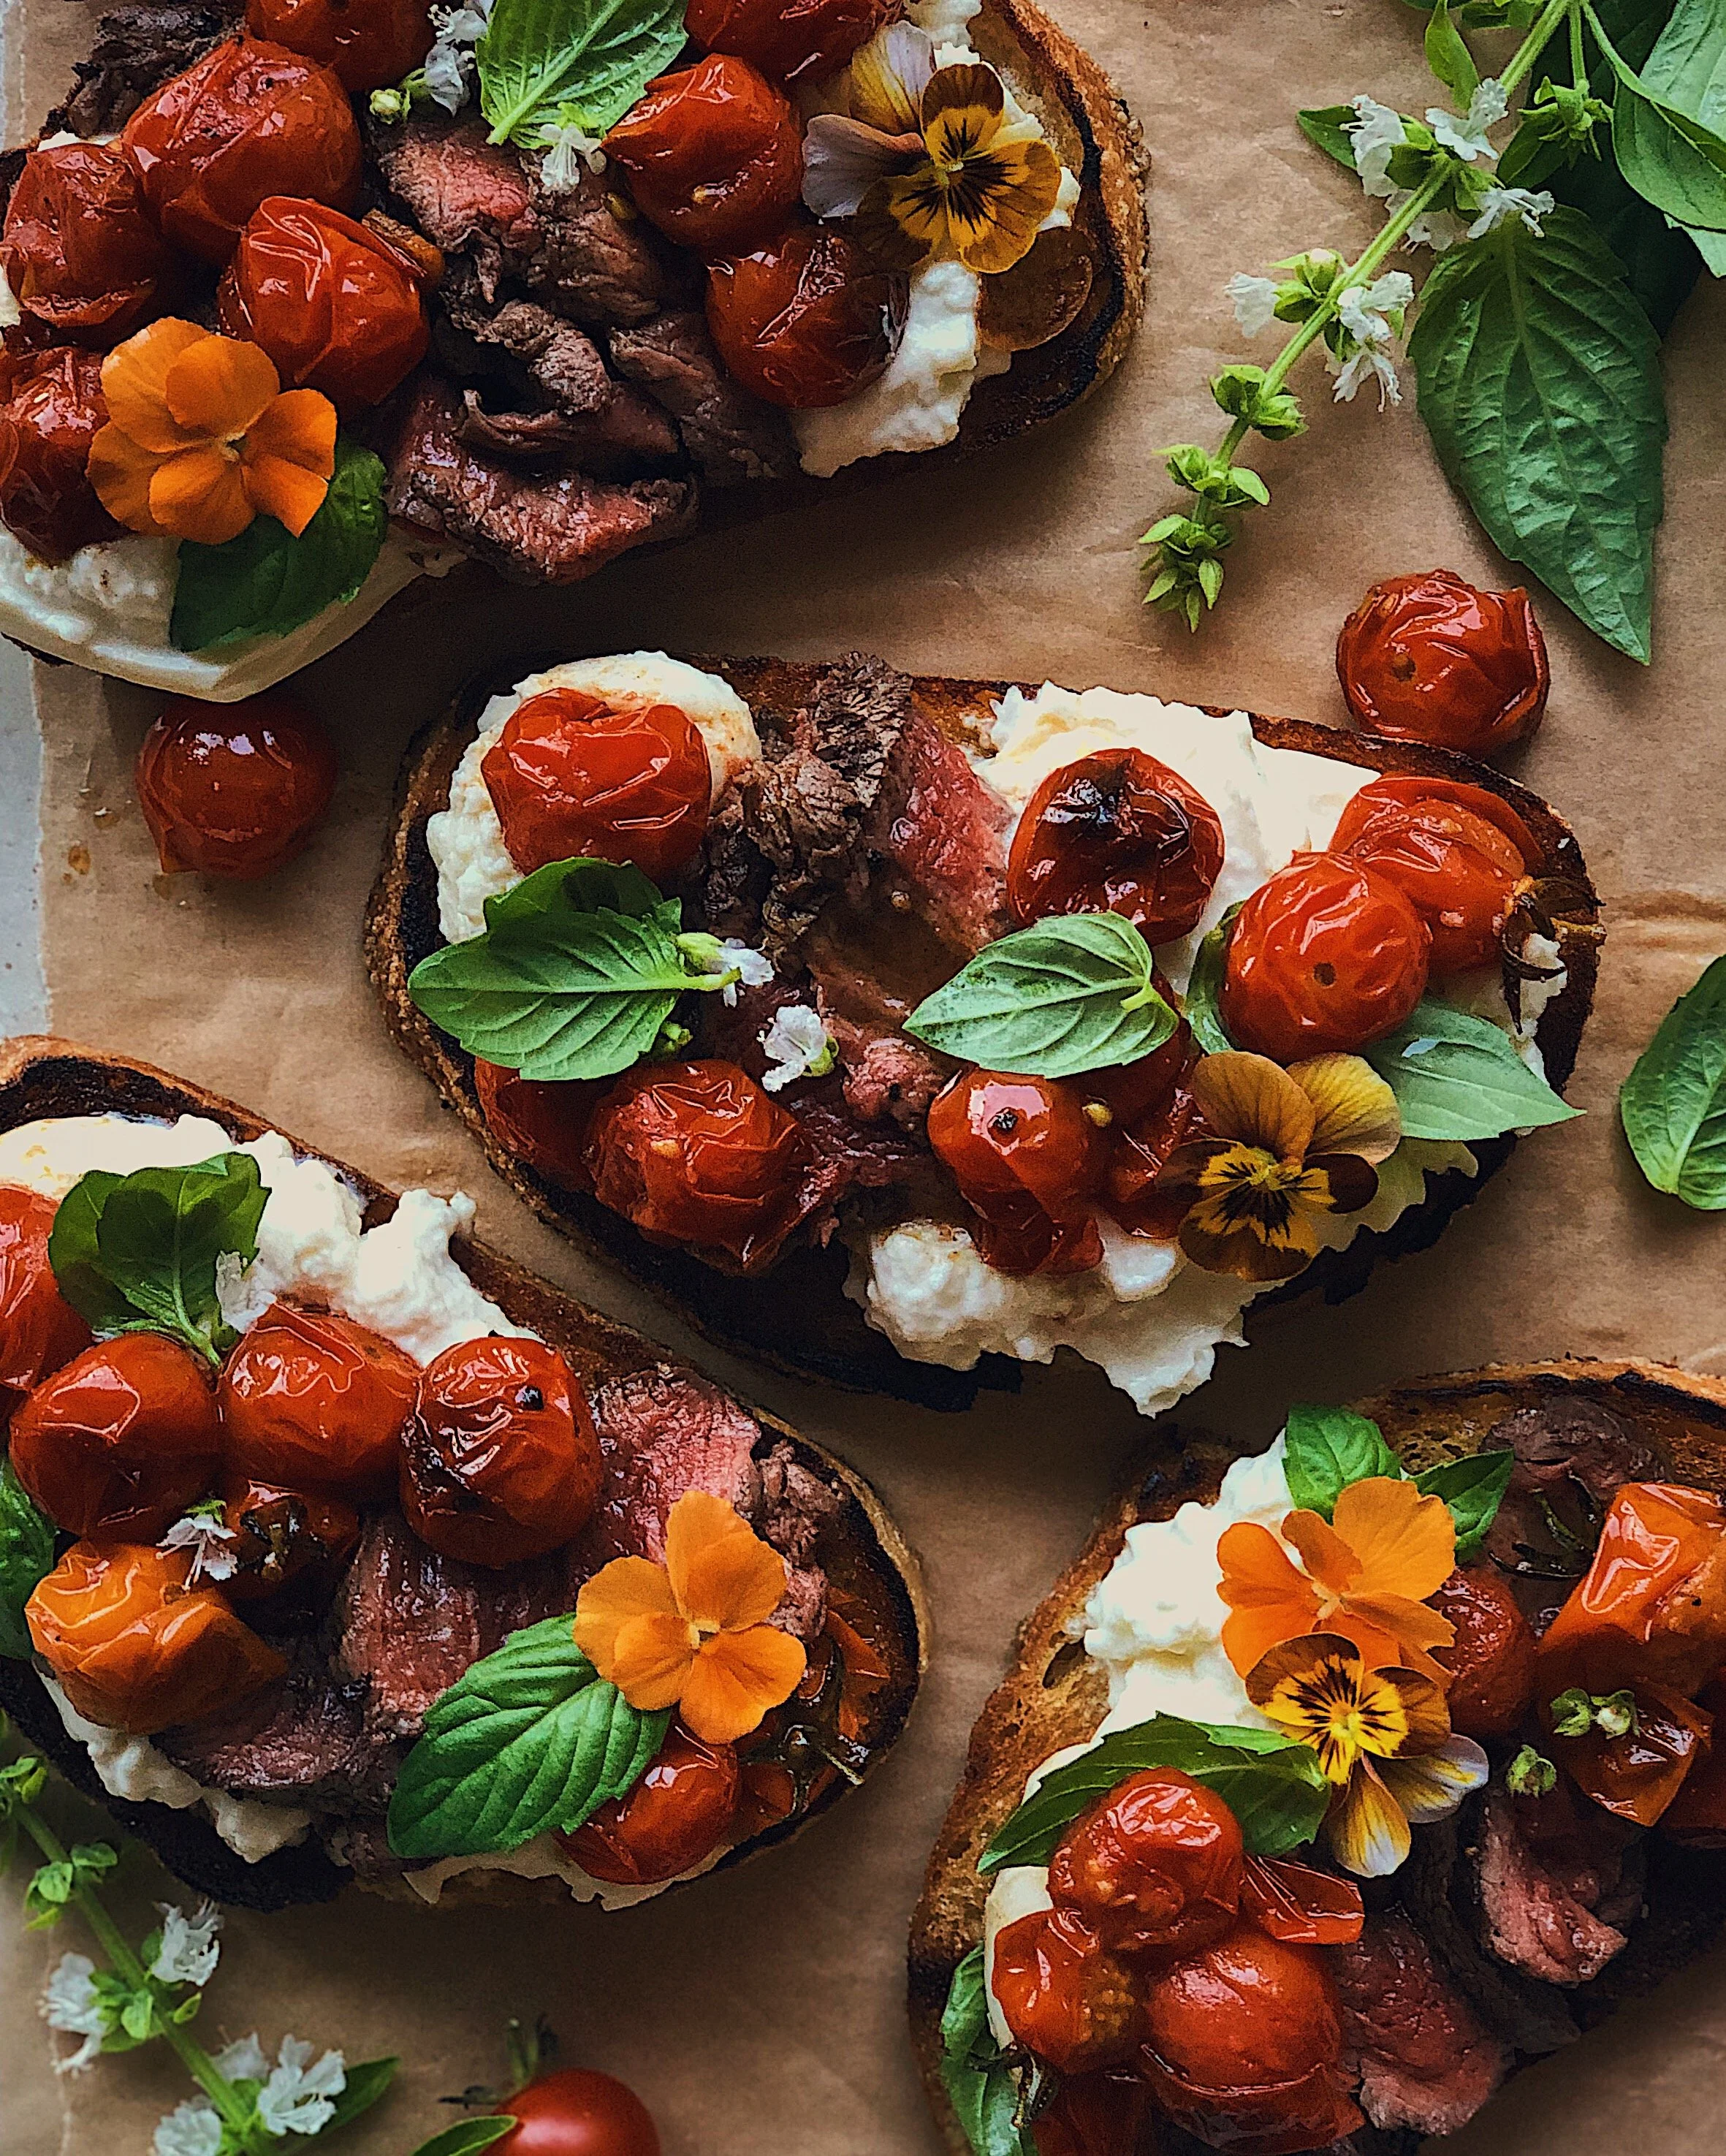
Steak and Caprese Toasts

For when all you want to eat during the summer is caprese made from fresh garden grown tomatoes, but you need some protein too.

I don’t normally serve toast for dinner. I try to cook up a “real” meal for Spouse and I in the evenings but I must say that this toast recipe is definitely dinner status. Maybe it was a little overkill to use such a nice cut of steak for toast, but it tasted really good so I have no regrets. I also didn’t want the risk of us biting into the toasts, and having fatty bits dragging too much steak along with the bite because we couldn’t cut through cleanly with our teeth.

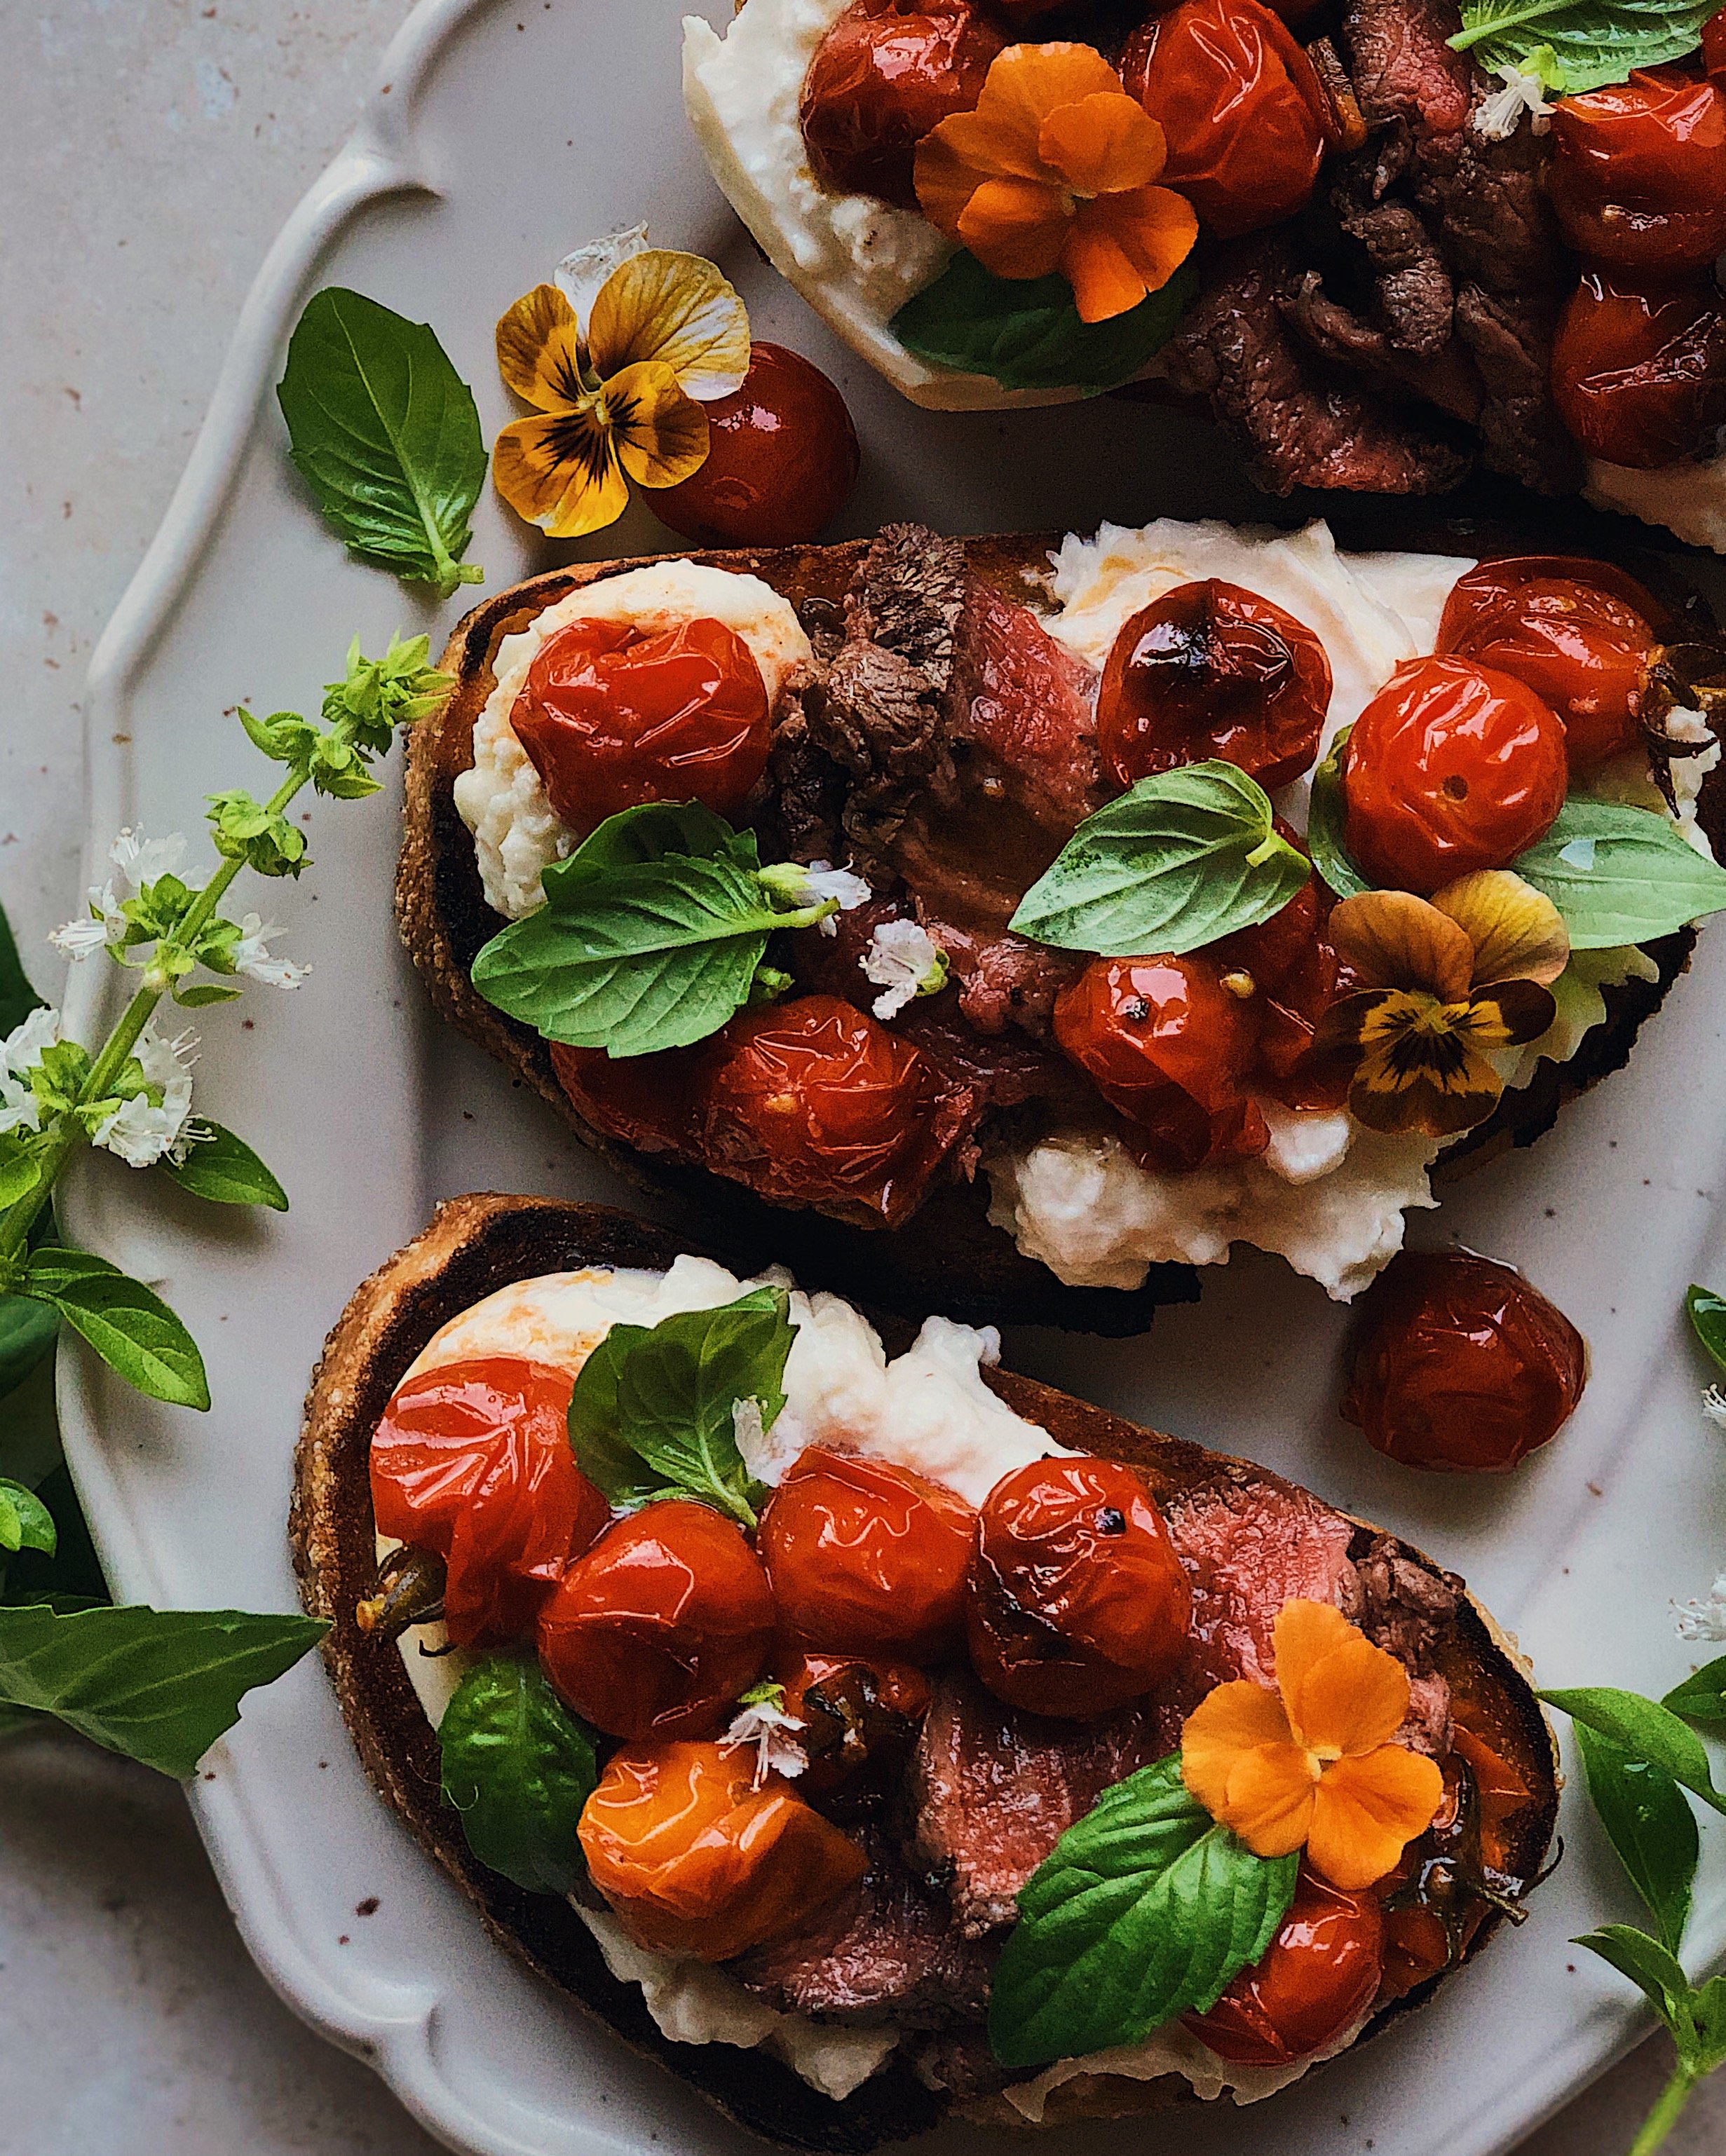
There are a few phases to making these but the good news is that it all gets done in the same cast iron pan. And in the end, you’ll have a world of flavor—tender steak with richness from the butter it was seared in, crunch and carbs from the toast, creaminess from burrata, fresh herbaceousness from basil, and brightness from burst tomatoes tossed in a quick vinaigrette. ⁣

How to Make Steak and Caprese Toast

Ingredients

8 oz tenderloin or filet mignon steak, at room temp
kosher salt
freshly ground black pepper
4 slices of good bread
lots of olive oil
1 tbsp salted butter
10 oz cherry tomatoes
1 clove garlic, thinly sliced
1/2 tsp honey
2 tsp white wine vinegar
8 oz burrata
fresh basil leaves

Procedure

Generously season steak with salt and pepper.

Heat a cast iron skillet on medium high. Generously drizzle olive oil. Fry bread in the olive oil on both sides until golden, then remove and set aside.

Add butter to the skillet and then add the steak. For medium rare, cook steak undisturbed for ~3 minutes on each side. Transfer steak to a grooved cutting board to rest for at least 10 minutes.

Reduce heat to medium. Add 2 tablespoons of olive oil, followed by the cherry tomatoes, 1/4 teaspoon salt, and garlic. Let tomatoes char on one side before turning. Cook tomatoes until they start to burst, about 4–5 minutes total. Shut off heat.

Combine honey and vinegar in a small bowl. Spoon in the charred tomatoes and mix gently to combine.

Slice the steak thinly.

Assemble the toasts. First, divide the burrata among them, then the steak. Then spoon some of the tomato mixture over each. Garnish with the basil leaves.

For more toast inspiration, check out all the posts with the “toast post” tag here.

Baguette au Brie with Roasted Tomatoes

In Berkeley, California, my college town, there is the cutest little Provençal restaurant called La Note where baguette au brie is on the menu. I have many fond memories of eating at La Note, one of those places choc-a-bloc with mismatched wood chairs and vintage French mixing bowls, mugs, and salt and pepper shakers that you would expect to find in some grandma’s country cottage. It was too expensive for us to eat there as poor college students so I never went while I was in school at UC Berkeley. And it is one of those places that draws crowds and over an hour’s long waitlist for their weekend brunch. So, there was only a very specific window of my life when I could have eaten at La Note—one where I was old enough to afford a cute brunch treat but young enough to have the patience to wait that long for a table—and sadly, that window has now passed, in favor of my current curmudgeonly state.

But when I did eat there for brunch, my go-to choice was the baguette au brie and I would never skimp on the buy-up to add roasted tomatoes. I remember the tomatoes being very simply done, maybe not even the most flavorful and just a quick blister with a little sprinkle of herbes de provence. But somehow that combo of the crusty baguette, that rich creamy brie, and the juicy tomatoes translated to perfection in its simplicity when all chewed together in my mouth.

A sad early attempt at food photography, circa late 2013.

What’s nice about such a simple yet perfect combination is that it can easily be replicated at home! I’ve been doing as much for years but now I finally have some nice photos to show for it. I’m also sharing one of my earliest attempts at taking food photography seriously, above, and I hope you can see some improvement has been made since then. Incidentally, that old photo from 2013 was taken with a real DSLR camera, whereas the hero photo on this post was taken with my iPhone (as is my modus operandi these days)—proof, I hope, that it’s not about the equipment when it comes to taking a good food photo. (If you are interested in hearing more about how I shoot professionally on an iPhone now, check out my interview on the My Food Lens podcast here.)

Anyway, about this recipe. Obviously not a “recipe” recipe because toasty bread based meals like these are, I believe, so much more about what feels like the right amounts (or the amounts that fit) verses exact measurements. Just use a good French baguette, the creamiest European style butter, and your favorite brie. For the roasted tomatoes, mine are probably much more time consuming that what they did at La Note, but it shows in the amount of flavor that they will bring if you use my technique—found here.

How to Make Baguette au Brie with Roasted Tomatoes

Ingredients

1 French baguette, halved lengthwise
brie, sliced somewhat thinly
European style salted butter, softened
roasted tomatoes (see recipe here)
fresh herbs, such as thyme or oregano (optional)
cracked black pepper (optional)

Procedure

Slice baguette halves into desired lengths. Generously spread butter over the cut surfaces. Arrange an even layer of brie slices on top. Place on a baking sheet and put under the broiler; watch carefully and broil until the brie just begins to melt.

Immediately place slices of roasted tomato on top of the melted brie. If desired, garnish with fresh herbs and finish off with pepper.

For more toast inspiration, check out all the posts with the “toast post” tag here.

Green Tomato and Chili Cheese Toast

greentomatotoast.JPG

Green tomatoes are not easy to come by in my part of the country but I think they have such a great tart flavor. When I saw one in the pile of mixed tomatoes at the store, I snatched it up, but then it sat in my fridge for a while. It didn’t seem worth heating up a bunch of oil to make just one fried green tomato. I googled what else to do with a green tomato and saw lots of examples which pair pimento cheese with them. Apparently this combination is a common thing where fried green tomatoes are popular—I had no idea, but I can see why! They are delicious together!

What made things even more perfect is that I happened to have a cornmeal-crusted jalapeño and garlic loaf from my favorite local-ish bakery, Wild Flour Bread on hand. It was the perfect bread for this toast combo, but a nice slice of crusty sourdough or rye would taste amazing too.

I topped off the otherwise Southern-inspired combo with a chili oil fried egg because I couldn’t resist bringing some extra spice to the toast. You can learn how I made this fried egg in more detail here.

greentomatopimentoast.JPG

How to Make Green Tomato & Chili Cheese Toast

Ingredients

1 slice of bread, toasted
1/2 green tomato, thinly sliced
~1/4 cup pimento cheese
1 chili oil fried egg
red pepper flakes, to taste
dill, for garnish

Procedure

Generously spread pimento cheese over the toast (I used the one from Trader Joe’s). Top with a few thin slices of green tomato, and then with the fried egg. Sprinkle red pepper flakes over everything and garnish with fresh dill and/or dill flowers.

For more toast inspiration, check out all the posts with the “toast post” tag here.

Toasts with Labneh and Burst Tomatoes in Paprika Butter

tomatotoast.JPG

Making these quick burst tomatoes in some sort of flavored butter is one of my favorite things to do with my homegrown cherry tomatoes at this time of year. There is no denying that a tomato grown at home tastes better than one from the store, so there is no need to do much to them in terms of cooking; I prefer to enjoy that natural sweet flavor without much fuss or distraction. So I throw them in hot melted butter and just wait for them to barely blister and burst and that is pretty much good to go for me.

Lately, though, I have been loving mixing summer fruit with smoked paprika; the sweetness of the fruit seems to go so well with it. I have been using the smoked Spanish paprika that I received from Spice Tribe and it is so so good—while I do other sponsored content in partnership with them, this post is not sponsored and this is truly one of my favorite products of theirs that I use in regular life. Allowing the spice to bloom just a little bit in the hot butter adds an incredible depth of flavor to this otherwise simple and simple to make toast combo.

How to Make Toasts with Labneh and Burst Tomatoes in Paprika Butter

Ingredients

1 cup cherry tomatoes
2 tbsp salted butter
1/2 tsp smoked paprika (or to taste)
2–3 slices of toast
labneh
fresh basil leaves (I used Thai basil)
flaky salt

Procedure

In a skillet on medium high heat, add the butter. Once melted, add the cherry tomatoes and allow them to sit in the skillet until they start to burst (could get a bit messy). Roll them around a bit to heat through, then put them to the side of the pan and add the paprika to the excess melted butter. Once the paprika and butter become very fragrant, gently fold everything together and turn off the heat.

Swirl labneh on top of the toast, forming areas for the melted butter to pool. Spoon the tomatoes and melted butter on top. Finish with a few fresh basil leaves and some flaky salt.

For more toast inspiration, check out all the posts with the “toast post” tag here.

Inside-Out Pizza Toasts

pizzatoast.JPG

The last time I shared a photo of pizza toast on Instagram, I got a surprising number of people asking me for a recipe. Though I am always filled with gratitude when someone tells me they feel inspired to recreate something I shared, in this case I was also slightly disheartened, if I am being completely honest; pizza toast, or at least some rudimentary version of it, was one of the very first foods I made for myself as a child, so to me, it should always be something borne of imagination and improvisation, and one should never feel beholden to following a recipe for it.

One kind soul clarified, however, that they wanted the recipe for my garlicky tomato sauce. Okay, that’s fair! So this time around, I really wanted to make the sauce the star of the pizza toasts, and I kind of have a recipe to share for them now. I was inspired by Detroit style pizza (which I’ve been really into lately) to use the sauce as a topping. The sauce in this recipe is going to be thicker than what you would normally find on pizza, because the time in the oven is going to be much less and you want the flavor to have a big impact. As such, the sauce also features my special ingredient for any tomato-based recipe: fish sauce! Trust me, the fish sauce is a game changer when added to tomato sauce.

Beyond the sauce, however, feel free to add your choice of toppings. I kept it very simple: a very very thin layer of sauce on the bread, gobs of mozzarella melted on, and slices of homemade pickled Fresno chilies. Then, dollops of more thick sauce and basil added after the oven. But do not allow yourself to be confined by this recipe—pizza toast is only limited by the boundaries of your pizza toast eating desires.

How to Make Inside-Out Pizza Toast

Ingredients for the sauce

4 cloves garlic, chopped
1 tsp good olive oil
8 oz canned tomato sauce
a splash of water
2 tbsp tomato paste
2 tsp harissa paste
1 1/2 tsp sugar
1 tsp fish sauce
2 pinches dried oregano

Ingredients for the Toasts

4 slices of good bread
~ 8 oz fresh mozzarella, sliced or torn
sweet pickled chilies
fresh basil leaves

Procedure

Preheat oven to 400°F.

Sauté the garlic in olive oil until fragrant.

Add tomato sauce, a splash of water to rinse out the can, and all the other sauce ingredients. Simmer on low, stirring occasionally, until the sauce thickens; when dragging a spoon along the bottom of the pot, it should close up very slowly.

Spread the thinnest layer possible of sauce on each slice of bread. Place bread on an unlined baking tray* and dot with mozzarella, then top with pickled chilies (or whatever toppings you want).

Bake the toasts at 400°F for 3–4 minutes, or until the bottom of the bread is lightly toasted, then broil the toasts until the cheese is bubbly. Top with dollops of the remaining prepared sauce, and then with basil leaves.

* Seriously, do not line your tray with parchment paper! I tried this before with visions of easy clean-up dancing in my head, and quickly learned that parchment paper + open flame broiler does not make a successful toast!

For more toast inspiration, check out all the posts with the “toast post” tag here.

Recipe: Chili Makrut Yellowtail Ceviche

LM_DutchYellowtail_Pt2_Post2.JPG

One of my favorite food memories of all time is from a ceviche tostadas stall in Mexico City called Tostadas La Chaparrita in the Mercado de Coyoacán. We had spent several hours waiting in the heat to get into Casa Azul (a.k.a. Frida Kahlo’s old home turned museum) and were desperate for a good bite to eat after a disappointing museum experience. A quick Google search led me to this well-reviewed place but what we got when we arrived exceeded expectations—a wide bar lined with mounds and mounds of all varieties of ceviche, ready to be piled on to crispy tortillas. They were piled up the way spices are heaped in the markets in Turkey or Morocco, but the piles were fresh seafood in every combination imaginable, marinated in lime juice. 

I often daydream about those mountains of ceviche but I never thought to try making my own until I learned about The Kingfish Company’s Dutch Yellowtail. It recently became available in the frozen section at Whole Foods Markets and because of the way it is raised and frozen, it is safe to eat raw as a high-grade sashimi when properly thawed. Dutch Yellowtail is sustainably raised in indoor basins on land using pristine water from a marine estuary. It is also a “Green Choice” as recommended by the Good Fish Foundation in the Netherlands. This means that it is raised specifically to be clean to eat and clean for the planet as well! When I took the thawed pieces out of the packaging, I found the fish to be firm and bouncy, with a clean smell. Since Dutch Yellowtail has a mild flavor and firm texture, it is so perfect for ceviche! 

Instead of replicating those exact memories of ceviche in Mexico or a traditional recipe from Peru, I wanted to come up with my own take on it, using Southeast Asian ingredients. I took inspiration from the aromatics used in the Malaysian food of my heritage, but I also was inspired by Thai and Vietnamese dipping sauces as I was developing the recipe for my ceviche marinade. I think that a little bit of funk from fish sauce, a little spice from fresh chilies, and bright, aromatic flavors like ginger and makrut lime leaves put such a great spin on ceviche that is distinctly Southeast Asian and therefore, distinctly me!

SEAsianCeviche_4.JPG

What you should know about the ingredients:

  • Dutch Yellowtail: This sustainably raised fish comes from farms run on 100% green energy and with no hormones or antibiotics. Its taste is similar to the hamachi you would find at a sushi restaurant. It absorbs the flavors of the marinade really well, and the longer you keep it in the marinade, the more “cooked” the texture will seem. I enjoyed it both with a brief (30 minute) rest, where the texture was more similar to sashimi, as well as after it soaked overnight. Look for this at Whole Foods Market!

  • bird’s eye chilies: These are also known as Thai chilies or I grew up calling them chilli padi. I love the instant spicy zing that they impart on Southeast Asian dipping sauces, but I personally find biting into a fresh piece to feel too much like a tiny fireball on my tongue. I picked them out before mixing the marinade with the fish but leave them in if you prefer!

  • makrut lime leaves: To me, this is what gives this ceviche recipe a unique flavor that is distinct from the ceviches of Latin American countries. (You can read more about alternative names for finding it here.) The leaves are quite hard, so slice them as finely as you can; I like to kind of crush them up a bit with my hand before rolling them tightly to cut a fine chiffonade. Of course, it is okay to leave this ingredient out if you can’t find it, but the dish will not have as much of a unique Southeast Asian flavor.

SEAsianCeviche_1.JPG
LM_DutchYellowtail_Pt2_Post1.JPG

In the photos here, you can see that I’ve served this ceviche a couple different ways:

  • Tostadas, inspired by my experience in Mexico City—You can often buy ready-made tostadas in the tortilla section of a grocery store, or you can simply make your own by deep frying corn tortillas in corn oil until they are nice and crunchy.

  • Toast, my all-time favorite carb based food vehicle—Use whatever is your favorite method for making toast; spreading on a layer of the avocado mash first before piling on the ceviche will help prevent the bread from getting soggy

This ceviche would also be great in little single-serving glasses, or served family style with tortilla chips for scooping. However you choose to serve it, I hope these ideas inspire you to make your own fresh yellowtail ceviche at home!

SEAsianCeviche_3.JPG

How to Make Chili Makrut Yellowtail Ceviche & Mashed Avocado

Ingredients for the Marinade

3/8–1/2 cup lime juice (about 4 limes)
2 tsp fish sauce
1 tbsp brown sugar
1–2 bird’s eye chilies, sliced
2 tsp ginger, finely grated
1 clove garlic, finely grated

Ingredients for Ceviche

8 oz Dutch Yellowtail, cut into small cubes (about 1/4”–1/2”)
2 makrut lime leaves, very finely sliced
1/2 shallot, finely chopped
2 sprigs Thai basil leaves, torn
5 stalks cilantro, leaves picked

Ingredients for Mashed Avocado

1 ripe avocado
1/2 lime, juiced
pinch of salt

For serving

prepared toasts, tostadas, or tortilla chips
microgreens, radish slices, or edible flowers (optional)

Procedure

Combine the ingredients for the marinade and let stand for 1 hour. Then, optionally, remove the chili pieces.

Combine the Dutch Yellowtail cubes, makrut lime leaves, shallot, and Thai basil leaves with the prepared marinade. Mix together and let the ceviche marinade in the fridge for at least 20 minutes, or up to overnight, depending on preference. (Over time, the fish will take on more flavor from the marinade and have more of a “cooked” texture.) Add the cilantro leaves after the ceviche has rested to the desired doneness. 

Just before serving, slice open the avocado, remove pit, and scoop flesh into a bowl. Add lime juice and salt and mash together to the desired consistency.

Serve the ceviche on top of avocado mash on toast or tostadas, or serve both components with tortilla chips on the side.


Thank you so much to The Kingfish Company for sponsoring this recipe! Visit their website to learn more about how they raise their sustainable fresh Dutch Yellowtail!

Disclaimer: consuming raw or undercooked meats, poultry, seafood, shellfish, or eggs may increase your risk of foodborne illness, especially if you have certain medical conditions.

Recipe: Pepper Popper Crostini with Crispy Prosciutto

PepperPopperCrostini_1.JPG

One of my favorite indulgences is jalapeño poppers. When I see them on a menu, I absolutely have to order them, whether it’s at Jack in the Box or a nice burger place, and I love them all. The spiciness of the pepper contrasting with the cooling creaminess of the cream cheese, the crispy-crunchy breading, and sometimes even with bacon—there is obviously a lot there to love. And yet, I have no interest in making them. Figuring out how to keep the stuffing inside the jalapeños and then figuring out how to keep the breading clinging to their smooth exteriors is something that I will leave to professional kitchens with industrial deep fryers. But what I have come up with instead is a way to get all the awesome flavor combos—and more—of a jalapeño popper, without those complicated puzzles.

What I came up with were these pepper popper crostini! I think they look a little fancier than jalapeño poppers, and that they would be perfect for a little summer bbq now that things seem to be transitioning back to “normal” in the States. I garnished mine with pea flowers, pea tendrils, and chive blossoms that I grew in my backyard in order to make these look extra pretty and special, and I also added cilantro for some nice freshness and pepitas for extra texture. Don’t they look like a garden party for your mouth? But you can dress them up or down depending on your needs. I always think of toast recipes as guidelines rather than hard rules to dictate what you have to do, so I would encourage you to follow this recipe for the bread, cream cheese, prosciutto, and peppers to get a delicious and flavorsome base that totally elevates the flavors of a jalapeño popper…and then, get creative with the garnishes!

PepperPopperCrostini_4.JPG

Looking at these cute crostini, would you ever have guessed that the source of inspiration was the humble jalapeño popper? But here’s how they stay true to the ingredients of their fast food ancestor:

  • chili peppers: I couldn’t call these “jalapeño popper crostini” because I did not use jalapeños. Instead, I used red Fresno chilies (which coincidentally share a name with my hometown). I believe they are fairly similar in spiciness, but I think that Fresno chilies have a little more flavor and a beautiful color when roasted, so I went with those. You can use whatever crunchy peppers you want so long as you can cut them up into about 1/4-inch slices that will fit on the toasts. Note that removing the seeds and ribs from any chili pepper will help decrease its spiciness. I opted to roast and then marinade the peppers to give them some tanginess that contrasts nicely with the saltiness of the prosciutto and gives these an antipasti vibe.

  • cream cheese: The spread that holds all the toppings onto the toasts is a cream cheese that has been majorly boosted in flavor by Spice Tribe’s California Love blend, which has really become a go-to chili blend for me whenever I want to quickly and easily give things some savory spiced seasoning. It has roasted chili, cumin, coriander, garlic, onion, oregano, bay leaf in it, and it truly goes great with everything. I believe this is what really gives these crostini much more depth of flavor; whereas jalapeño poppers taste exactly like the combination of their individual ingredients, using this spice blend not only ties all the ingredients together, but it enhances how good they taste together. I folded it in gently into softened cream cheese so that you can see some distinct streaks of the spices, but either way, you’ll know this seasoning blend is there when you taste it!

  • crispy prosciutto: In place of the bacon that can be found with some extra awesome jalapeño poppers, I opted to use prosciutto, to again give that antipasti motif to these crostini. Baking prosciutto in the oven can make it extra crispy—almost like a super savory, meaty chip. I found in recipe testing that draping the prosciutto over the peppers and allowing them to roast together not only gives the prosciutto a nice concave shape, but it makes for a better texture than baking it directly on a sheet pan.

  • toasted bread: Instead of having fried breading to hold everything together, I opted for slices of toast to hold all these delicious components and transfer them to your tastebuds. To get these slender shapes that are just perfect for chomping into, I cut a baguette on a bias (diagonally).

I think that lovers of jalapeño poppers and antipasti alike will really enjoy these crostini. I know I did!

PepperPopperCrostini_3.JPG

How to Make Pepper Popper Crostini with Crispy Prosciutto

Ingredients for the Roasted Peppers

10 red Fresno chili peppers (about 10–12 oz)
2 garlic cloves, minced
1 lime, juiced
1 tbsp extra virgin olive oil, plus extra for drizzling
pinch of salt

Ingredients for the Crostini

8 oz cream cheese, softened at room temp
1 tsp Spice Tribe California Love blend
2–3 oz prosciutto, torn into large pieces
8 baguette slices (cut about 1/2” thick on a bias)
1/4 cup extra virgin olive oil
fresh soft herbs, such as cilantro
pepitas (optional)
edible flowers (optional)

Procedure

Preheat oven to 425°F.

Cut peppers on a bias into 1/4-inch slices and discard stems. Remove seeds as desired to reduce spiciness. Add the pepper slices to a medium baking tray, drizzle a bit of olive oil on top, and toss to coat. Spread out evenly and roast for 10 minutes. 

In the meantime, combine garlic, lime juice, 1 tablespoon olive oil, and salt in a medium bowl and whisk to combine.

Flip the pepper slices over and drape the pieces of prosciutto loosely on top of them. Bake for an additional 10 minutes or until the prosciutto is crispy and the peppers are soft with slight char on some edges. 

Combine cream cheese and Spice Tribe California Love in a bowl and fold gently, so that the spice blend forms visible swirls throughout the cream cheese.

When the peppers and prosciutto are done baking, transfer prosciutto to a separate plate and add roasted peppers into the lime juice mixture. Toss to combine and let stand for at least 10 minutes for the peppers to soak up the flavors.

Brush baguette slices with olive oil on both sides. Bake directly on the oven rack for 3 minutes, or until desired crispness is reached.

Spread the seasoned cream cheese on the toasted crostini. Divide the crispy prosciutto among the crostini, then top with the marinated roasted peppers. Garnish with fresh herbs and pepitas, as well as edible flowers if desired. Enjoy immediately.

Thank you so much to Spice Tribe for sponsoring this recipe! Check them out on Instagram here or visit their website to purchase high quality spices and unique small-batch spice blends.

Recipe: Baked Feta with Roasted Strawberries

bakedfetastrawberries1.JPG

So we all know about baked feta from that baked feta and tomato pasta trend on TikTok. I tried it and I think it is perfectly tasty but one thing that confused me about it was why people’s minds were so blown. It’s warmed, creamy cheese and roasted tomatoes…OF COURSE those taste good together! But rather than fester on my confusion, I decided to take inspiration from the baked feta trend and make it a bit more interesting. We all know that roasted tomatoes are amazing…but have you tried roasting strawberries?

Think about when you are eating a charcuterie platter where there’s crostini, and spreadable cheeses, and jams, and how combining those things is like a party for your mouth. This is basically a sheet pan version of that!

Roasting tender fruits like strawberries makes them so lovely and jammy because it concentrates their flavors and makes them soft. Obviously baking the block of feta makes it warm and soft and spreadable, so it becomes perfect to smash on top of toast. I admit that this is not all that groundbreaking either, but a lot of people don’t think to roast sweet fruits like berries and grapes, so I thought this recipe was still worth sharing. It also makes your house smell amazing.

bakedfetastrawberries.JPG

How to Make Baked Feta with Roasted Strawberries

Ingredients

1 lb strawberries
8 oz feta (domestic is fine)
2 tbsp date syrup
freshly cracked pepper, to taste
1/2 a soft baguette, cut into 1/2-inch slices
extra virgin olive oil
1–2 sprigs basil, leaves picked

Procedure

Position one rack in the middle of the oven and another closer to the bottom. Preheat oven to 400°F.

Remove the stems and leaves of the strawberries. Slice smaller strawberries in half and cut larger ones into 1/4-inch slices.

Place the block of feta on a baking sheet and arrange strawberries around it. Drizzle date syrup and sprinkle black pepper over everything.

Bake the feta and strawberries for 20 minutes on the middle rack.

In the meantime, brush the baguette slices with some olive oil. When there are 3–5 minutes left for the sheet pan (depending on how crunchy you like your toast), add the bread onto the other oven rack.

Take everything out of the oven, then gently mix the strawberries around with the juices that released.

Roughly chop larger pieces of basil and leave the small leaves whole.

To serve, smear some of the soft feta on top of each toast, then spoon on some of the strawberry mixture. Top with the fresh basil.

Citrus and Prosciutto Toast

avocadotoast.JPG

Welcome to another installment of my Toast Post series where I try to provide you vague guidelines for how I made a toast. For the record, I do not believe that toast requires a recipe, so I am only sharing these for those who could benefit from some added guidance. Fell free to make changes, use what you have, and treat toast as your own blank canvas for culinary expression and love for your tastebuds.

About this Toast

I made these toasts to commemorate the 3-year anniversary of my Instagram account. The color palette was strongly influenced by the colors of the flowers that were growing in my backyard at the time, and I actually chose the other ingredients for the toast based on the sunset color scheme I wanted to capture. Here are some shoutouts to some of the foods I used and love to use:

  • Sourdough: Country Bread by Josey Baker Bread

  • Chèvre: I LOVE the truffle chèvre by Laura Chenel; it has converted Spouse into a chèvre enthusiast

  • Burrata: I have tried various brands and BelGioioso is my favorite.

  • Prosciutto: If you like what is available at your local deli, get that by all means. But lately I have been loving the packaged version by Creminelli Fine Meats. It’s often on sale at Whole Foods and I like how nicely the slices stay intact as I pull them apart. You can tell they are paper thin yet structurally sound in the photo.

How to Make Citrus & Proscuitto Toast

Ingredients

3 slices of country sourdough
extra virgin olive oil for toasting
~ 3 oz truffle chèvre, room temp
1 cara cara orange
1 blood orange
2 oz sliced prosciutto
1 ball of burrata
purple radish microgreens
sumac
bee pollen
everything seasoning
edible flowers

Procedure

Slice the peels off of the oranges and slice them into cross-sections or segments.

Toast the bread to your preference. I heated olive oil in a skillet, toasted one side in the oil and then flipped over and turned off the heat. This allows the toasted side to withstand the toppings and provide crunch, but prevents the bread from becoming a gum-cutter.

Spread the goat cheese over the toast. Arrange the prosciutto and orange pieces on top however you like, then fill any empty spaces with burrata.

Top with the remaining ingredients as desired.

For more toast inspiration, check out all the posts with the “toast post” tag here.

Avocado and Burrata Toast with Pickled Carrot Ribbons

avocadotoast.JPG

The toast series: An Introduction

I never set out to be a toast account on Instagram but people seem to like the toasts I make. And I get asked all the time for recipes for my toasts. Personally, I do not think that toasts should require a recipe. Toasted bread is like a tasty blank canvas. Put whatever the hell you want on it, you don’t need me to tell you what to do. I am the kind of person that would find a toast recipe incredibly stifling, and I urge you to get to a point where feel confident enough in your abilities in the kitchen to feel the same way.

My spouse always is there to lend a different perspective, though. He can’t do anything in the kitchen without a recipe, and even then, I think he doesn’t have enough cooking experience to grasp the nuance of things; how time sensitive something cooking on the stove can be and that sort of thing. He reminds me that just because I have that confidence and intuition to cobble things together and make it taste good, doesn’t mean everyone does, and maybe that confidence can be built over time but it needs to start with the practice that comes from following a recipe first.

So, okay, I hear you. I’m gonna try to capture “recipes” for my favorite toasts, but I urge you not to depend on measurements (which won’t always be there) and rather use this as an ingredient list or a starting point. And don’t let getting caught up in precise details prevent you from enjoying the process of assembling your own toasts! Now, let’s get that bread, literally.

About this Toast

I made this toast as a celebratory post on the 2-year anniversary of my Instagram account. I think the curly scallions and the carrot ribbon swirls resemble party streamers. The flowers all came from my backyard garden (violas, marigolds, and chive blossoms) and the pea leaves and tendrils came from seeds that a neighbor planted in the communal area right outside my house.

How to Make Avocado & Burrata Toast with Pickled Carrot Ribbons

Ingredients for the Pickled Carrot Ribbons

1 carrot
4 tsp sugar
1/4 cup rice vinegar
1/4 cup hot water
salt

other ingredients for this toast

2 slices of sourdough
butter, for toasting
1 avocado
1 ball of burrata
1 scallion
everything seasoning
pea tendrils
edible flowers

Procedure

Prepare quick-pickled carrot ribbons. Using a vegetable peeler, remove rough outer skin of carrot and discard. Continue using the vegetable peeler to shave thin “ribbons” of carrot. Rotate as necessary until reaching the core of the carrot. (Feel free to snack on the carrot core!) In a small bowl, combine 1/4 cup hot water (does not need to be boiling; hot tap water is fine) and sugar; mix until sugar is dissolved. Mix in rice vinegar and a pinch of salt. Add carrot ribbons and allow to marinade for 15 minutes to (in the fridge) overnight. Note: You will have more than you need for this recipe.

Slice scallion lengthwise into thin strips. Place in a bowl with ice water, and place bowl in the fridge to allow them to curl up. This can also be done in advance of making the toasts.

Toast the bread to your preference. I like to melt some butter in a skillet, toast one side in the butter, and then flip over and turn off the heat. This allows the toasted side to withstand the toppings and provide crunch, but prevents the bread from becoming a gum-cutter.

Cut the avocado in half, remove the pit, and carefully peel off the skin. Thinly slice crosswise, and fan out one half over each of the pieces of toast. Grab small globs of burrata and arrange them over the avocado. Top with the remaining ingredients as desired.

For more toast inspiration, check out all the posts with the “toast post” tag here.

Recipe: Spiced Honeynut Squash Toasts

Lily_Nov3_Social_v3.jpg

Note: This is not your #basic fall squash recipe!

As a diehard member of Team Savory, as much as I love the smell of pumpkin spice and everything nice come autumn season, my stomach never really craves baked sweets. So I am always trying to come up with ideas to capture fall flavors in ways that are appealing to my own tastes. I realized that pairing honeynut squash with Spice Tribe’s Masa Mole spice blend would be a lovely foundation for a savory fall-themed toast; it contains cinnamon—one of the usual fall suspects—but beyond that, it brings those warm vibes through toasted Mexican chilies.

It was at that point that I decided I was declaring honeynut squash mash toast a thing—the yummiest autumn-iest alternative to avocado mash toast!

If you haven’t heard of honeynut squash before, it’s like a smaller, super adorable, deeper-colored version of butternut squash. Just look at how it is barely bigger than spice bottle. Freakin’ cute!

If you take anything away from this recipe, I hope it is this combo of mashed squash and this spice blend. Much like avocado toast, and toast in general, it feels a little silly to me to set a strict recipe for a toast, so top that spiced honeynut sqaush with whatever you like! In this example, I opted for fried halloumi and crispy sage, followed by a drizzle of good-quality maple syrup because, admittedly, that little bit of sweet does really bring out the natural sweetness of the squash even in a savory dish. I sometimes find halloumi to be too salty though, so if you don’t have a halloumi brand you love but still want that fried cheese goodness on top of your toast, firm queso fresco is a great mild option that you can fry up the exact same way.

Are you ready to swap your avocado toast routine for THIS?:

Lily_Oct2_Banner.JPG

How to Make Spiced Honeynut Squash Toast

Ingredients

1 honeynut squash; peeled, deseeded, and cut into small cubes
4 slices of sourdough bread
12 sage leaves
5–6 oz halloumi cheese*, cut into 8 slices
3/4 tsp Spice Tribe Masa Mole blend
1/2 cup ricotta cheese
4 tbsp maple syrup
Olive oil
Kosher salt
1 sprig of tarragon (optional)
Sprinkle of Spice Tribe Maras Chile Flakes (optional)

* If you find halloumi to be too salty, queso fresco is a great alternative that fries the same way.

Procedure

Preheat oven to 425°F. **

Line a baking tray with parchment paper or foil. Add honeynut squash cubes and toss in some olive oil and salt to taste. Roast in oven until fork-tender, about 20–30 minutes.

In the meantime, toast bread slices to preference and set aside. (I like to heat some olive oil in a skillet, toast one side of the bread in the oil, flip, and then turn off the heat and let it sit in the pan while I prep everything else. This makes one side crusty and soggy-resistant for toppings without making the overall toast too hard.)

In a small skillet, add enough olive oil to cover the bottom in a thin layer, and heat the oil on medium. Carefully add sage leaves, trying to make them land flat in the oil. Remove the leaves when they start to crisp and look fully soaked with oil; they will continue to crisp up after being removed from the heat. Transfer to a paper towel to drain excess oil.

Using the same skillet and now sage-infused oil, fry slices of halloumi until golden brown on both sides. Transfer fried halloumi to a separate plate.

Sprinkle the Spice Tribe Masa Mole seasoning over the cooked squash, and mash squash with a fork until homogenous. 

Spread the ricotta equally on the toasts, followed by the spiced honeynut squash mash. Top with fried halloumi and crispy sage. Drizzle maple syrup over the top of each toast. Optionally, garnish with tarragon and Spice Tribe Maras Chile Flakes. Serve immediately.

**Shortcut version: Alternatively, you could steam the honeynut squash in the microwave until soft. Place cubes in a shallow bowl and cover completely with a wet paper towel. Microwave until fork-tender, about 3 minutes. Season with salt to taste before following the same directions as above for the cooked squash.

Thank you so much to Spice Tribe for sponsoring this recipe! Check them out on Instagram here or visit their website to purchase high quality spices and unique small-batch spice blends.

Recipe: Korean Egg Toast / Gilgeori Toast

Lily_June1_Social_v2.JPG

I partnered with Bibigo USA to help their audience “travel” through food at home by developing a recipe for a classic Korean street snack. One thing I noticed about the street foods when I was in South Korea last year, was that a touch of sugar was often included in otherwise savory snacks. Even the famous cheese-filled Korean “hot dogs” (a.k.a. battered and fried cheese on a stick that allows you to make the most epic of cheese pulls!) come dusted in sugar on the outside.

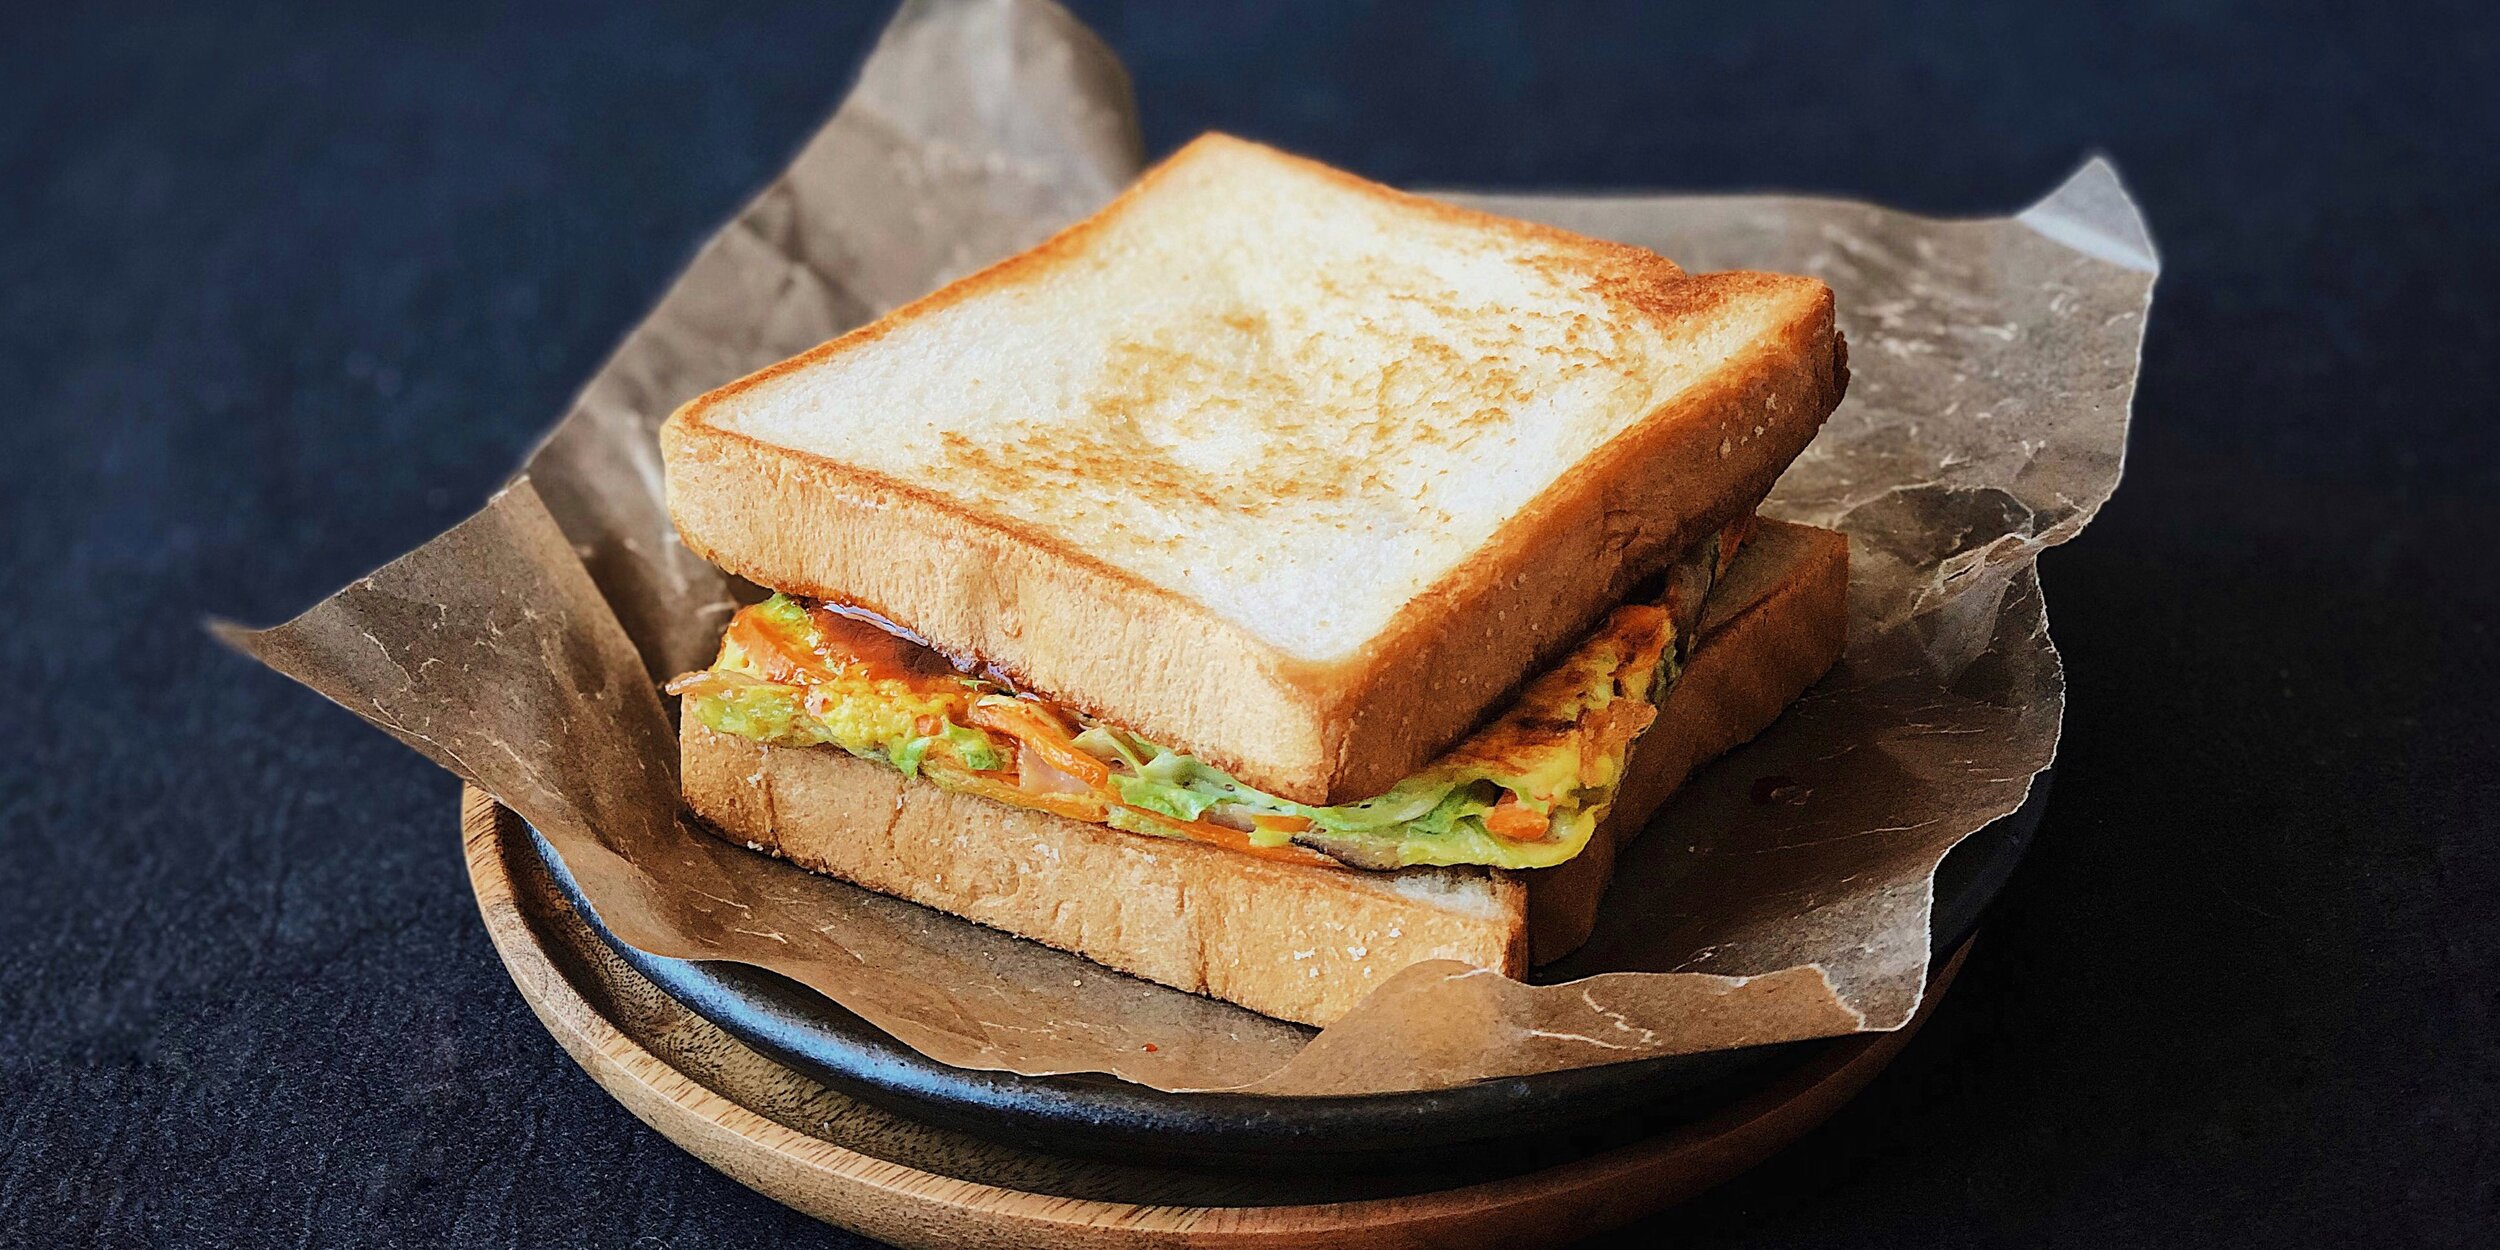
Gilgeori toast (which means “street toast”) is no exception. This toast typically involves shredded veggies and egg cooked together into a square and topped with a sprinkle of sugar and a squirt of ketchup or jam; it’s then served rolled up in a slice of soft, gently toasted, buttered white bread, either in a paper cup or wrapped in foil. For this version, I used Bibigo Hot & Sweet Go-Chu-Jang Sauce instead of ketchup, which helped bring together the sugar and the savory ingredients really well. Other variations I’ve seen include adding ham or different types of cheeses, either inside the egg patty or layered on top. This is a great recipe to help use up random scraps of ingredients that you have in your fridge, and it is really fun to experiment to find your favorite combo!

0AB2949B-B047-4AD0-A66C-DF2ED333A0D6.JPG
1FE881C1-976B-4ACB-AFDE-35D1C883D833.JPG
Lily_June1_Banner_v5.JPG

There are other “egg toast” places in South Korea where the toast is actually more like what Americans would call a sandwich, served with two slices of bread in a cute cardboard holder. I decided to make my gilgeori toast look more like those. For those of you who live in the SF Bay Area, I’ve found that the thick milk toast sold at Manila Oriental Market (shown in the photos for this post) works really well for Asian toasts and sandwiches that typically have a soft white bread. Another place I like for milk bread is Andersen Bakery, where they sell whole loaves so you can slice to the thickness of your liking.

I was also excited that this recipe helped me find another use for my little rectangular omelette pan that I bought in Seoul. It is meant to be used to make rolled egg omelettes (typically known in the States by the Japanese name tamagoyaki) but it came quite in handy for making these square egg patties for gilgeori toast. Don’t worry if you don’t have one, though; just pile your ingredients in the center of a skillet or flat griddle and use a pancake turner/spatula to help shape your ingredients into a square.

How to Make Gilgeori Toast

Ingredients

2 slices milk bread
1 large egg
1/2 cup cabbage, finely shredded
1/4 medium carrot, julienned
1 slice (1 oz) ham, thinly sliced
1 scallion, thinly sliced
2 tbsp butter, divided
1/2–1 tsp sugar
1 tbsp Bibigo Hot & Sweet Go-Chu-Jang Sauce
salt, to taste

Procedure

Combine shredded cabbage, carrot, and scallion into a mixing bowl. Add a pinch of salt and gently massage everything together to combine and soften. Mix in ham. Set aside.

Heat a large skillet or griddle on medium heat. Add 1/2 tablespoon butter and allow to melt and coat the cooking surface before adding the bread. Allow bread to toast on one side for about 1.5 minutes or until golden. Remove bread, melt another 1/2 tablespoon of butter, and toast the other side of each slice. Set toasted bread aside.

Crack egg into a separate bowl and beat vigorously. Add beaten egg to the vegetable and ham mixture, and gently mix to combine. 

Heat a rectangular omelette pan or small nonstick skillet on medium heat. Melt 1/2 tablespoon butter. Add the egg mixture as one small pile, then use a cooking spatula or turner to flatten the pile and shape it into a square as the egg sets. Cook until the bottom starts to turn golden, about 2 minutes. Add remaining 1/2 tablespoon of butter on top, then carefully flip over and cook until the other side starts to turn golden.

Place omelette on top of one slice of toast. Sprinkle sugar over the top, then drizzle Bibigo Hot & Sweet Go-Chu-Jang Sauce. Top with the remaining slice of toast. 

Lily_June1_Banner_v4.jpg

Thank you so much to Bibigo USA for sponsoring this recipe! For more recipe ideas and to learn more about their products, visit their website!

Recipe: Mashed Potatoes on Toast!

LilyMorello_MashedPotatoToast.JPG

I make extra mashed potatoes for Thanksgiving on purpose in order to use the leftovers for this toast.

I wish I could take credit for this genius idea but even I would never be so brazen as to put mashed potatoes and toast (the two best food groups of all time) together on my own. No—this is my copycat version of the Mash Up at @sprocoffeelab, a super cute coffee stand in San Francisco run by really nice people.

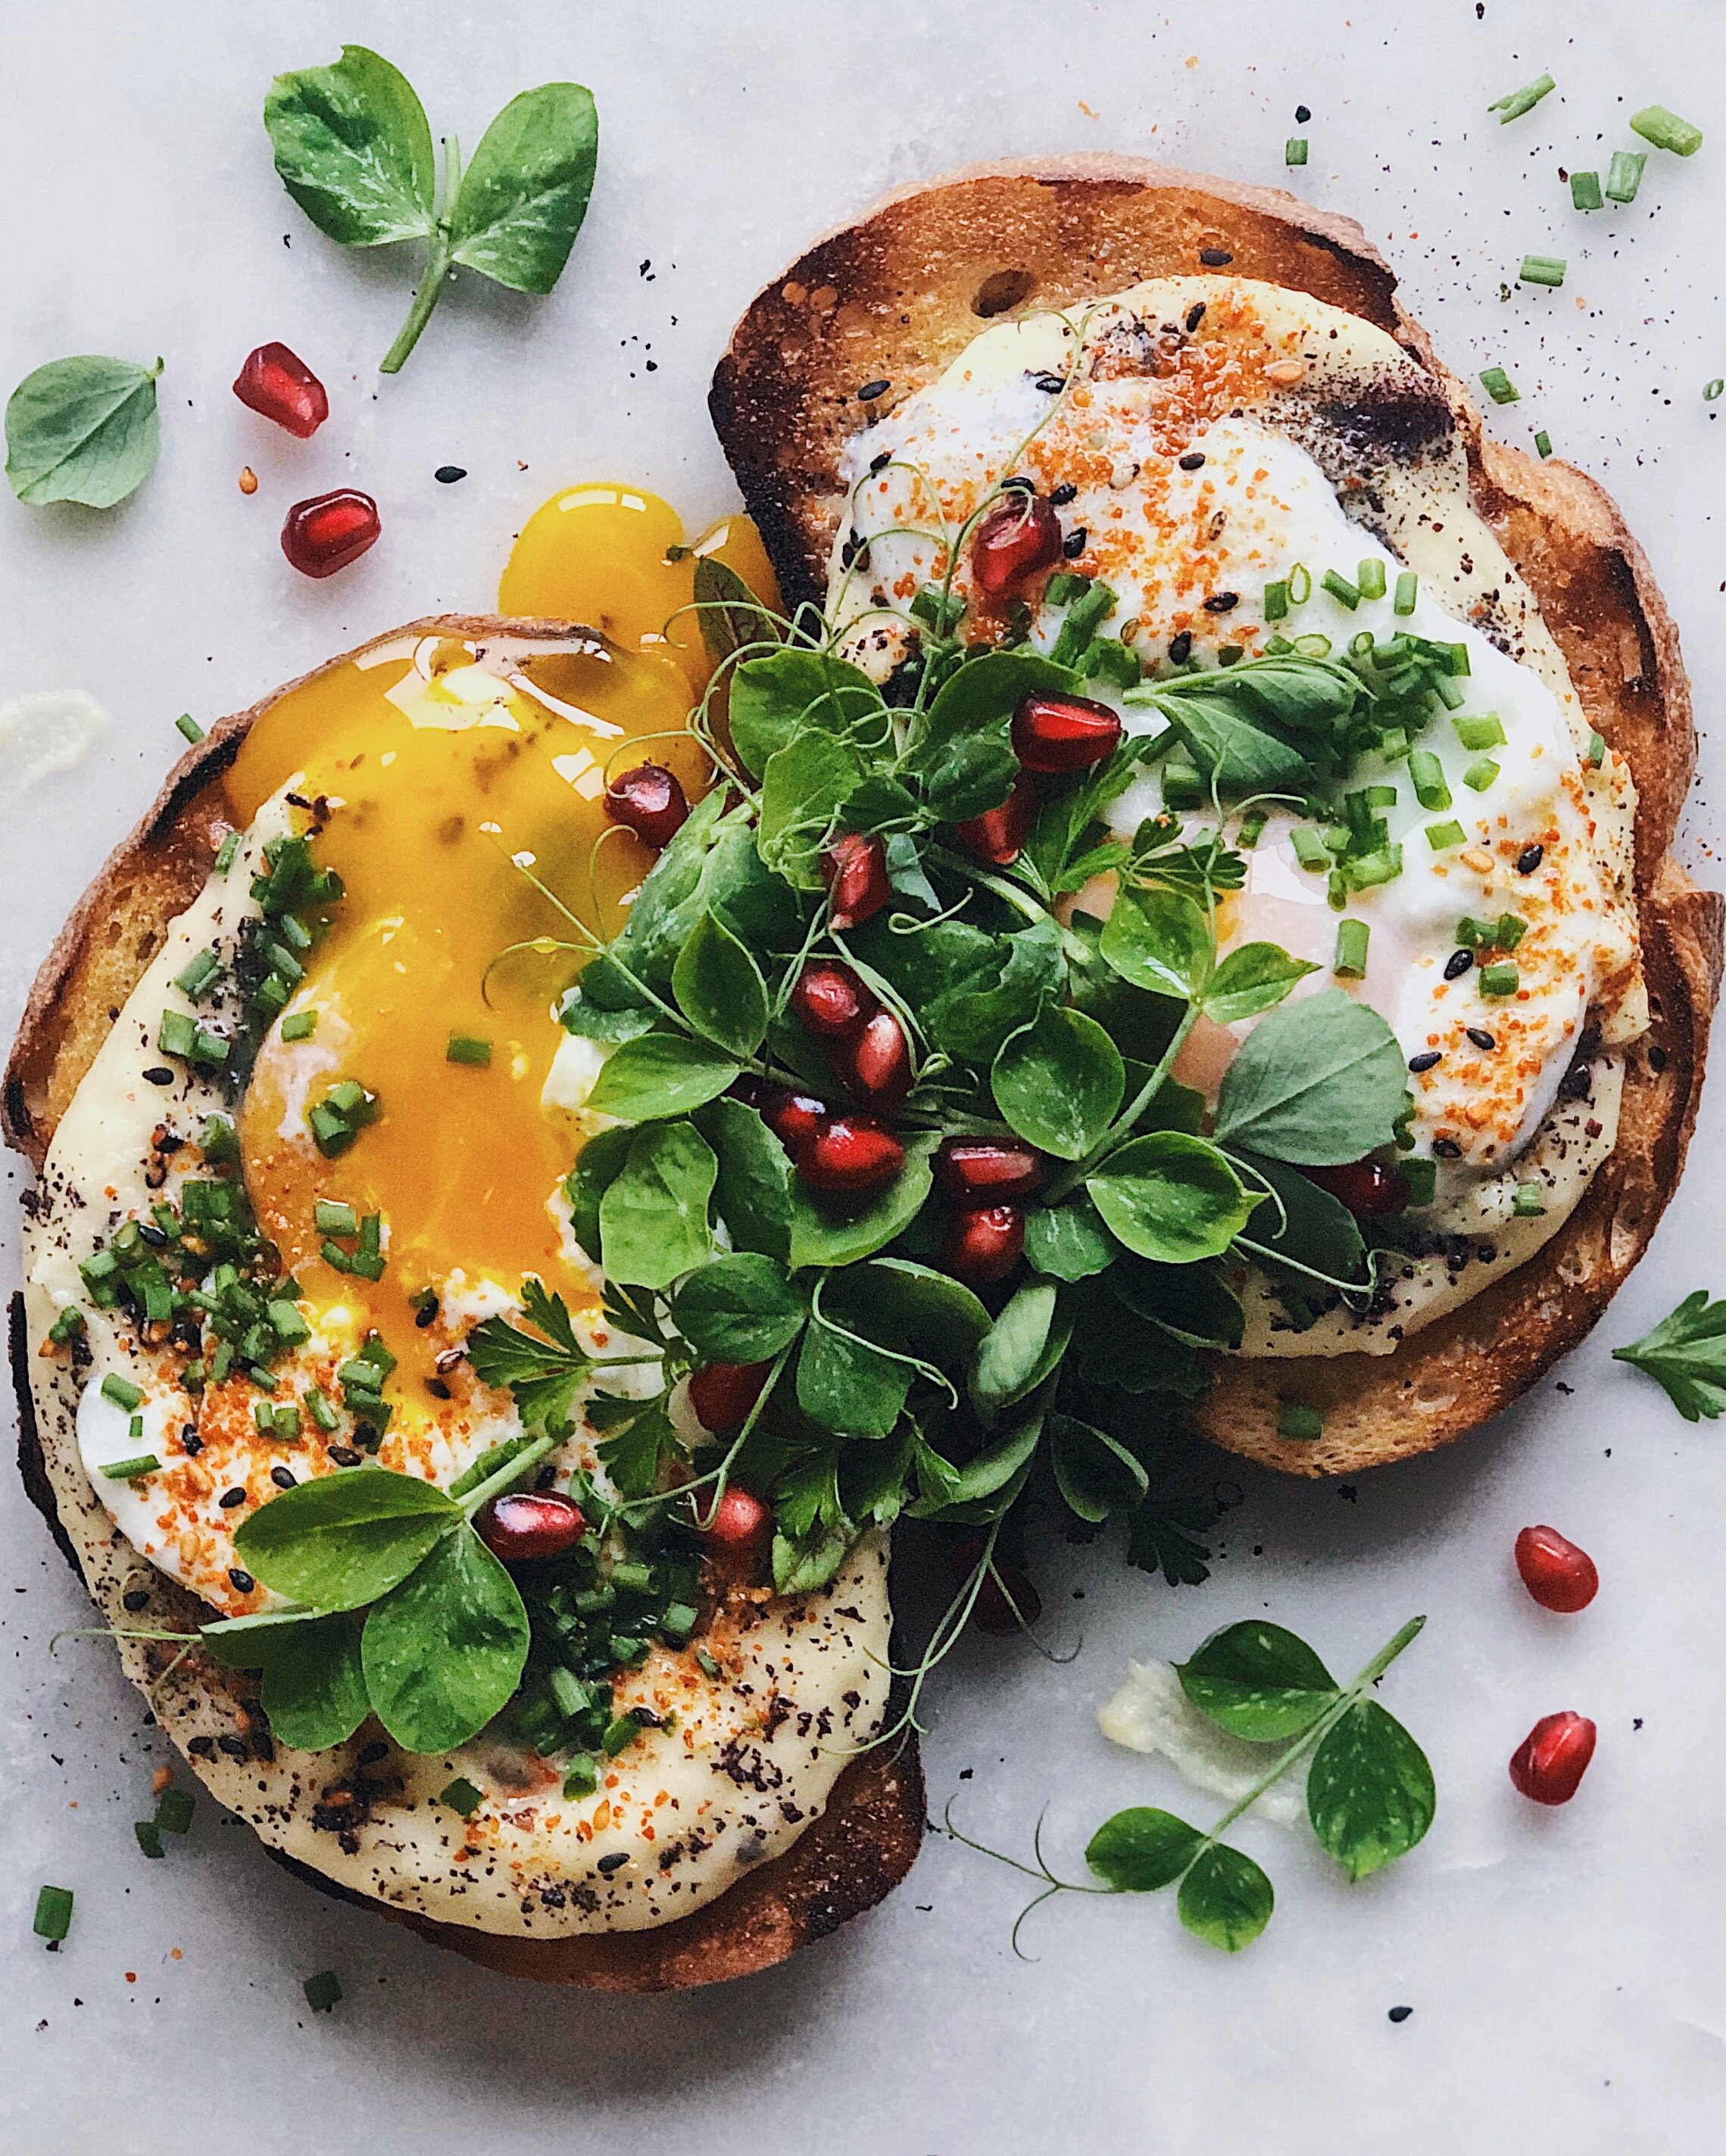
My version is topped with super-runny, Malaysian-style half-boiled eggs—iconic to my childhood but totally underrated everywhere else. I use these in place of “sous-vide” eggs because they have quite a similar texture and I don’t have a sous-vide device. However, regular poached eggs would also be great here if that’s your preferred method.

How to Make Mashed Potatoes on Toast

Ingredients for the Toast

2 slices of sourdough bread
1/2 cup-ish leftover mashed potatoes (the more garlicky, the better; bonus points if they also contain parm)
2 eggs
olive oil

For Garnishes

Use whatever you want or whatever you have lying around that looks pretty, depending on your priorities. For greens, I used a combination of stuff growing in my backyard and pea shoots that a random neighbor decided to plant in the communal planter in front of my house. An approximation of what is shown in the photo is as follows:

1 tbsp chives, chopped
1/4 cup mix of pea shoots, parsley, sorrel, nasturtium
1 tbsp pomegranate seeds
a few sprinkles of furikake
a few sprinkles of togarashi

Procedure

How to make Malaysian-style half-boiled eggs: Bring a small pot of water to a rolling boil. Gently lower the eggs into the pot and shut off the heat. Let the eggs cook for 8 minutes. Remove from pot and place in an ice bath to stop the cooking.

Heat some olive oil in a skillet on medium heat and toast the sourdough slices to your liking.

Meanwhile, reheat the leftover mashed potatoes.

Carefully crack open the half-boiled eggs and use a small spoon to loosen the egg whites from the shells. Pour each egg into a small bowl.

To assemble, scoop some mashed potatoes in a mound onto each piece of toast, then use your spoon to shape them into a nest that can contain the egg. Gently pour an egg into each nest. Season to your liking with furikake and togarashi seasonings. Top the eggs with chopped chives. Pile the rest of the green garnishes in the middle and finish with pomegranate seeds.

Toasts From My Childhood

For National Toast Day, I want to talk about some toasts from my childhood. But first, here’s my reimagining of those childhood flavors as an adult.

childhoodtoasts.JPG

As a kid, these probably would have all been on pre-sliced white bread. I don’t think my mom would have even gone for the Wonder Bread name brand; we probably got the generic supermarket brand white bread. But for this dressed-up adult version, and because I worked damn hard in life and now I can, I went for one of the most luxurious (but still square-shaped) breads available at my local vegetarian grocery co-op: the Josey Baker Bread Adventure Bread. Here’s what you’re looking at (clockwise from top-left):

Whipped buttercream and brown sugar. Inspired by my memories of having toast slathered with margarine (from the plastic tub) and a scoop of sugar sprinkled over. I don’t know why my mom thought this was a legitimate thing to serve a child, but in fairness I never had any energy and was scared of playing outside, so sugar intake was not an issue.

Creamy peanut butter and apricot preserves. Because yes, even as an Asian kid, I had peanut butter and jam. I never liked grape jelly.

Condensed milk. I think everyone knows about condensed milk toast now. I made my own condensed milk for this because I didn’t want to open up a whole can just to smear a little bit on a tiny piece of bread for a photo. (So I made a whole jar of it by laboriously stirring for 45 minutes over the stove instead? Adult Lily logic.)

Pandan kaya jam. Yes, I’ve been having this ever since I was a child even though you may have just learned about it from seeing someone post about it on Instagram. This is really what I wanted to talk about.

Kaya toast is having a moment right now here in San Francisco. Thanks to the popularity of Bread Belly’s version, with a bright green pandan kaya piped diagonally across the surface of the bread, kaya toast is showing up on my Instagram feed more often that the ubiquitous avocado toast these days. I haven’t made my way across town to try it just yet, but they seem to be a great little local business and I am happy for their success over presenting Asian-inspired flavors in high-quality baked goods. Seeing kaya toast blow up this way is a little weird for me, though. You see, Bread Belly did not invent kaya toast, nor do they make any claims that they did, and I have been eating kaya toast since I was a little kid. It’s a flavor I associate with visiting my family in Malaysia, when—even though I wasn’t considered a picky eater as a kid—my aunties were kind enough to give me toast and cereal for breakfast because they knew I wasn’t used to having curry or nasi lemak in the mornings. I associate it with avoiding eye contact with tiny lizards on the walls and the rotting-fruit smell of ripe durian caught in the humid air as I made my way down the stairs in their homes. I do not associate it with eating for the ‘Gram.

This must be what it was like for Japanese people when all of a sudden everyone started losing their shit over ramen that didn’t come out of a styrofoam cup or for Danish folks when everyone suddenly realized that putting stuff on bread looks more aesthetic when served open-faced. I’m excited that a food so Malaysian/Singaporean in origin is rising in popularity but part of me feels strangely worried that almost none of the people flocking to it know where it came from. Do they know that you can get a jar of kaya (a jam made of coconut milk, sugar, and eggs—pandan optional) from the Southeast Asian section of the Asian supermarket for less than $4? Because that’s the kaya I’m familiar with: not the nice, handcrafted, vibrant looking stuff that makes toast pretty, but rather the fresh-from-the-jar gooey stuff, as everyday as the processed peanut butter I used in this photo. Should I care about whether or not people know this?

I never bought it before in the States because I wanted to preserve that specialness that I associated between visiting Malaysia and the flavor of kaya but now I’ve gone and purchased it for $3.19 at Pacific Supermarket right here in San Francisco for purposes of this photo and the story I wanted to tell with it. I wanted to do my part to share with people where kaya came from and try to describe how weird it is to suddenly see everyone getting excited about it. I’ve always loved it and it’s always been exciting to me. I’m glad you like it, too.