Recipe: Crunchy Spring Salad with Sesame Vinaigrette

Lily_March2_Social.JPG

I partnered with Bibigo USA to develop a spring salad recipe that is both pretty and fun to eat. Bibigo Chicken & Vegetable Mini Wontons are an exciting alternative to salad croutons, with the benefit of added protein. Also, aren’t they freakin’ cute? Here, they are combined with spring peas and other crunchy veggies that hold up well against the heat from the wontons.

As someone who has unintentionally invested a lot of time already into developing good kitchen instincts, salad recipes always seemed a little silly to me. There is no wrong way to make a salad as long as you are making one that suits your personal tastes and, if you are eating salads for health, fulfills your goals. If you are like me and already comfortable with figuring such things out, I think salad recipes are much more for purposes of presentation instructions, serving as help and inspiration for how to dish out a salad in a way that puts the beauty of fresh produce in full display, perhaps in a way you wouldn’t have thought of on your own. Considering that when I was a little kid, I would love to go to salad buffet style restaurants and make my signature “salad” of peas, bacon bits, and a pool of ranch dressing, I would say I have come a long way on that front. I hope you think so, too.

Lily_March2_Banner.JPG

How to Make Crunchy Spring Salad with Sesame Vinaigrette

Ingredients For the dressing

4 tsp tahini
4 tsp apple cider vinegar
2 tsp honey
2 tbsp olive oil
salt to taste

Ingredients for the Salad

15–20 Bibigo Chicken & Vegetable Mini Wontons
1 cup snap peas
1 cup pea shoots
3 stalks celery, leaves included
2–3 radishes
1 zucchini
4–6 chives

Procedure

Prep the vegetables: Cut the snap peas in half, lengthwise. Separate the celery leaves from the stalks and set aside, then finely slice the celery stalks at an angle. Using a vegetable peeler, shave zucchini into thin ribbons. Finely slice the radishes (I used a mandoline for this). Divide cut vegetables, celery leaves, and pea shoots into two bowls. Finely chop the chives and set aside.

Pan-fry Bibigo Chicken & Vegetable Mini Wontons according to package directions.

Whisk together dressing ingredients.

Top the vegetables with heated wontons and chives. Serve with dressing on the side.

Thank you so much to Bibigo USA for sponsoring this recipe! For more recipe ideas and to learn more about their products, visit their website!

Recipe: Cauliflower Stir-Fry with Pickled Carrot Ribbons

Lily_Feb_Social_v2.JPG

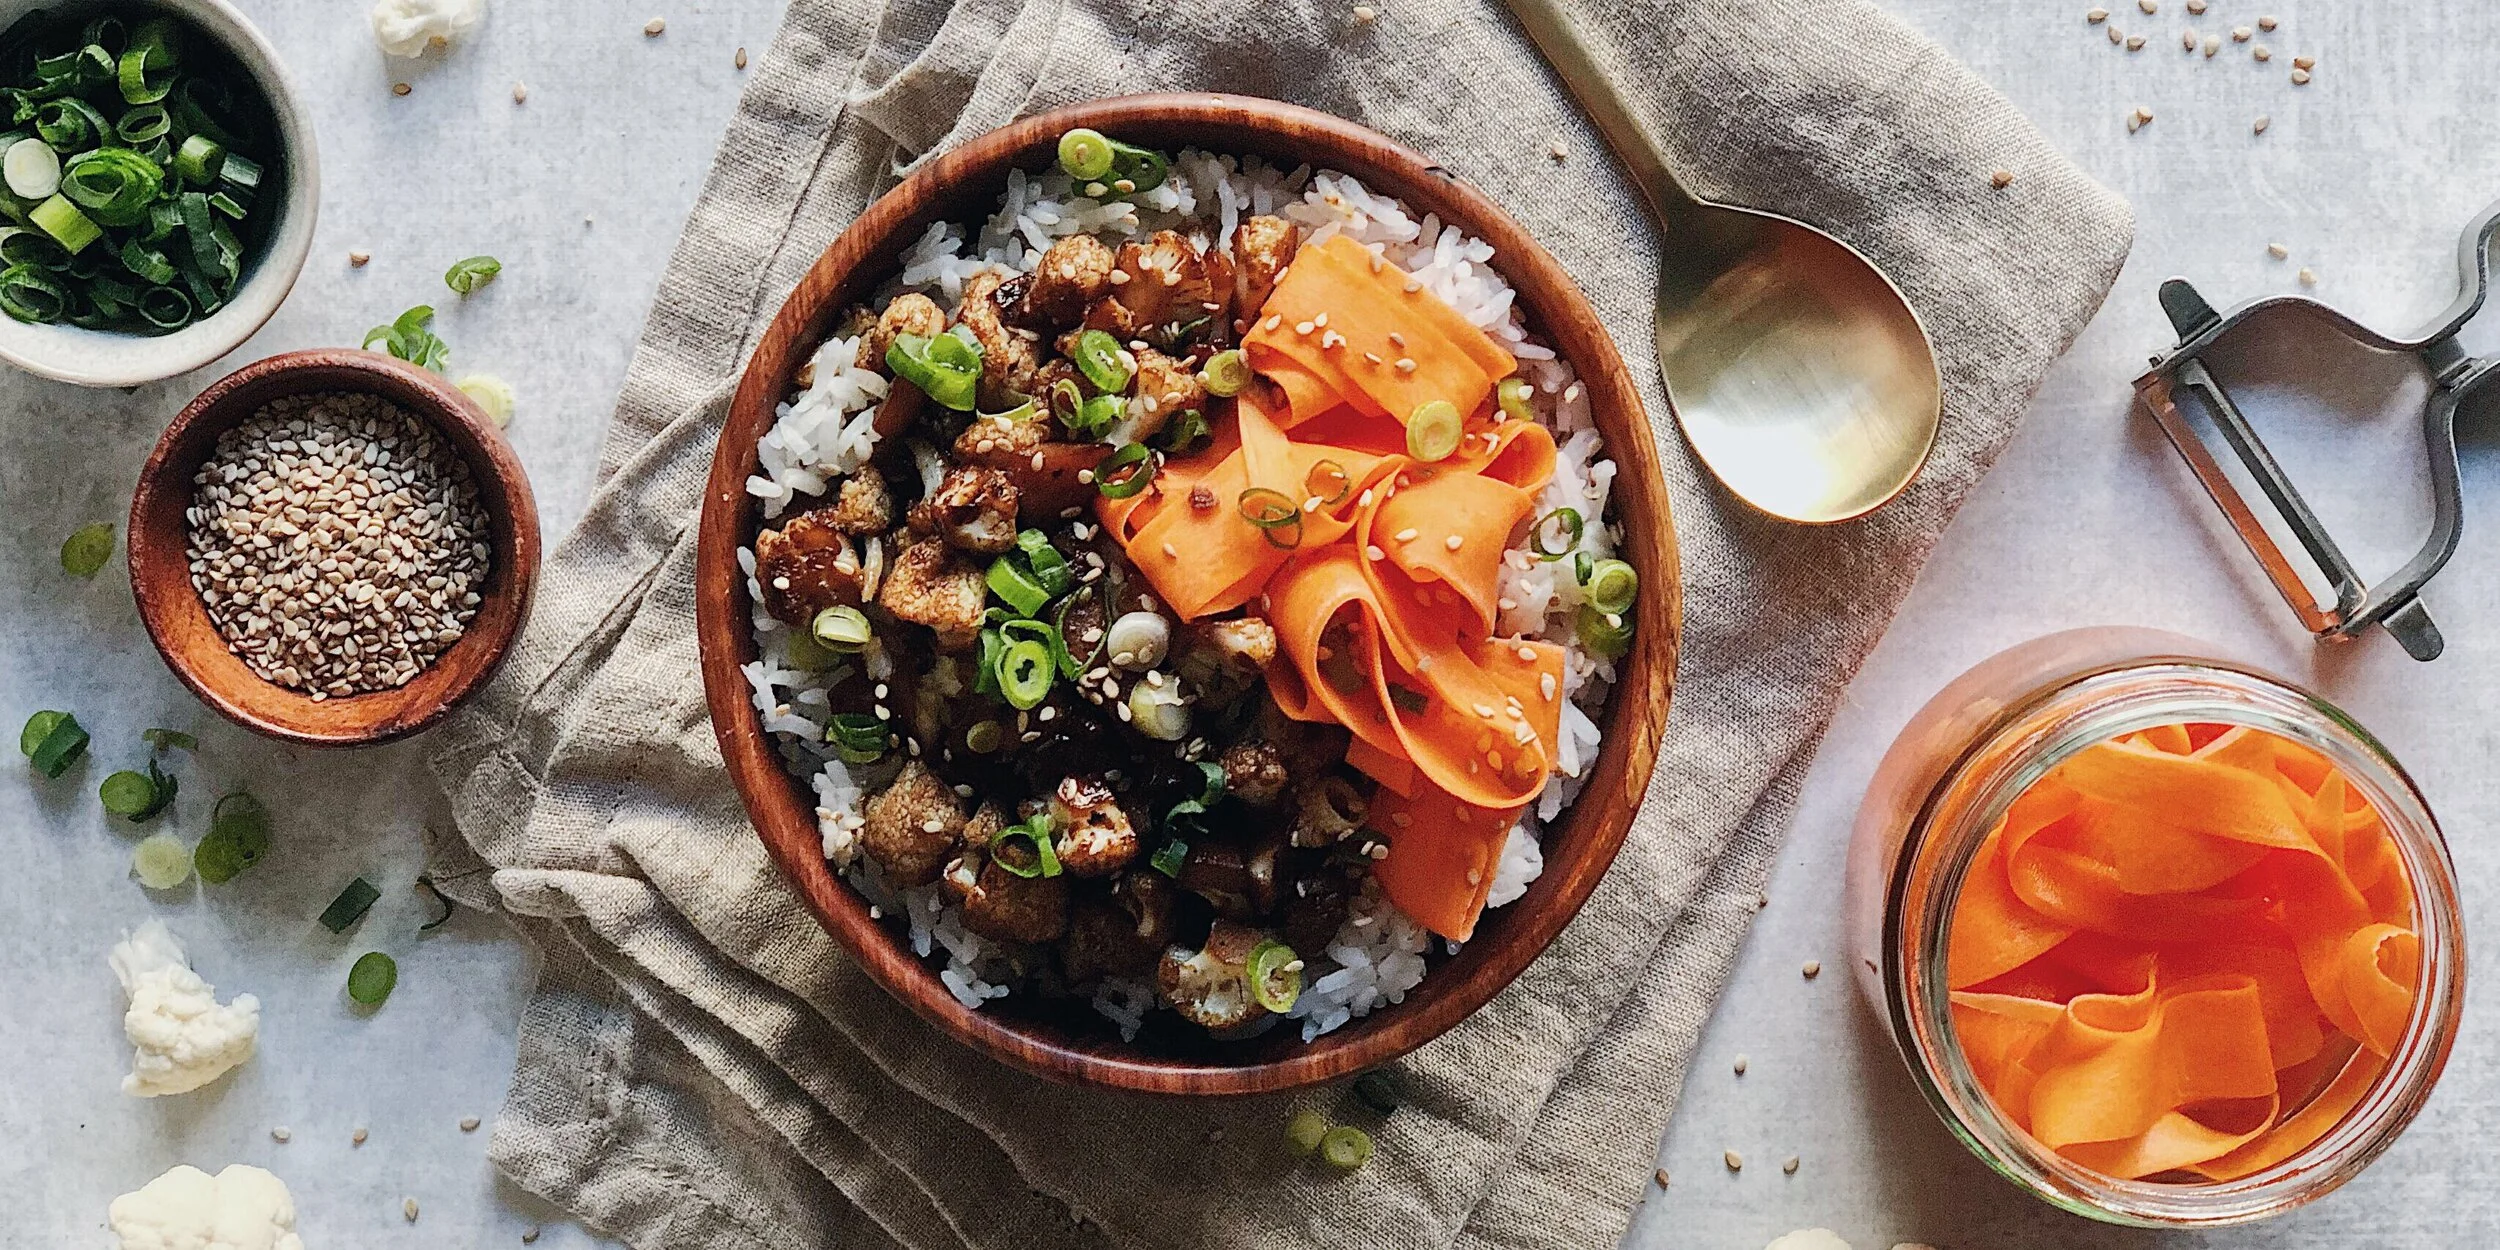
I partnered with Bibigo USA to create an easy, no-brainer recipe using their Bibigo Original Korean BBQ Sauce—a super convenient marinade for that bulgogi flavor that I love. The sauce is delicious as a meat marinade, but in this quick recipe, I combined it with cauliflower, which acts as an immediate flavor sponge without any marinating time.

86A555AC-0BD6-408F-8446-9E06423830D8.JPG
9CFCF496-6095-4A84-8242-95CE8432B444.JPG

Almost everyone owns a vegetable peeler but doesn’t realize its versatility. Using this common kitchen gadget to shave a carrot into super thin “ribbons” means you can make a quick pickle to complement the tender stir-fried cauliflower. This recipe produces more than enough pickled carrot for 1 serving; store the rest in a jar in the fridge and enjoy it over the next couple days!

Lily_Feb_Banner.JPG

How to Make Cauliflower Stir-Fry with Pickled Carrot Ribbons

Ingredients For the Stir-Fry:

6–7 medium cauliflower florets, stems included
3 tbsp Bibigo Original Korean BBQ Sauce
1 tbsp coconut oil (or peanut/vegetable oil)
1/2 cup water

Ingredients for the Pickle

1 carrot
4 tsp sugar
1/4 cup rice vinegar 
1/4 cup hot water
salt

For Serving

1 cup cooked rice
scallions, finely sliced
sesame seeds

Procedure

Prepare quick-pickled carrot ribbons. Using a vegetable peeler, remove rough outer skin of carrot and discard. Continue using the vegetable peeler to shave thin “ribbons” of carrot. Rotate as necessary until reaching the core of the carrot. (Feel free to snack on the carrot core!)

In a small bowl, combine 1/4 cup hot water (does not need to be boiling; hot tap water is fine) and sugar; mix until sugar is dissolved. Mix in rice vinegar and a pinch of salt. Add carrot ribbons and allow to marinade while you prep the rest of the dish, tossing occasionally to make sure the pickling liquid coats the carrot.

Chop cauliflower florets into small pieces, about 1/4-inch to 1/2-inch in size.

Heat up a wok (or non-stick skillet) on high. When the wok is very hot, carefully swirl in oil, then add chopped cauliflower. Stir-fry constantly for 2 minutes until the edges char slightly. Add Bibigo Original Korean BBQ Sauce and stir thoroughly to combine. Lower heat to medium and add 1/2 cup water; continue stirring until water is evaporated and cauliflower is slightly tender. 

To serve, scoop cauliflower over cooked rice and add some carrot ribbons. Sprinkle scallions and sesame seeds for garnish.

Thank you so much to Bibigo USA for sponsoring this recipe! For more recipe ideas and to learn more about their products, visit their website!

Recipe: Everything Focaccia in a Cast Iron Skillet

everythingfocaccia.JPG

For those inexperienced with breadmaking, like myself, focaccia is a great place to start. And if you haven’t experienced the joy of eating homemade bread fresh from the oven, you most definitely should. I’m looking forward to making this again with all kinds of toppings (especially when it’s tomato season) but for now, the “Everything but the Bagel” seasoning from Trader Joe’s is a pretty great choice.

I was having a lazy Sunday over the weekend and decided I may as well use my being at home to make something that required a little bit of time. My husband was downloading something on our PS4—which gives off some heat when it’s on—and that is when I had the brilliant idea to use our media cabinet to proof the dough. So if you’ve got a place where you store your gaming consoles and electronics, put your dough in it to proof, and you’ll also have something to do while you wait!

A terrible photo of my brilliant proofing setup

A terrible photo of my brilliant proofing setup

This recipe was adapted from Gimme Some Oven.

18FA2A78-C9FB-425B-BEE1-E16FECD55A2A.JPG

How to Make Everything Focaccia in a Cast Iron Skillet

Ingredients

2/3 cup warm water*
1 tsp honey
1 tsp instant yeast
1 3/4 cups + 1 tbsp all purpose flour
lots of olive oil
1 sprig fresh rosemary, leaves picked
1–2 tsp “everything but the bagel” seasoning
pinch of salt

* I have found that hot water from my tap works well for blooming yeast.

Procedure

In the bowl of your stand mixer, gently combine water, honey, and yeast. Allow the yeast to “bloom” for 5–10 minutes in a warm place until there is a fine foam on top.

Fit your stand mixer with the dough hook. Set the mixer to low speed and gradually add 1 3/4 cups flour, then 1/8 cup olive oil and salt. Turn up the speed of the mixer to medium-low and allow the dough to be kneaded for 4 minutes. If the dough has not pulled away from the sides of the bowl, add an additional 1 tablespoon of flour. Continue to knead for 1–2 minutes. Dough should be sticky but you should be able to easily remove it from the dough hook.

Generously coat the inside of medium mixing bowl with olive oil. Pull the dough off the hook and form a ball. Roll the ball of dough around in the olive oil until coated. Cover with a damp towel and place in a warm spot to proof for 45–60 minutes, until it has doubled in size.

Coat the inside of a 10-inch cast iron skillet with olive oil. Turn the risen dough into the skillet and use your fingers to gently press down on the dough, forming an even layer in the bottom of the skillet. Cover with the damp towel again, and continue to proof the dough for 20 more minutes.

Meanwhile, place a rack one-third from the top of your oven and preheat to 400°F.

Use your finger or a chopstick to poke lots of holes in the dough—they should go all the way down through the dough. Drizzle a generous amount of olive oil all over the surface. Sprinkle with seasoning and rosemary leaves. Bake for 20 minutes, or until golden. Slice and eat it as soon as you dare to touch it without burning your fingers.

Recipe: Easy Cheese Hash Browns

breakfastramen

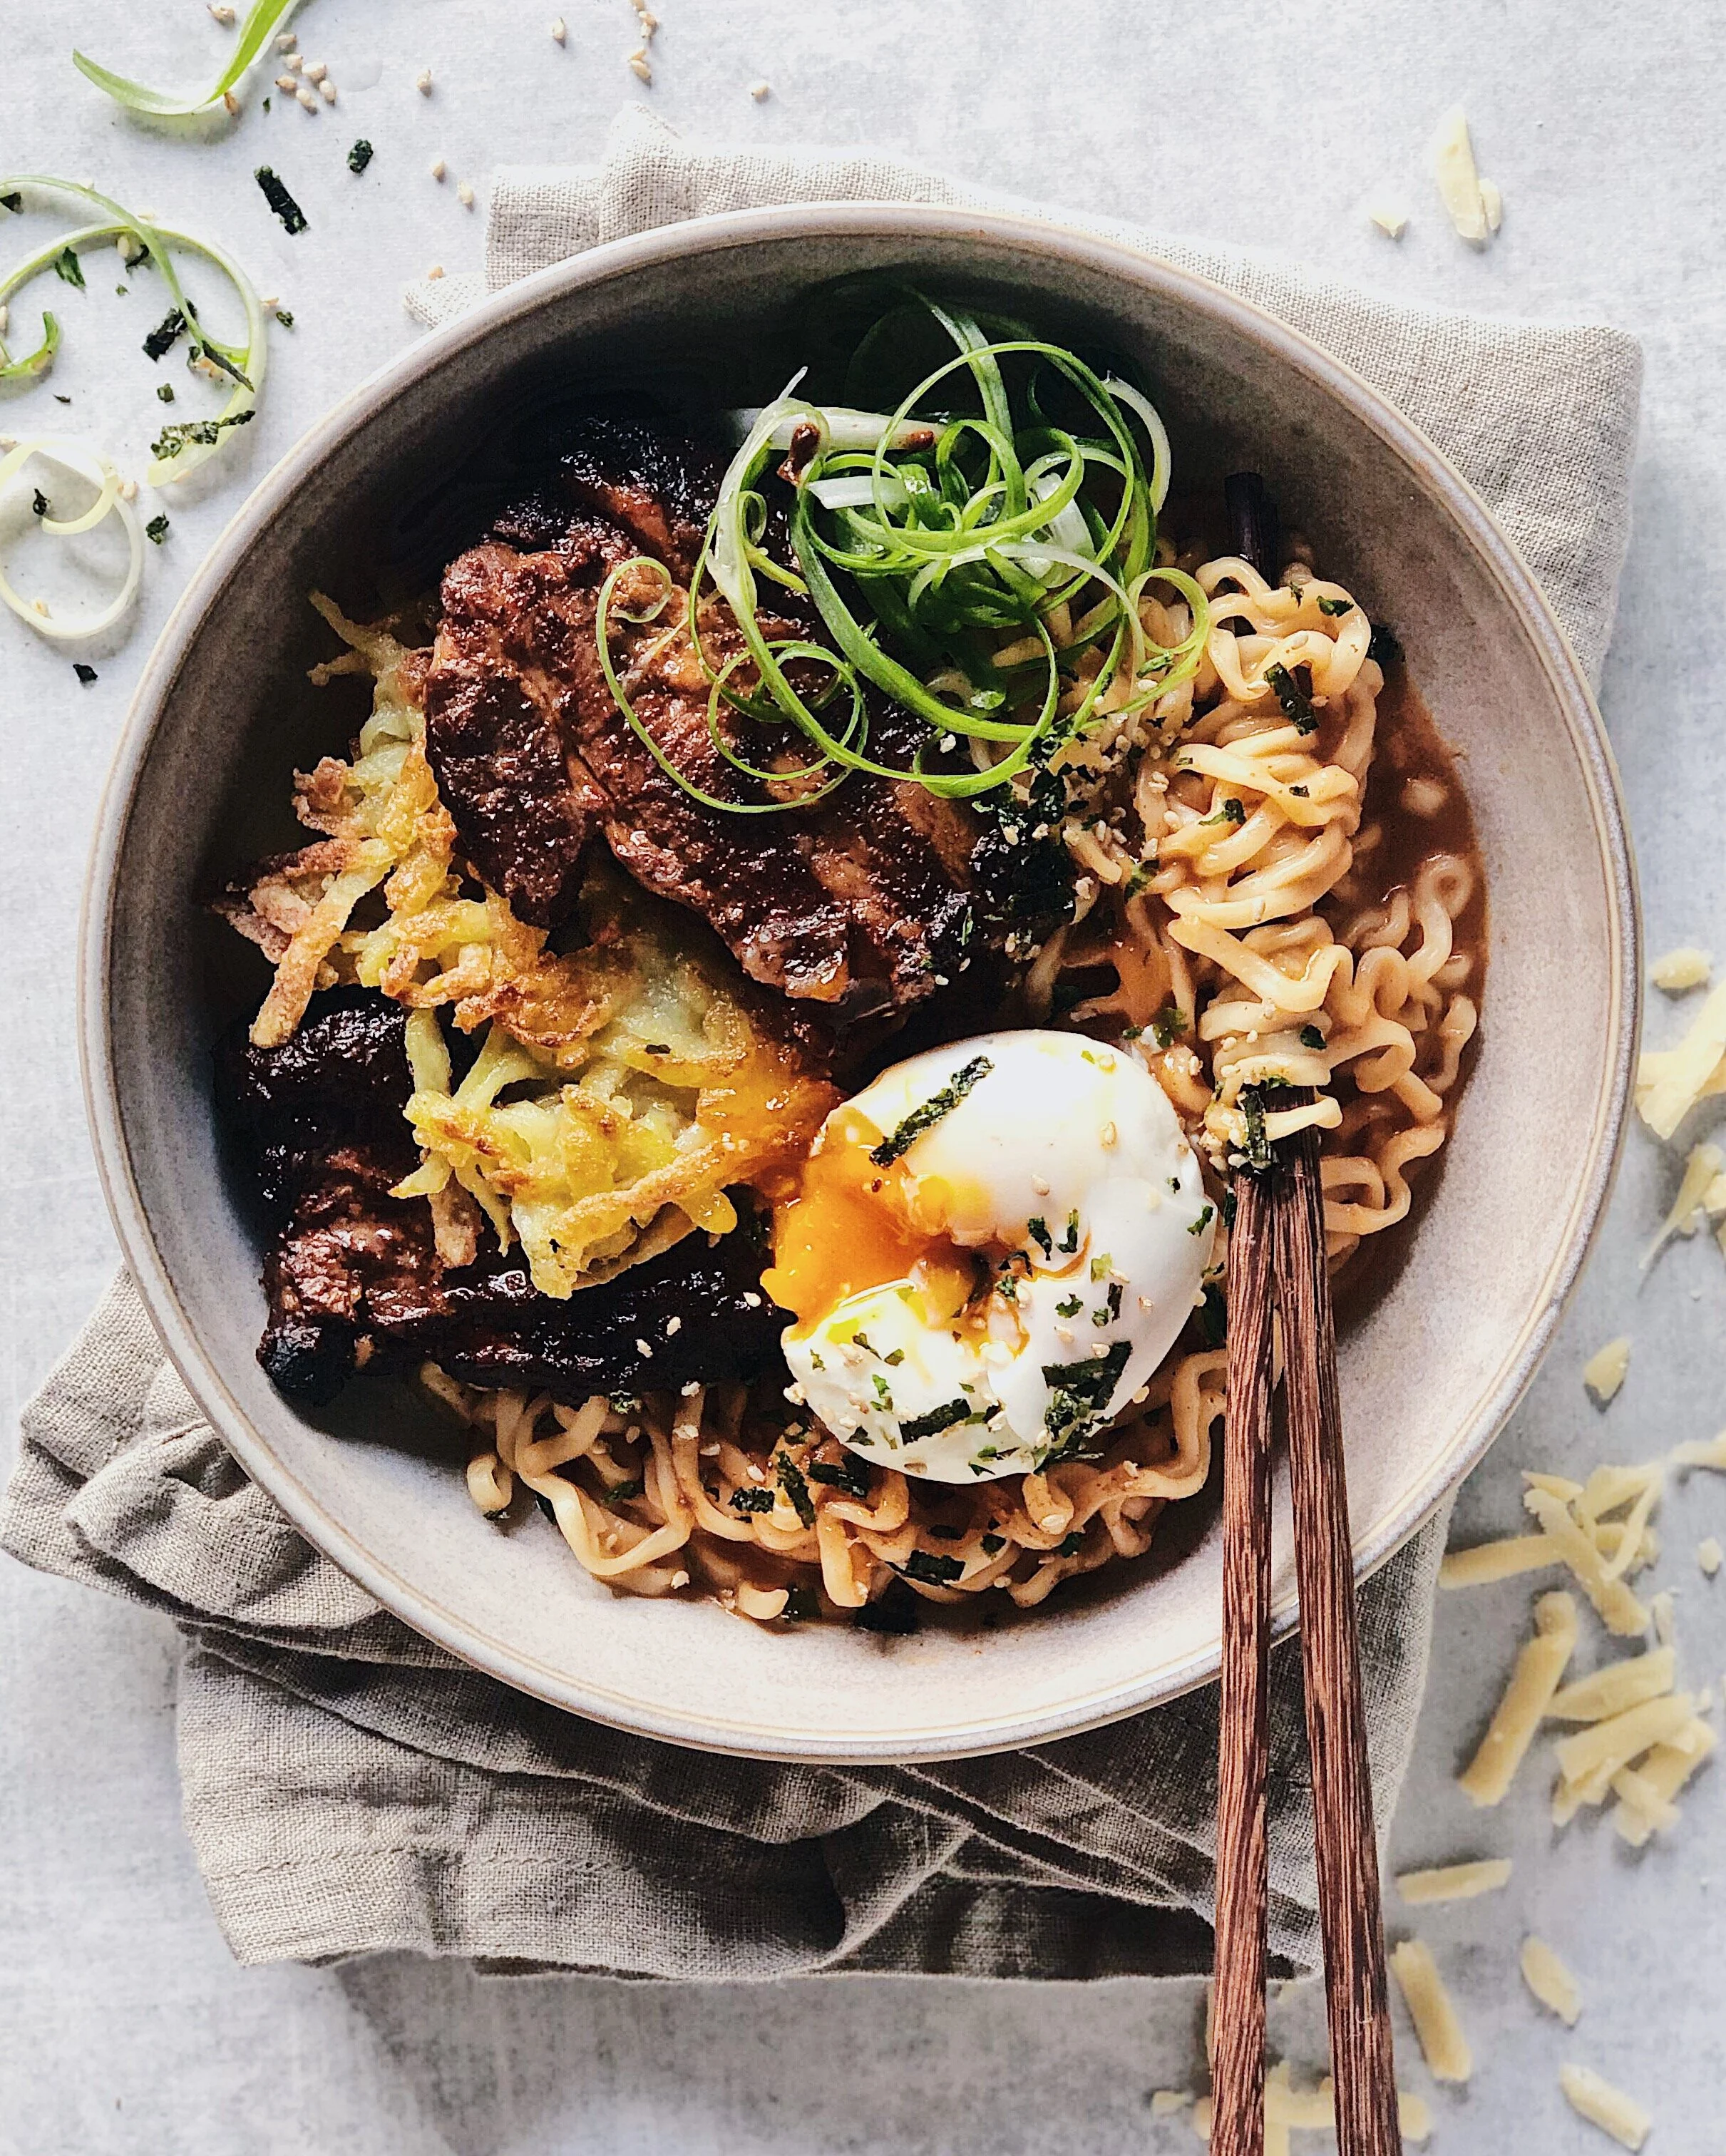
The earliest job that I can remember my dad having when I was a really young child was managing the finances at a company that distributed frozen potato products. In hindsight, we did not get nearly enough free potato goodness to show for it; perhaps my parents never took advantage because making fried potato things was fairly unfamiliar to them at that time, having not lived in the States for all that long. Anyway, I am not sure if it’s because of this, but I have spent most of my life thinking that it was impossible to make hash browns at home. Despite being very experienced with cooking potatoes in a vast array of formats at this point, I always envisioned has browns as something that had to come frozen from the store. Until one day I was experimenting with making a breakfast-y ramen, and looking around the kitchen to see what I could add to build upon the breakfast theme. I had a potato that was sort of past its prime and thought, what have I got to lose? Here’s what I did.

How to Make Cheese Hash Browns

Ingredients

1 small yukon potato, refrigerated
1/4 cup cheddar, grated
potato or corn starch
oil for frying

Procedure

Grate the potato with a box grater, then toss with potato starch until very lightly coated. Combine with grated cheese.

Heat some oil in a non-stick skillet. Add a thin layer of the potato/cheese mixture in, forming the shape/size you want. Pan-fry on both sides until golden.⁣

Enjoy your hash browns however you like. To make the breakfast ramen shown here: Prepare 1 package of SamYang Hot Chicken Flavor Ramen according to the instructions, then toss noodles and sauce with grated cheese until melted. Top with slices of your pork configuration of choice (this is leftover Taiwanese-style braised pork belly, but char siu, Spam, or bacon would be great), hash brown, egg, scallions, and furikake.

Easy Chili Oil Noodles

Welcome to the first installment of a series I am going to call “Awkwardly Vague Recipes by Lily Morello”. Most of the time, I don’t measure when I am just cooking for myself/my household, so when anyone asks me how I made something, this generally sums up the nature of my trying to recall and explain what I did after the fact. Except now people actually want to recreate the dishes that I share on my Instagram account, so I know I really need to get better at, at least, taking notes while I cook.

The problem is, some recipes are really not meant to be confined to a strict recipe. At least not with measurements and a specific order of operations, or any of those details. A lot of cooking involves seasoning and balancing flavors to taste—to match the preferences of the chef, or the eater. I may like things spicier or more sour than the next person, and I’m not going to be the one to dictate how much seasoning to put in a sauce for someone with different seasoning preferences than mine. In these cases, awkwardly vague is the only way to go.

I put together this recipe as a last minute idea for a Lunar New Year themed dish. I happened to have Hokkien-style noodles already open in my fridge, so that is what ended up in the dish. I grew up eating noodles at celebrations to promote longevity, and golden-colored things for prosperity, so I think these noodles fit perfectly in the Lunar New Year spirit.

This time, I took photos to help visualize all the unmeasured ingredients (please ignore the reflection of my camera mount). But seriously, feel free to add more or less depending on what you like!

How to Make Super Easy Chili Oil Noodles

Get a pot of water boiling. You can use this for your noodles, and any vegetables you feel like blanching to include in the dish.

Select a bowl from which you’d like to eat your noodles. You’ll be able to mix the sauce and eat out of the same bowl, so there’s fewer dishes to be done! To that bowl, add some black vinegar, a scoop of chili oil, some sesame oil, and a drizzle of kecap manis (Indonesian dark sweet soy sauce).
4BE49FC7-B5CB-43F4-AA86-C9E5FD8E3931.JPG
C5D5186A-C095-4295-971A-F1D2C2E7CCEB.JPG

Mix everything together to make your sauce.

Add your piping hot noodles to the bowl, and mix everything together. You can really use any noodles you like, as long as you know how to cook them to the texture you desire. You could even use pasta!

0A409228-AFC3-48CD-864F-275D5D6C340E.JPG

That’s honestly it. At this point, you could add blanched vegetables (I used broccoli rabe), or a poached egg, or whatever toppings and mix-ins you desire. Maybe add a flourish of chopped scallions or herbs, or a dash of sesame seeds for garnish if you are plating it for the ‘gram, but otherwise, there are really no rules. Just yummy, spicy, tangy, sweet noodles.

Recipe: Holiday Fuel Cookies

Because Double-Chocolate Cranberry Oatmeal Sea Salt Cookies Seemed like too much of a mouthful.

JUMP TO RECIPE >>

BE0D8883-91C3-4012-AAE5-C172B2BCA514.JPG

When I was in college, I had a notebook where I’d hand-copied recipes from my mom’s old cookbooks to bring with me and make away from home. We most definitely already had the internet and laptops back then, so I am not sure why I did this. But I still have the notebook and one of the recipes in it is a oatmeal raisin cookie recipe. I don’t think I’ve ever actually made it with raisins—because there’s nothing more disappointing in life than biting into what you think is an oatmeal chocolate chip cookie only to learn those chocolate chips are actually horrible raisins—and over the years the recipe has completely evolved according to my tastes. Over time, I’ve reduced the sugar, tried different mix-ins, and even experimented with different types of oatmeal—and I have always just maintained these recipe adjustments in my memory instead of writing them down.

Until now! I was so touched to be invited by @cosetteskitchen to participate in a Virtual Cookie Party on Instagram this Sunday. To be considered an active part of such a rich community of home cooks and food bloggers means so much to me as my own Instagram account (@lilybubbletea) has really become such an important place for me to show who I am as a food stylist and photographer, but also who I am in general. I thought Cosette’s idea of having a cookie potluck party no matter where we are really reminds how great Instagram can be as a community builder; check out the hashtag #virtualcookieparty2019 to see what others are bringing to the party.

I’m sharing my tried and true oatmeal cookie recipe but with a few mix-ins to turn these cookies into an indulgent snack that is easy and tempting to grab while feeling extra frantic during the holidays. Big gooey chocolate shards are the highlight for me, but there’s also cacao nibs for crunch, dried cranberries for a little tartness, sea salt for a tiny touch of savory balance, and oatmeal…for health?

424ECCC4-DEEC-4F0C-822B-8655C961F006.JPG

How to Make Double-Chocolate Cranberry Oatmeal Sea Salt Cookies

Ingredients for the Oatmeal Cookie Base

1/2 cup (1 stick) butter, softened but not melted
1/4 cup sugar
1/4 cup dark brown sugar
1 egg
1/2–1 tsp vanilla extract
1/2 tsp (or more!) ground cinnamon
1/4 tsp salt
1 cup all purpose flour
3/4 cup rolled oats
3/4 cup quick oats
1/4 tsp baking powder
1/2 tsp baking soda

Holiday Fuel Mix-ins

3/4 cup bittersweet chocolate
1/4 cup cacao nibs
1/2 cup dried cranberries
1-2 pinches flakey salt, for finishing

Procedure

Making chocolate shards: This is a totally optional step that requires some foresight but I think it gives baked goods a rustic, really gooey look. Melt the chocolate in a double-boiler and pour it all onto a parchment- or silicone-lined baking tray. Spread the chocolate into a thin layer and allow to fully set in the fridge or freezer, then cut or break into small shards. Alternatively, you could just use chocolate chips.

Preheat your oven to 375°F.

Cream together butter, sugars, egg, vanilla, and cinnamon in a large mixing bowl. In a separate bowl, whisk together all the dry ingredients.

Gradually incorporate the dry ingredients into the wet but try not to over mix. Then gently fold in the chocolate shards (or chocolate chips), cacao nibs, and dried cranberries.

Scoop dough into golf ball sized mounds, 2 inches apart, on ungreased cookie sheets. Top each with a little sprinkle of flakey salt. (Makes about 20 cookies)

Bake for 8-10 minutes, or until the bottom edges start to look golden brown. Allow the cookies to set for 2 minutes before removing and cooling on a rack.

2B8B6CCC-6569-4055-AFA4-4F90D226C76E.JPG

Here’s what other bloggers brought to our virtual cookie party:


Recipe: Chicken Parm Potstickers

LilyMorello_Lucini_12.JPG
LilyMorello_Lucini_15.JPG

Last year, after a very stressful event in my career, I treated myself to a solo trip to New York. It was on this trip that my perspective on dumplings changed. And now, I am going to change yours.

But first, a brief history of my interactions with dumplings: As a kid growing up Chinese-American, dumplings in my mind were of two extremes—either incredibly tedious for my mom to make at home on only very special occasions or incredibly tediously made in superhuman volumes at the dim sum restaurant but still only worth ordering if they were priced super cheap. When I was in college, I started venturing into making very plainly folded wontons for my then-person-I-was-seeing, now-spouse; my housemates remarked about how I must have cared very much for the person I was cooking for, to go through the trouble. Much more recently, I became determined to master pleating dumplings to look like the cute dumpling emoji; to my surprise I was able to pick it up very quickly and even teach my kitchen-inept spouse, so now homemade dumplings are totally nbd but I still like to take credit for producing a special, time-consuming meal every time I make them.

Throughout all this time, my focus was so much more on the way the dumplings looked and the act of folding them, than on the filling. Many a cheap Chinese takeout order had indicated to me that dumplings, especially potstickers, were always filled with a nondescript pork mixture, and thus this is what I emulated in mine at home. But then in New York, I encountered something that caused me to completely rethink my approach to dumplings: Chicken Parm Potstickers. With marinara dipping sauce. You know, like that classic Italian-American dish of breaded chicken slathered in tomato sauce and melted mozzarella cheese...but in adorable dumpling form! Somehow, in all that time of thinking about and pleating those dainty parcels of food, I never noticed how dumplings are the absolute perfect vessel for literally any flavor combination to be delivered in one- to two-bite packages to my mouth, and the mouths of my loved ones. Maybe right now you are thinking “duh!” or maybe you are having a revelation of your own. It doesn’t matter as long as you are now aware that you can put ANYTHING in a dumpling. 

And since then, I have. But when Lucini Italia asked me to share a recipe featuring their handcrafted, organic tomato sauces, I was excited for the chance to develop my own version of the chicken parm dumpling—a loving homage to the ones I had last year, but also better. This recipe is for chicken parm potstickers with crispy crunchy bottoms (reminiscent of the breaded chicken of its source), filled with the umami of two kinds of cheese, the herbaceousness of basil, and a garden-fresh tomato tang from Lucini Italia’s Tuscan artisan sauce. Lucini Italia’s Rustic Tomato Basil sauce is perfect for this because it’s not too sweet (there is no added sugar) and it has the perfect-sized tomato chunks. They work with only one organic farm in Tuscany that grows and harvests in small fields to ensure the right ripeness of all the tomatoes going in the jar and their cooked-once technique prevents them from getting overly processed or altered, so the texture feels very homemade and you’ll be able to include a little tomato in every dumpling bite.

LilyMorello_Lucini_01.JPG

There are some things I never make from scratch at home. Tomato sauce is one of them even though it’s something we go through a lot of at my house (because we love Italian food!). So, something that tastes gourmet but isn’t crazy expensive is always a great find. Another thing I never make from scratch is dumpling wrappers. (Ready-made ones can be found at Asian grocery stores and I have even seen them in large chain supermarkets.)

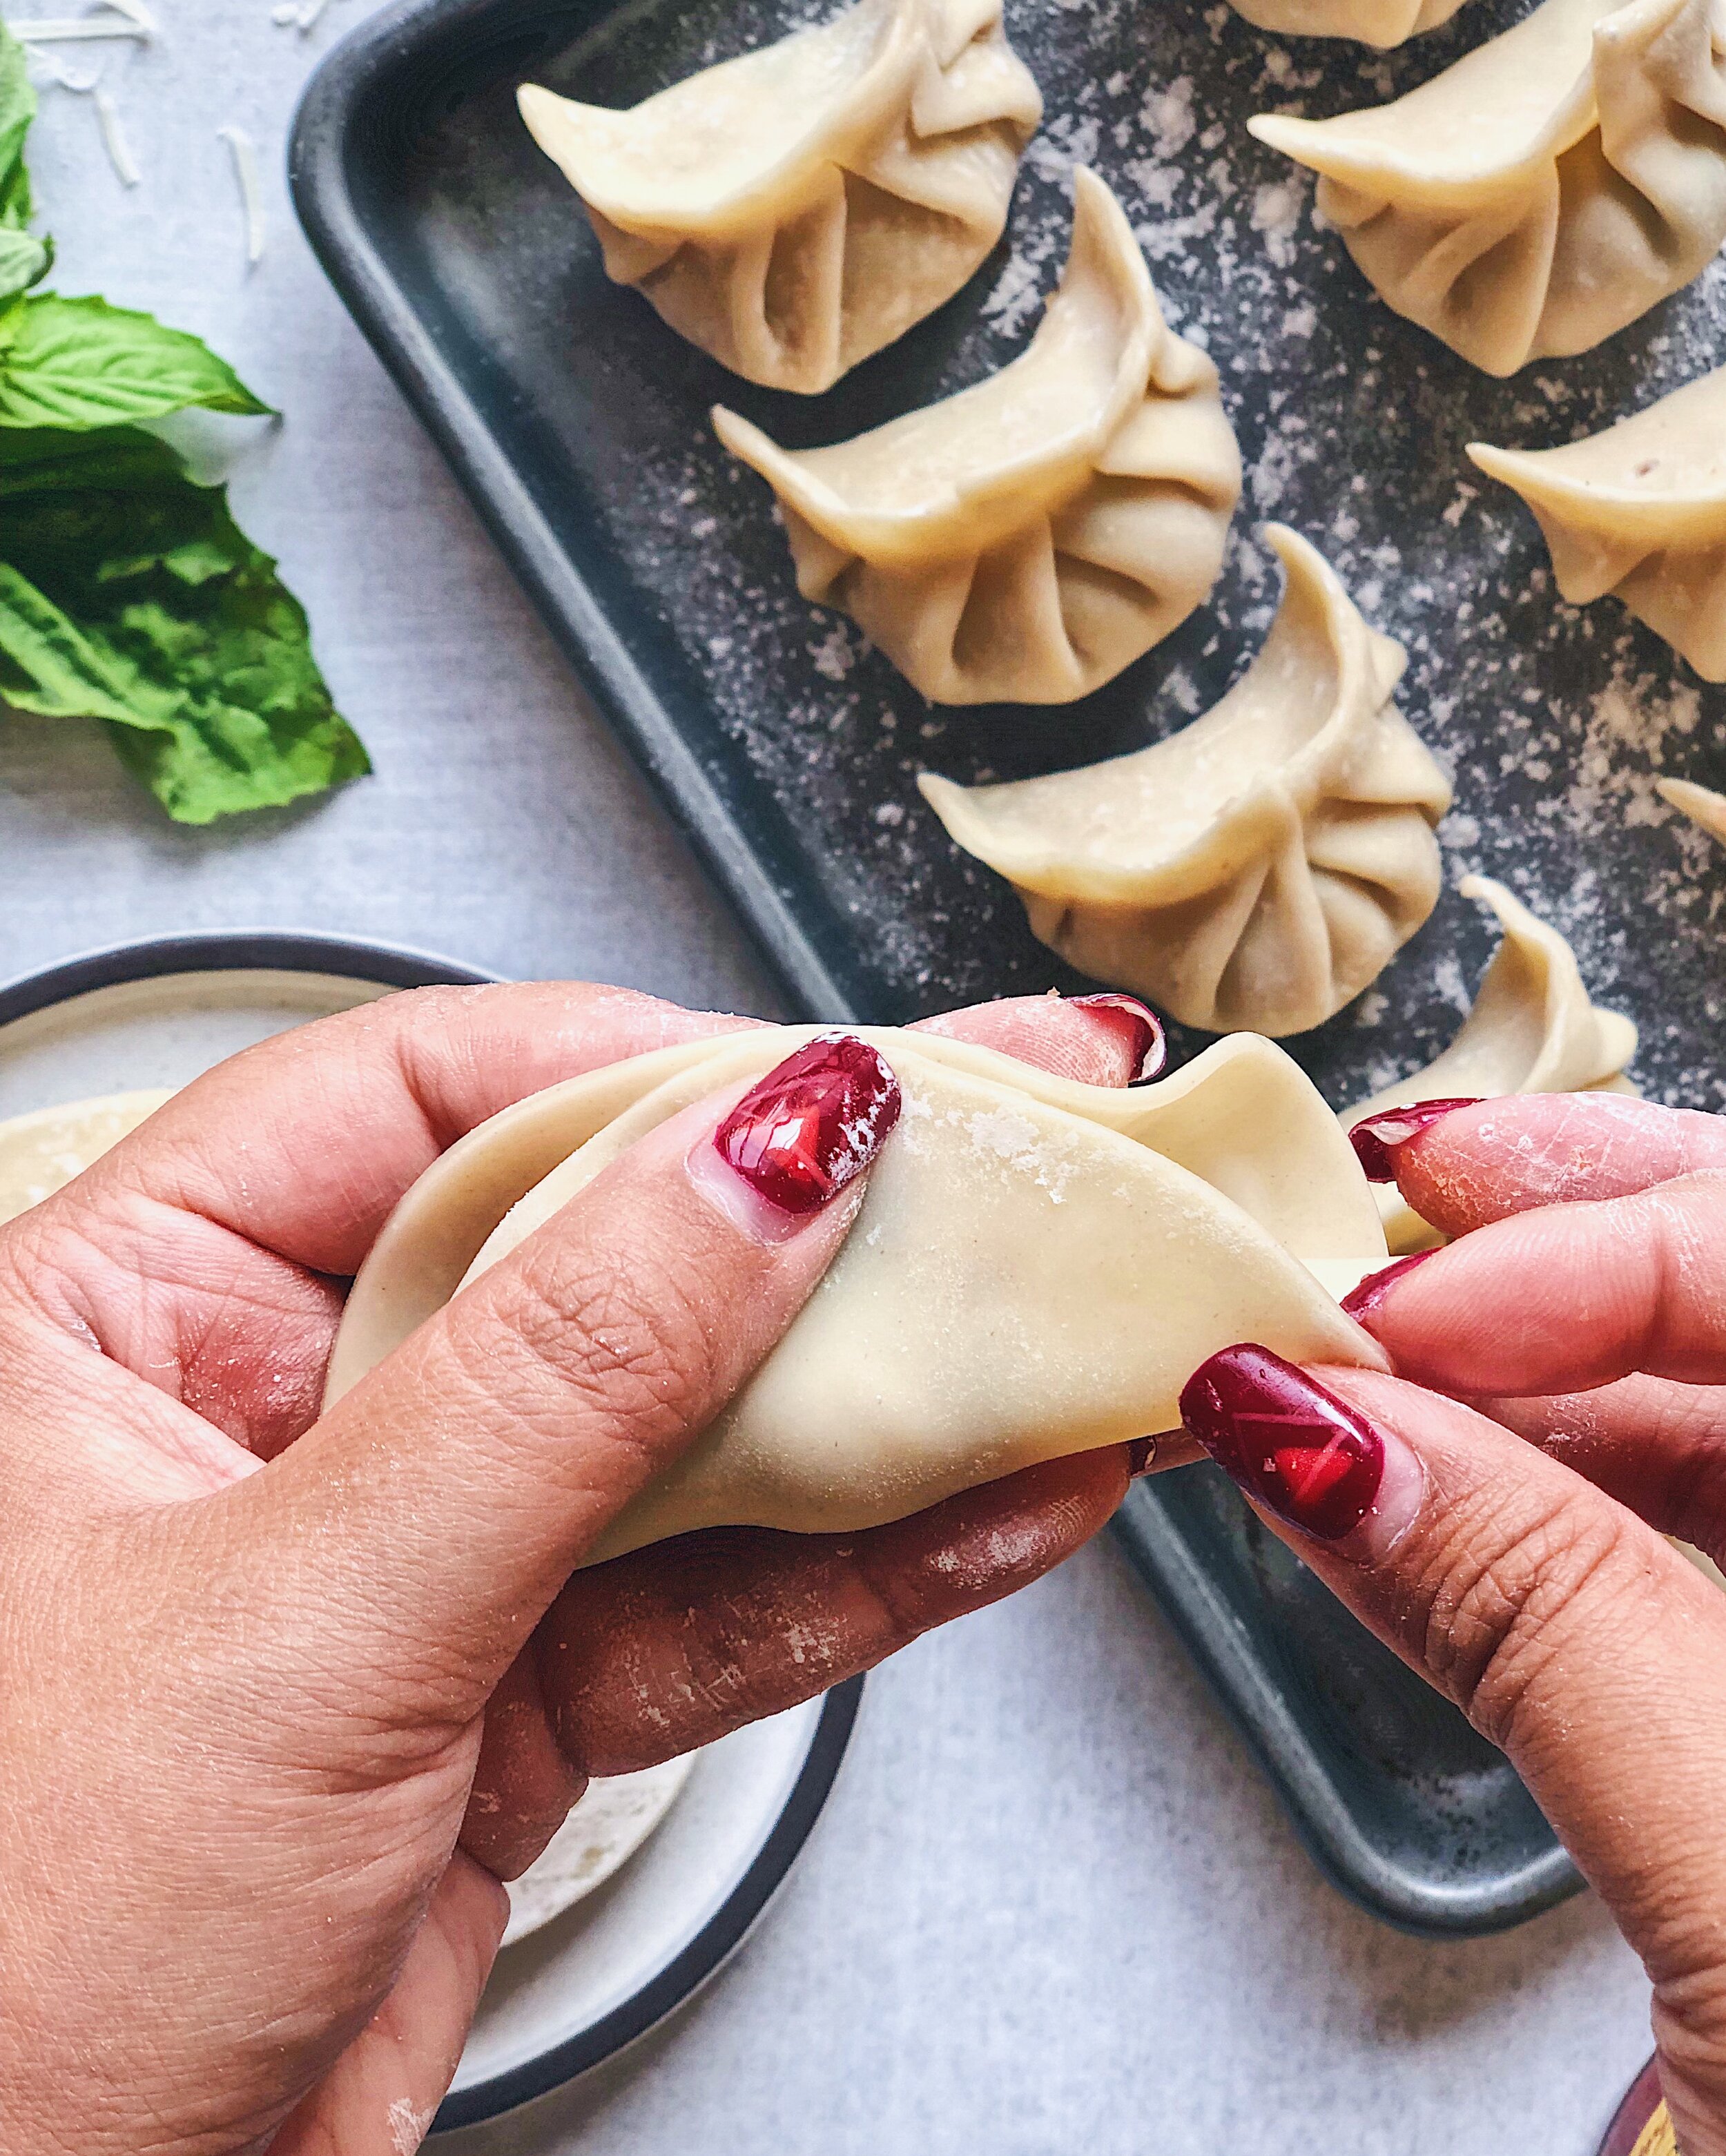
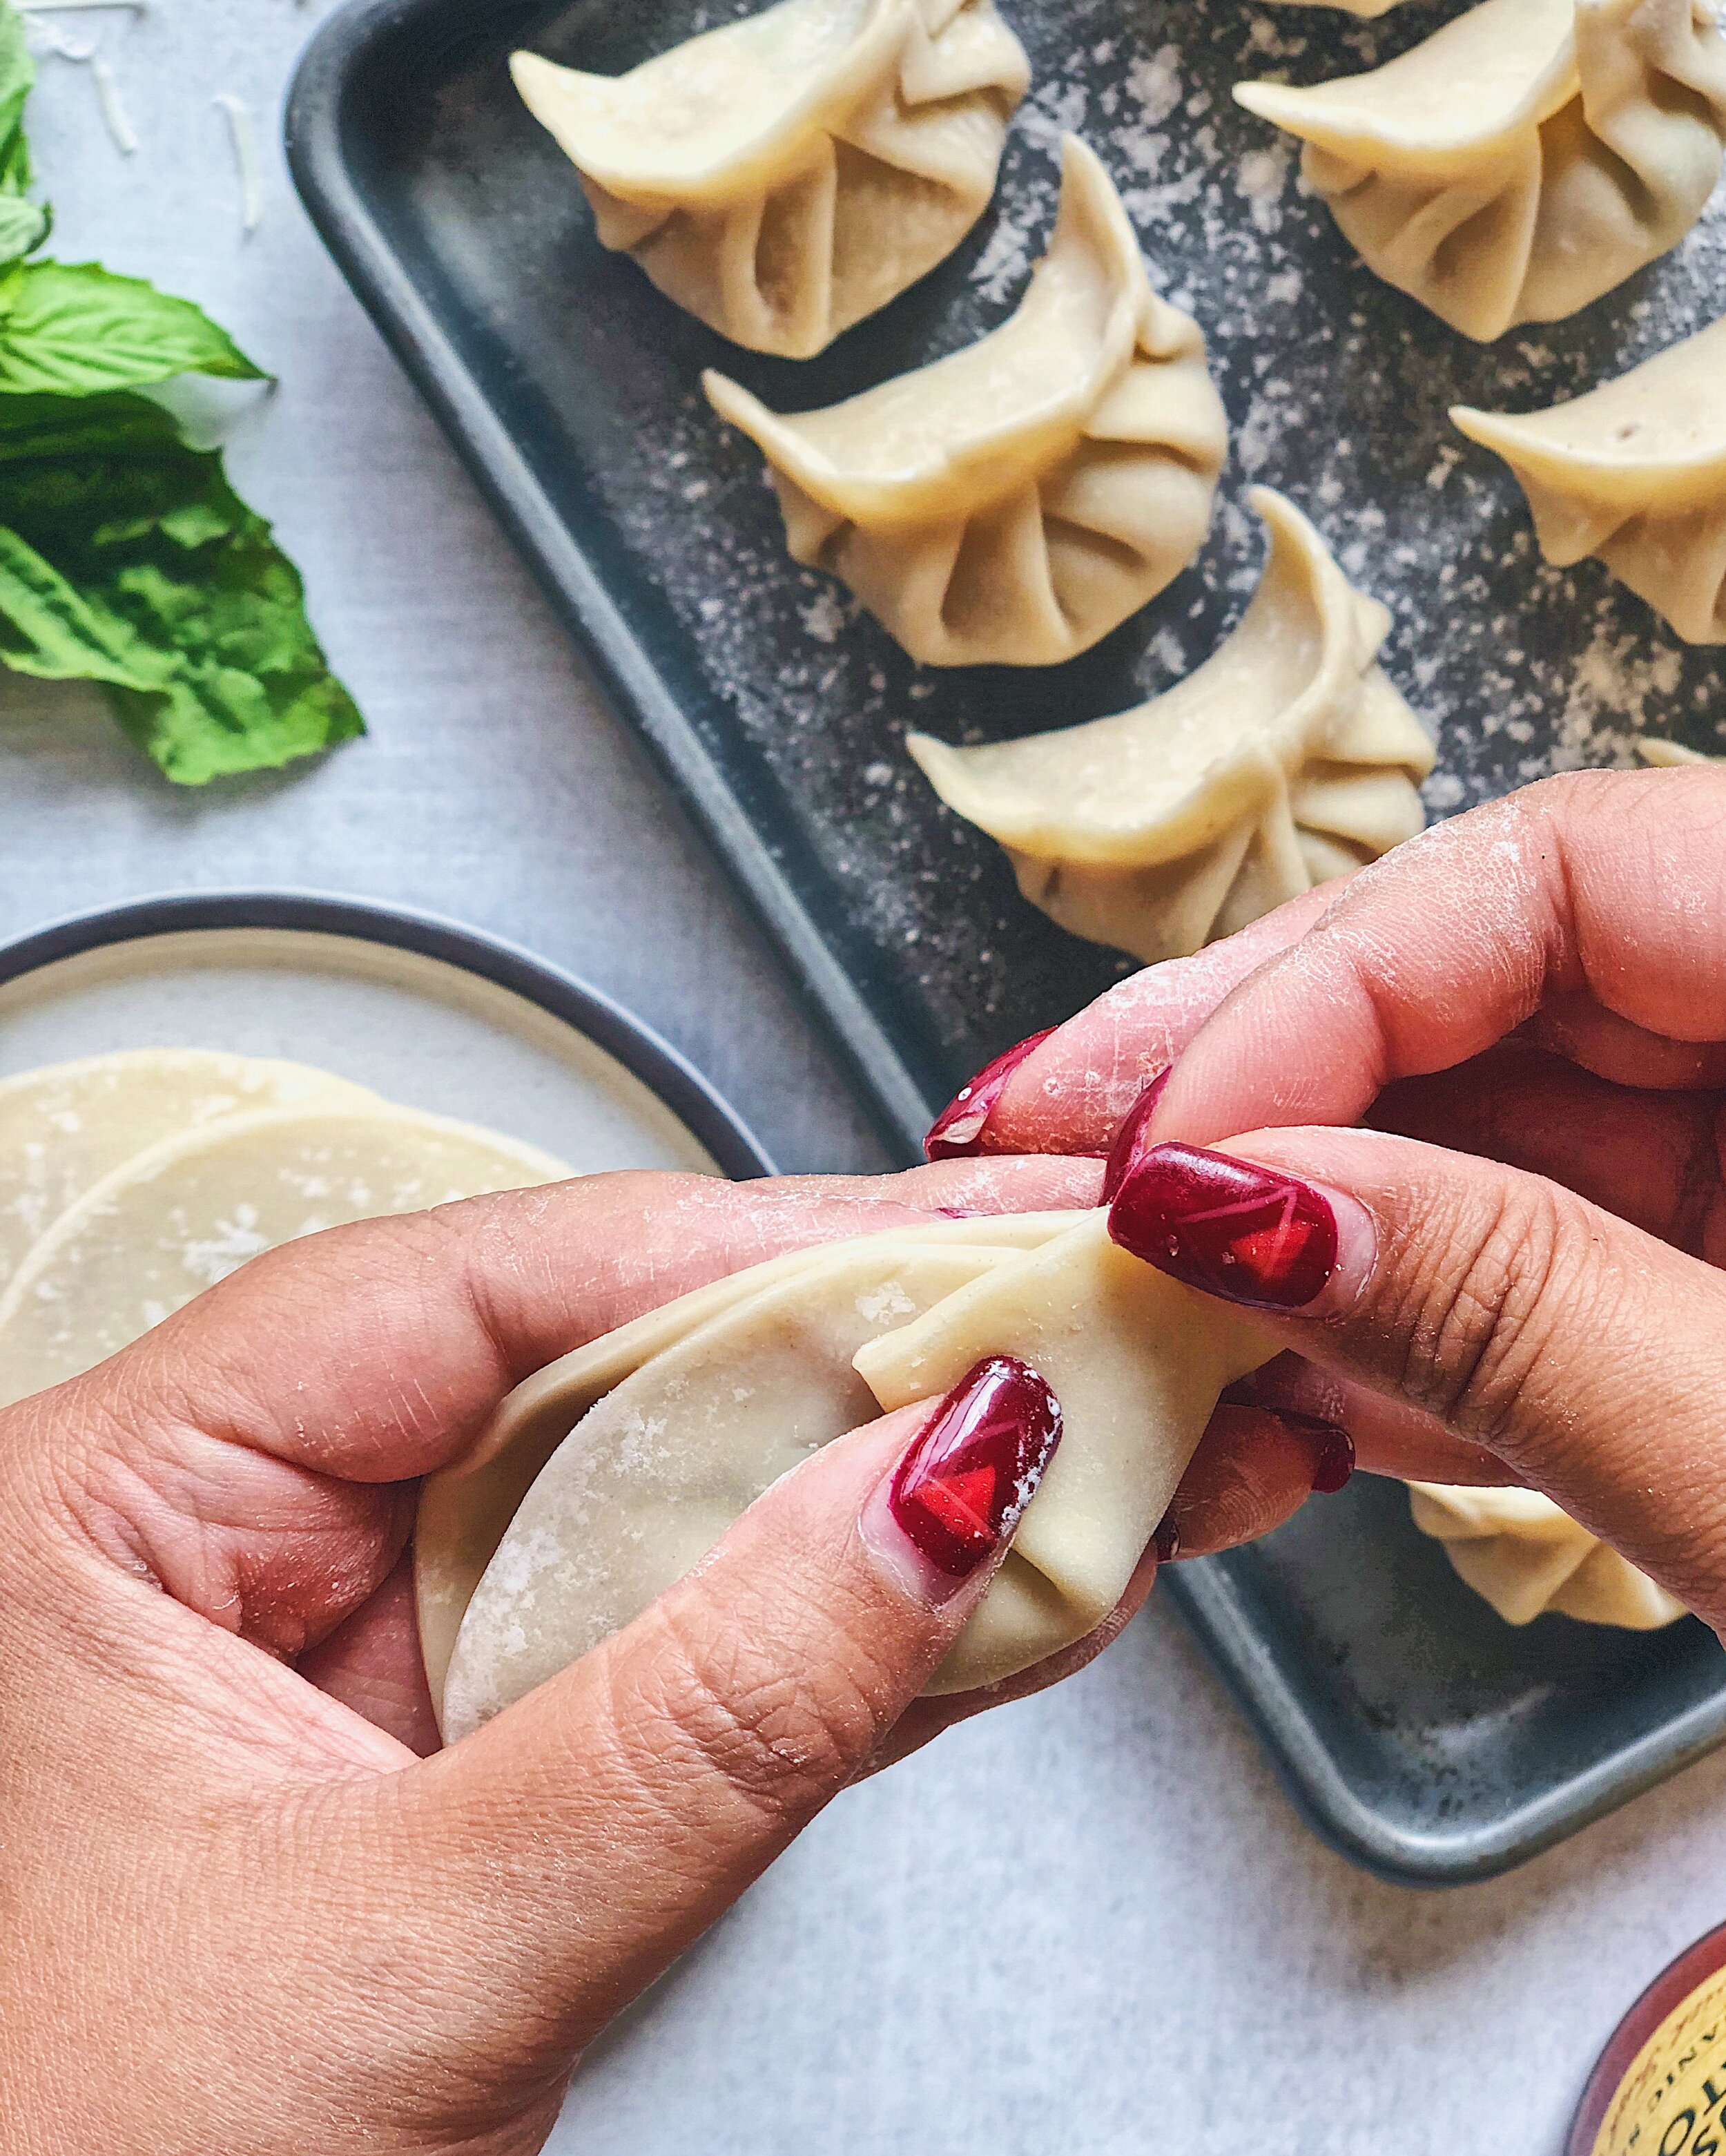
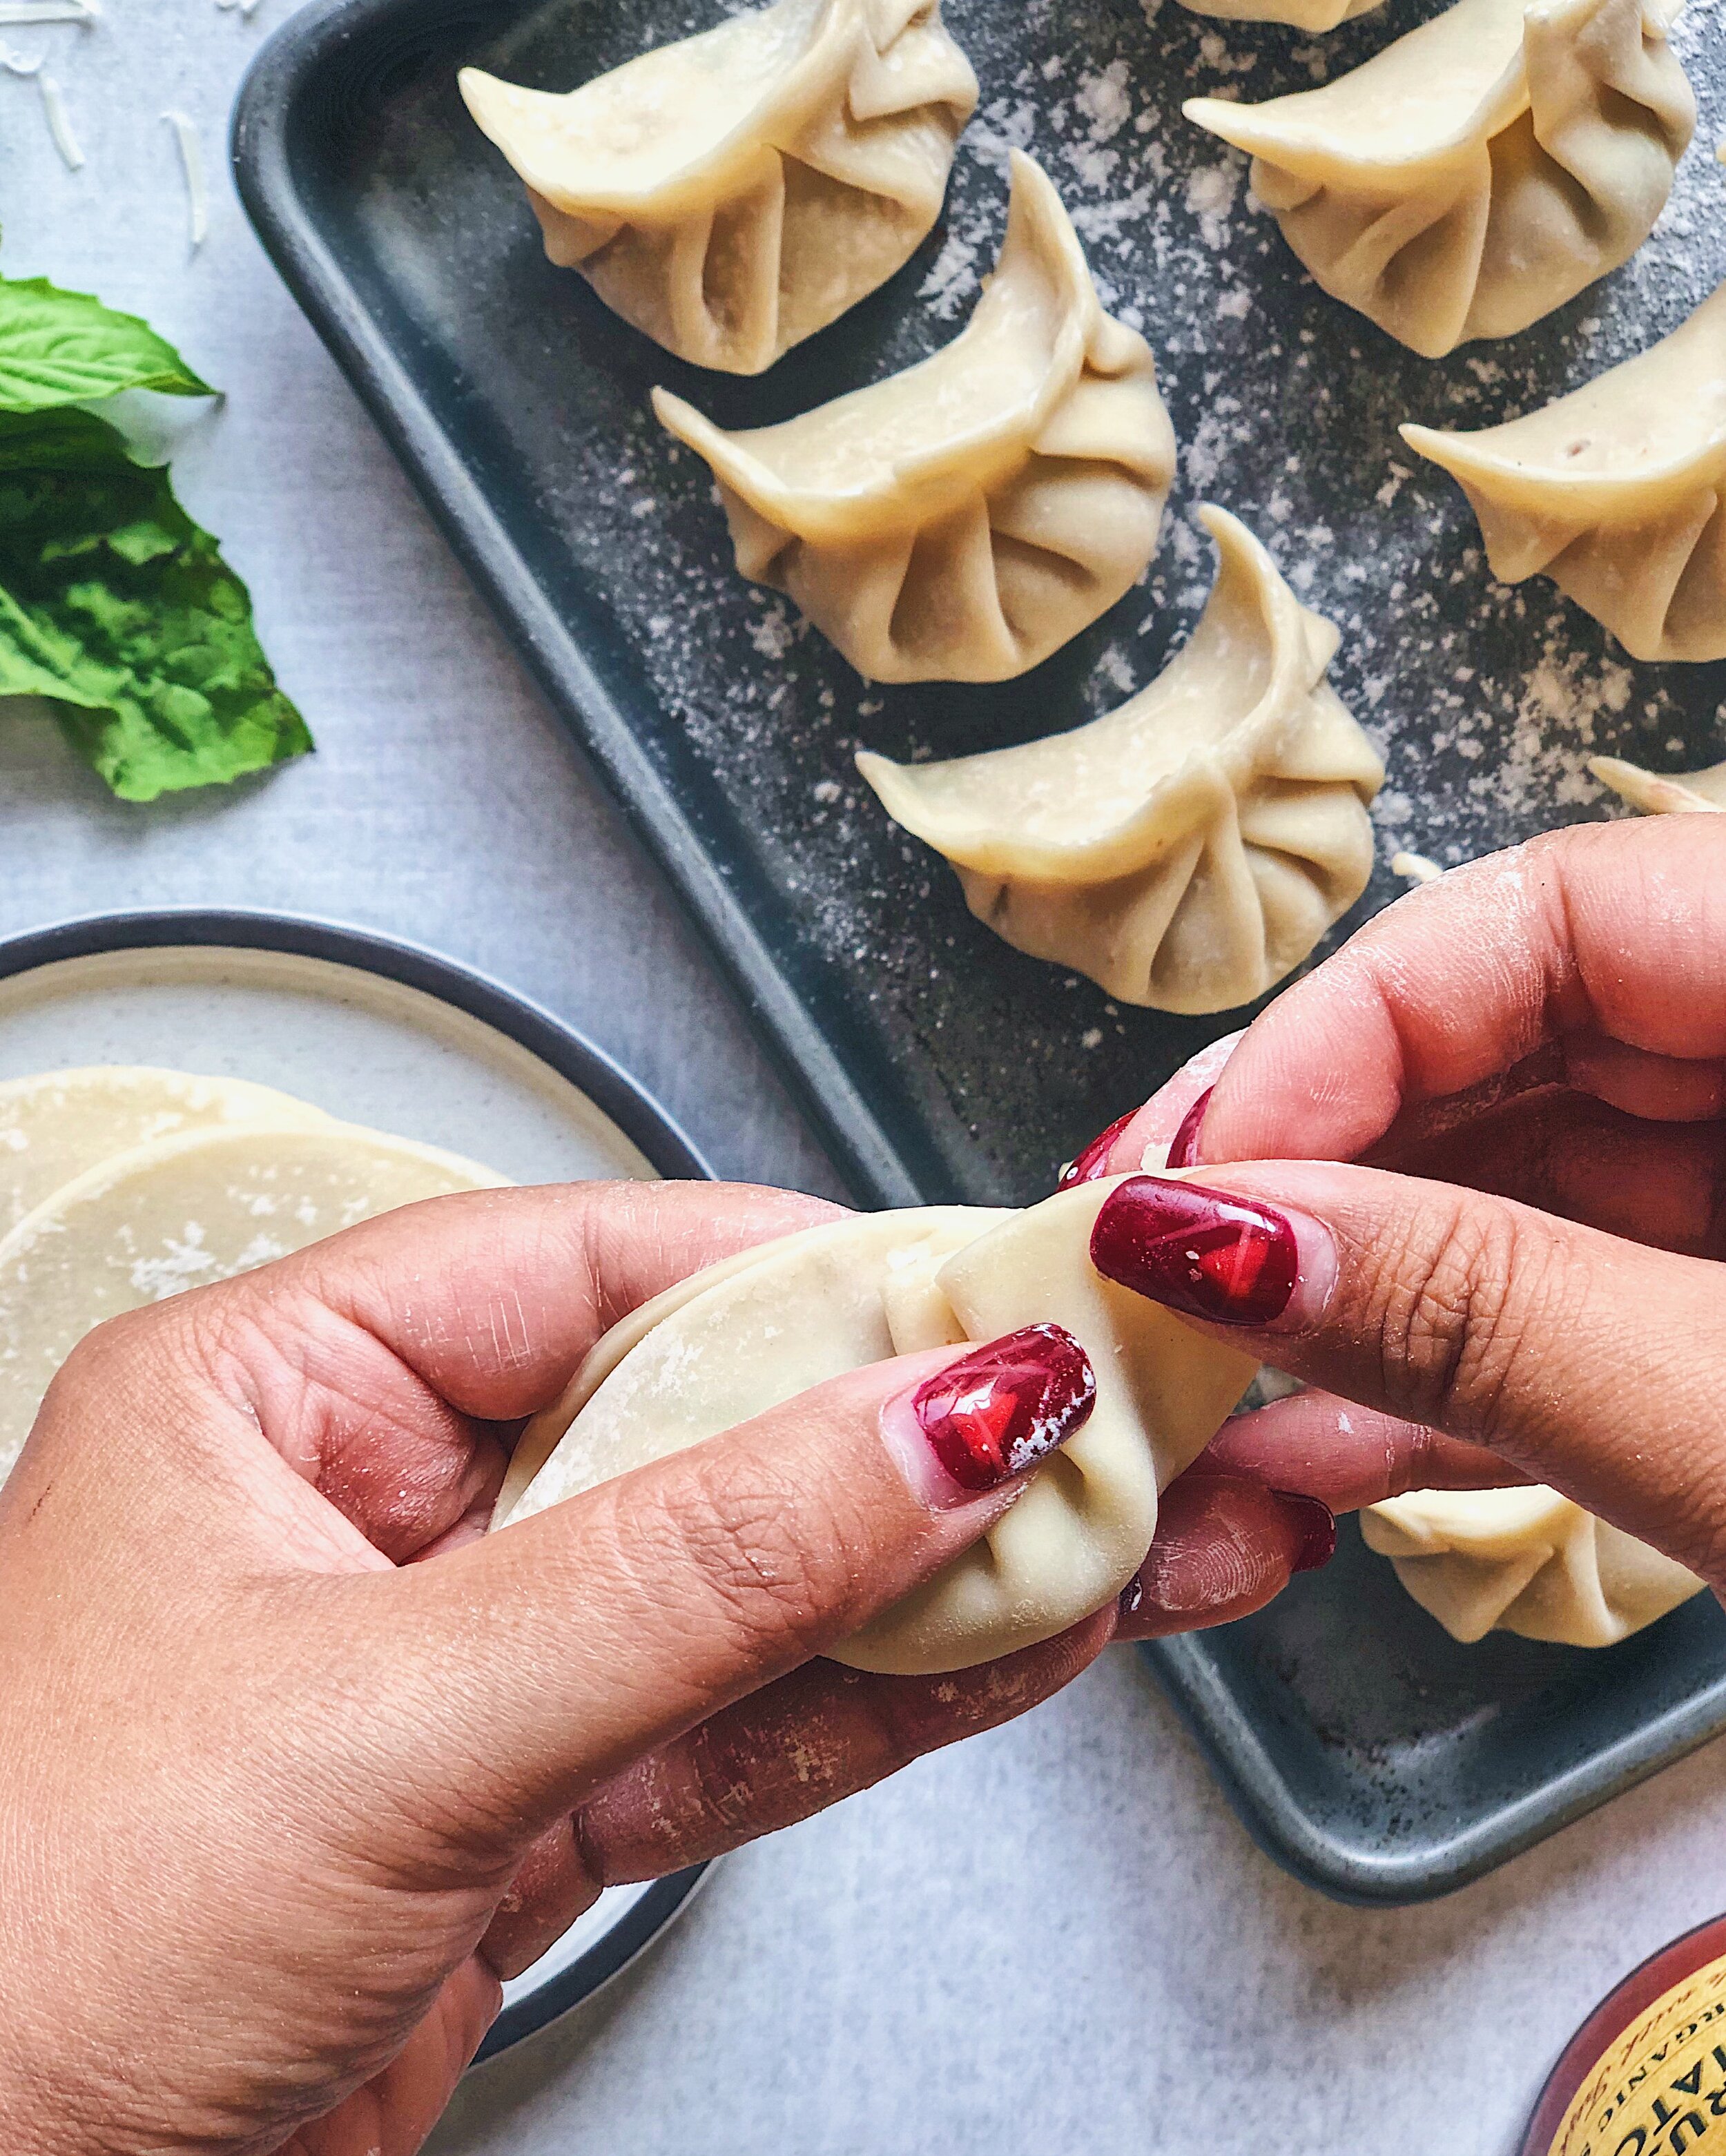
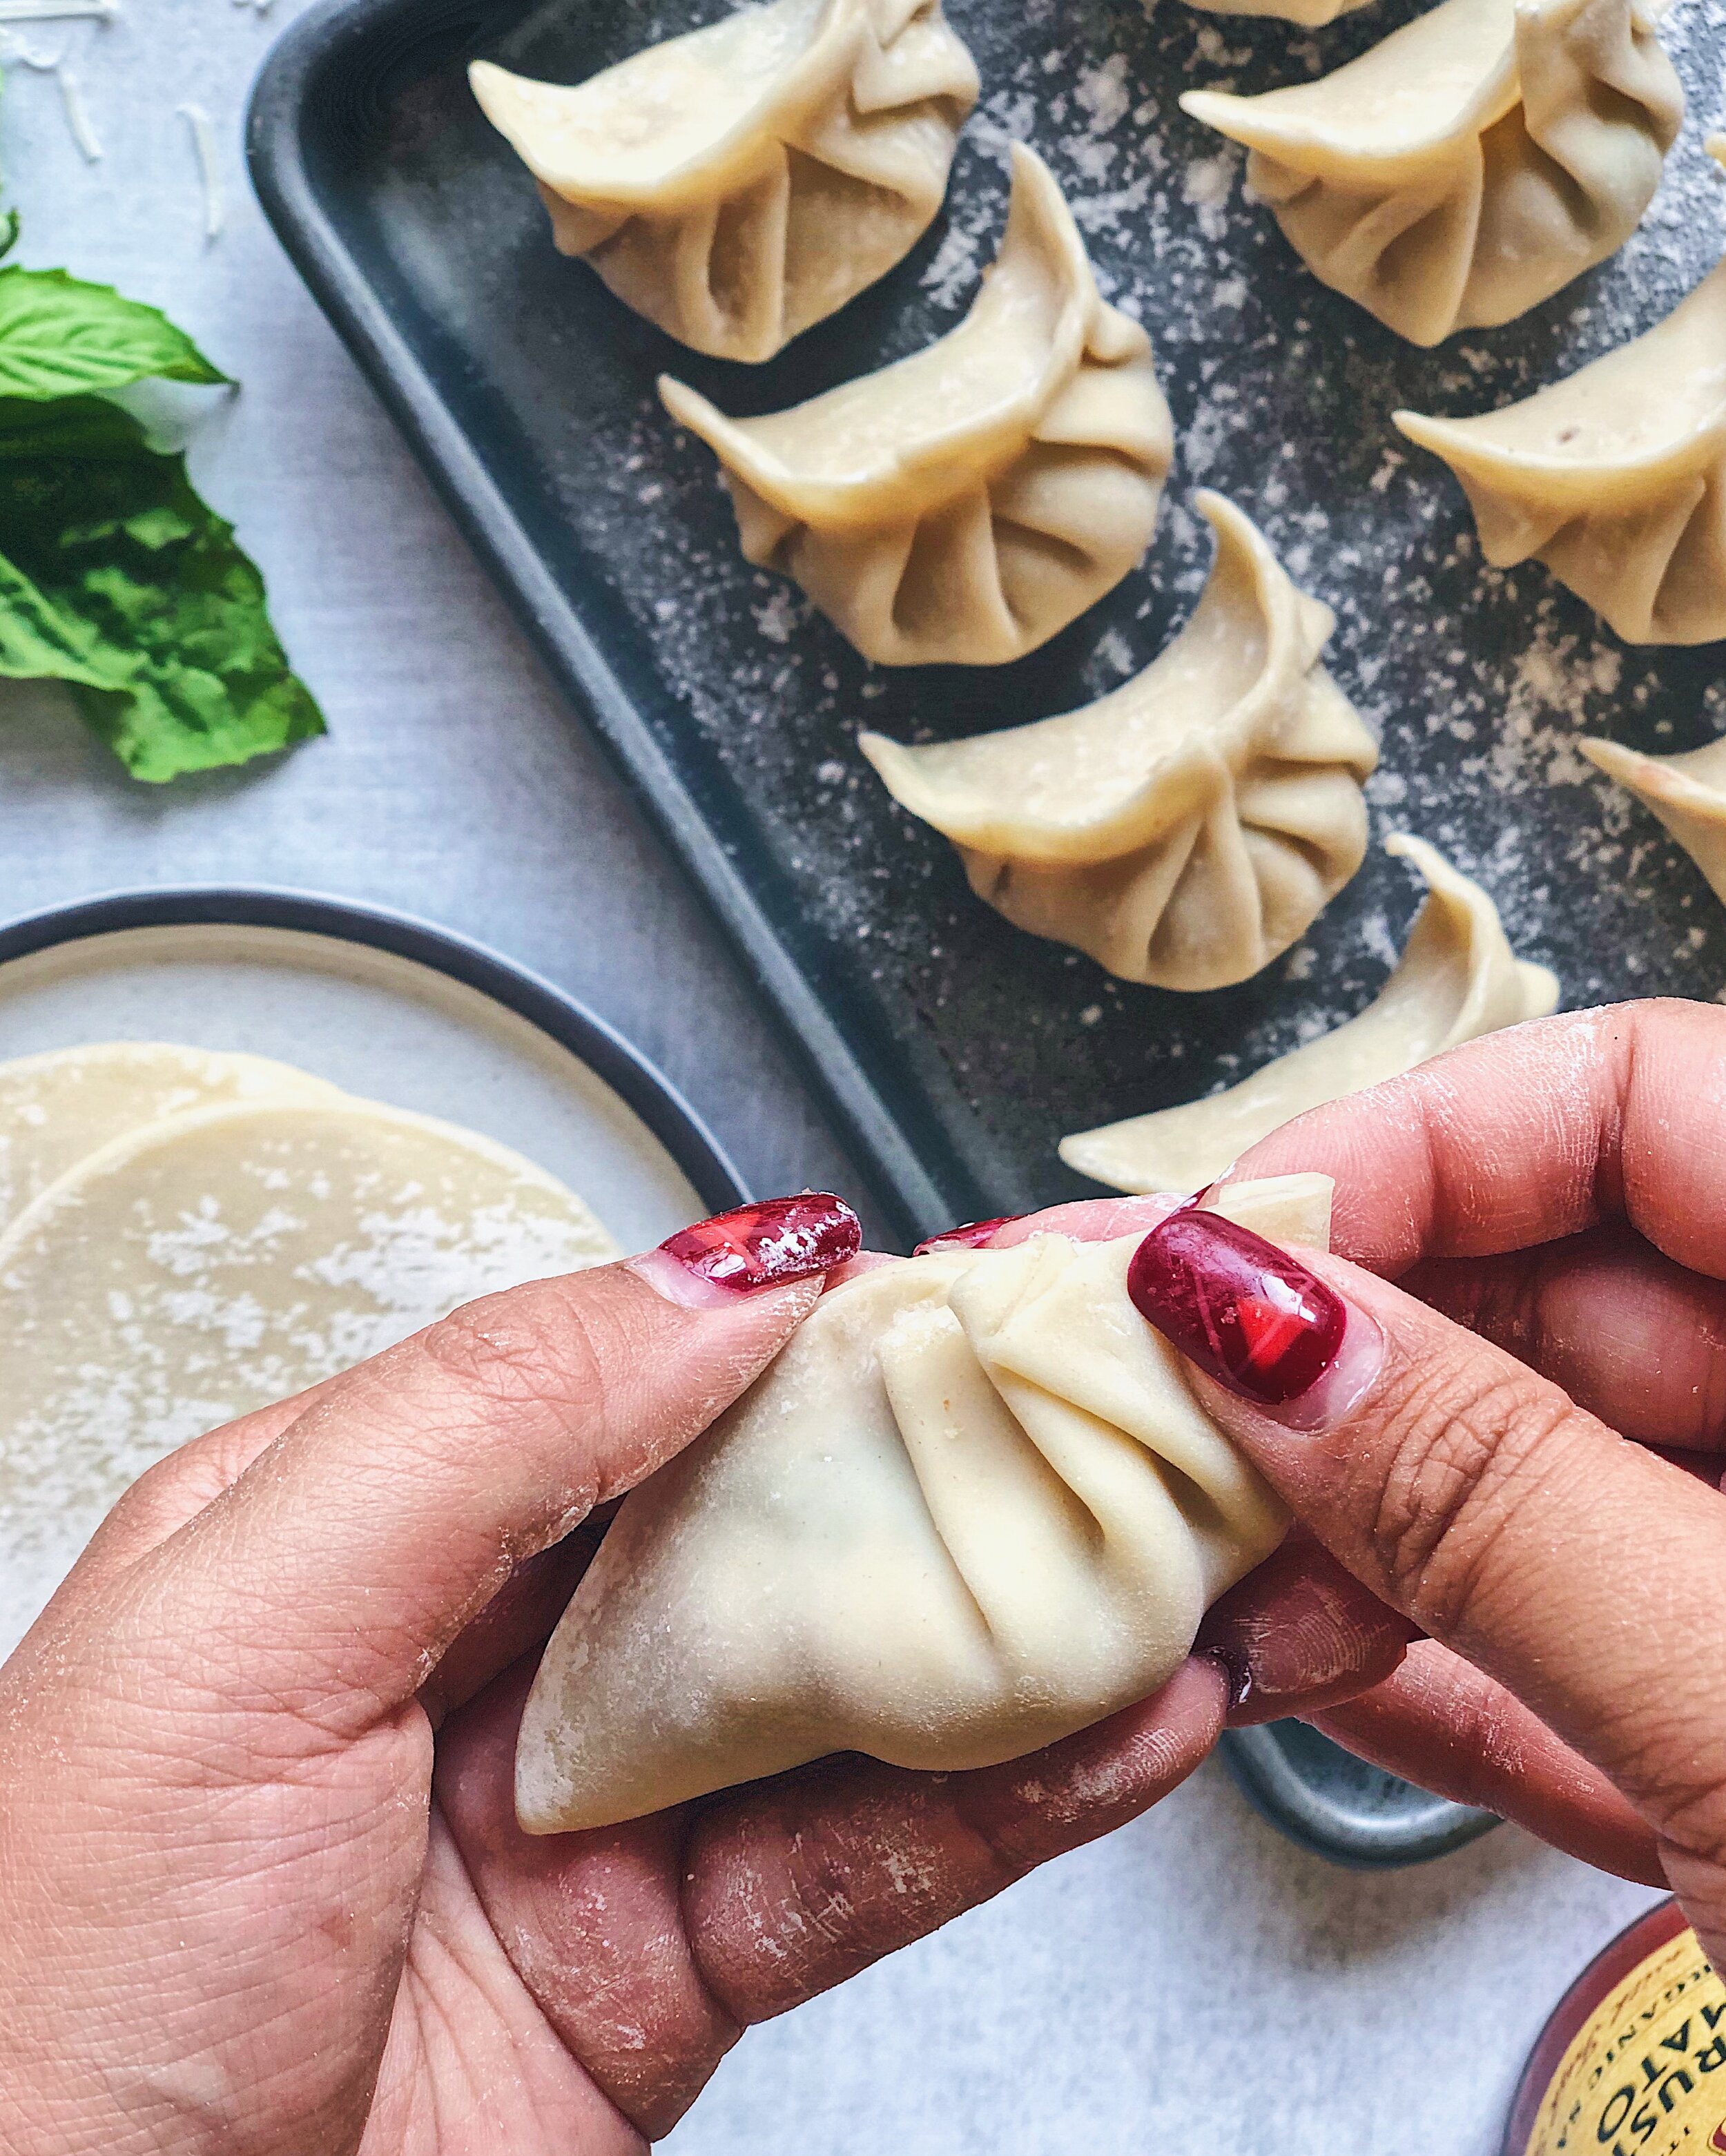
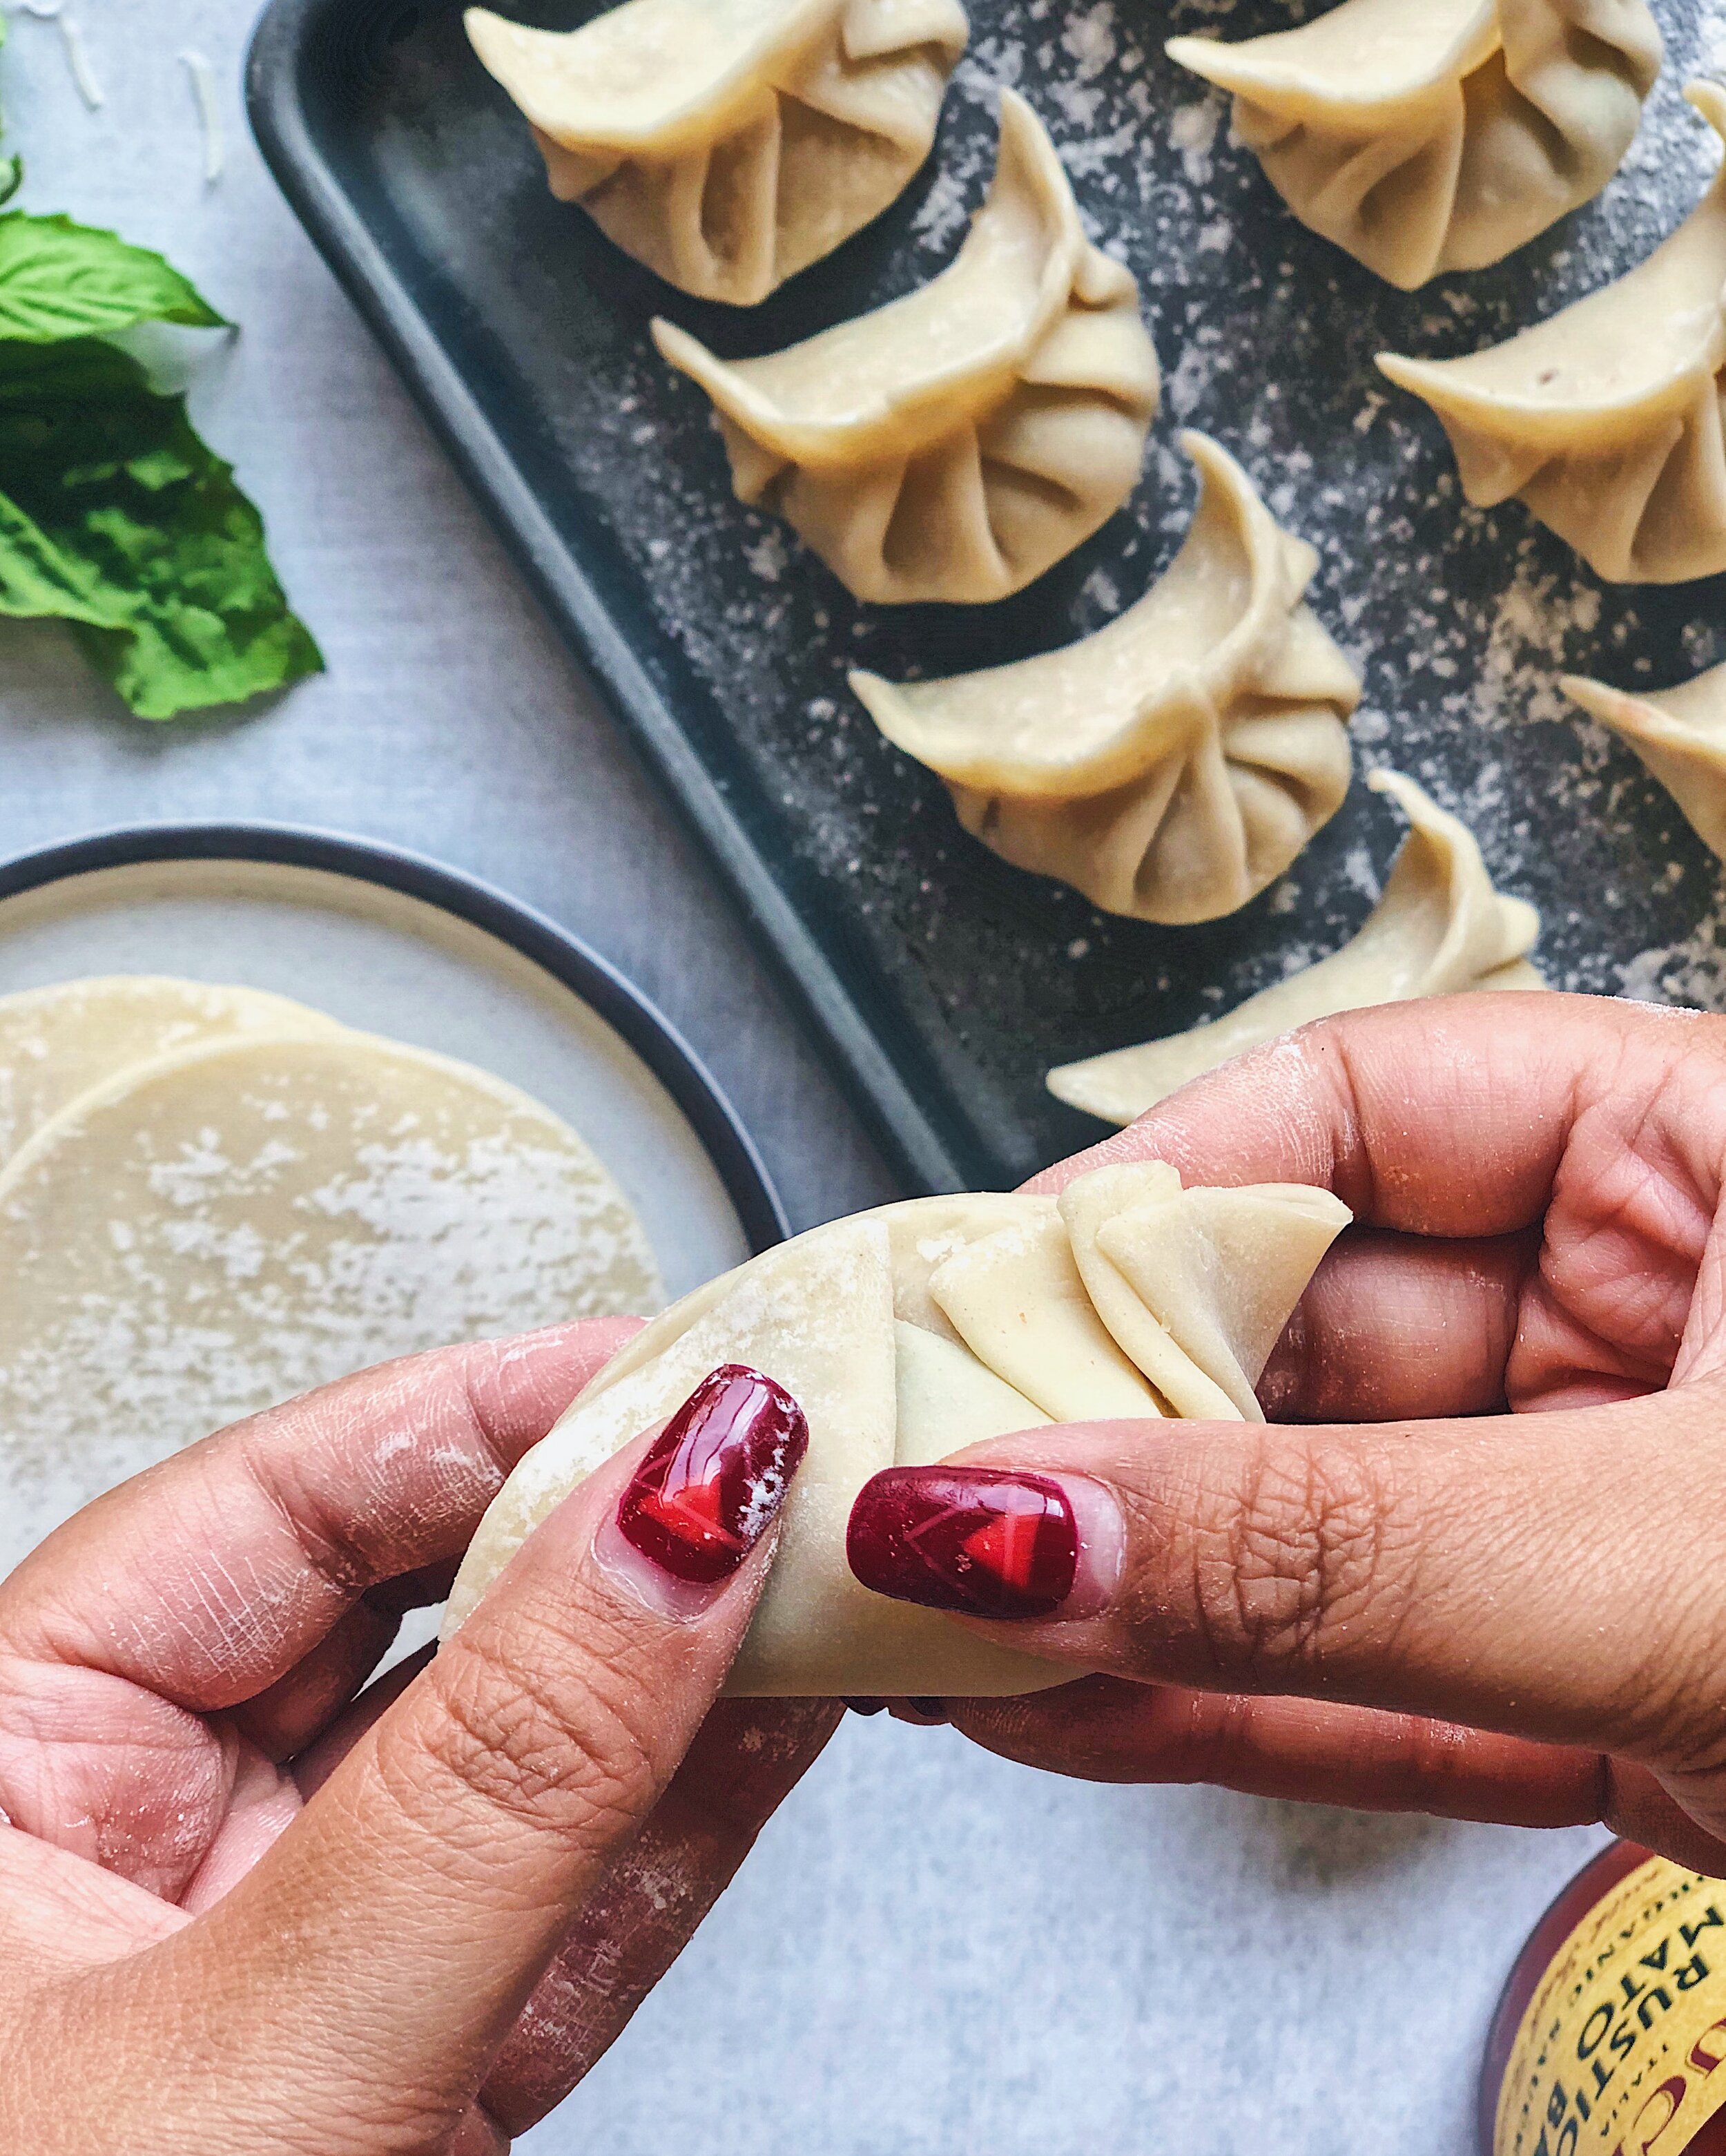
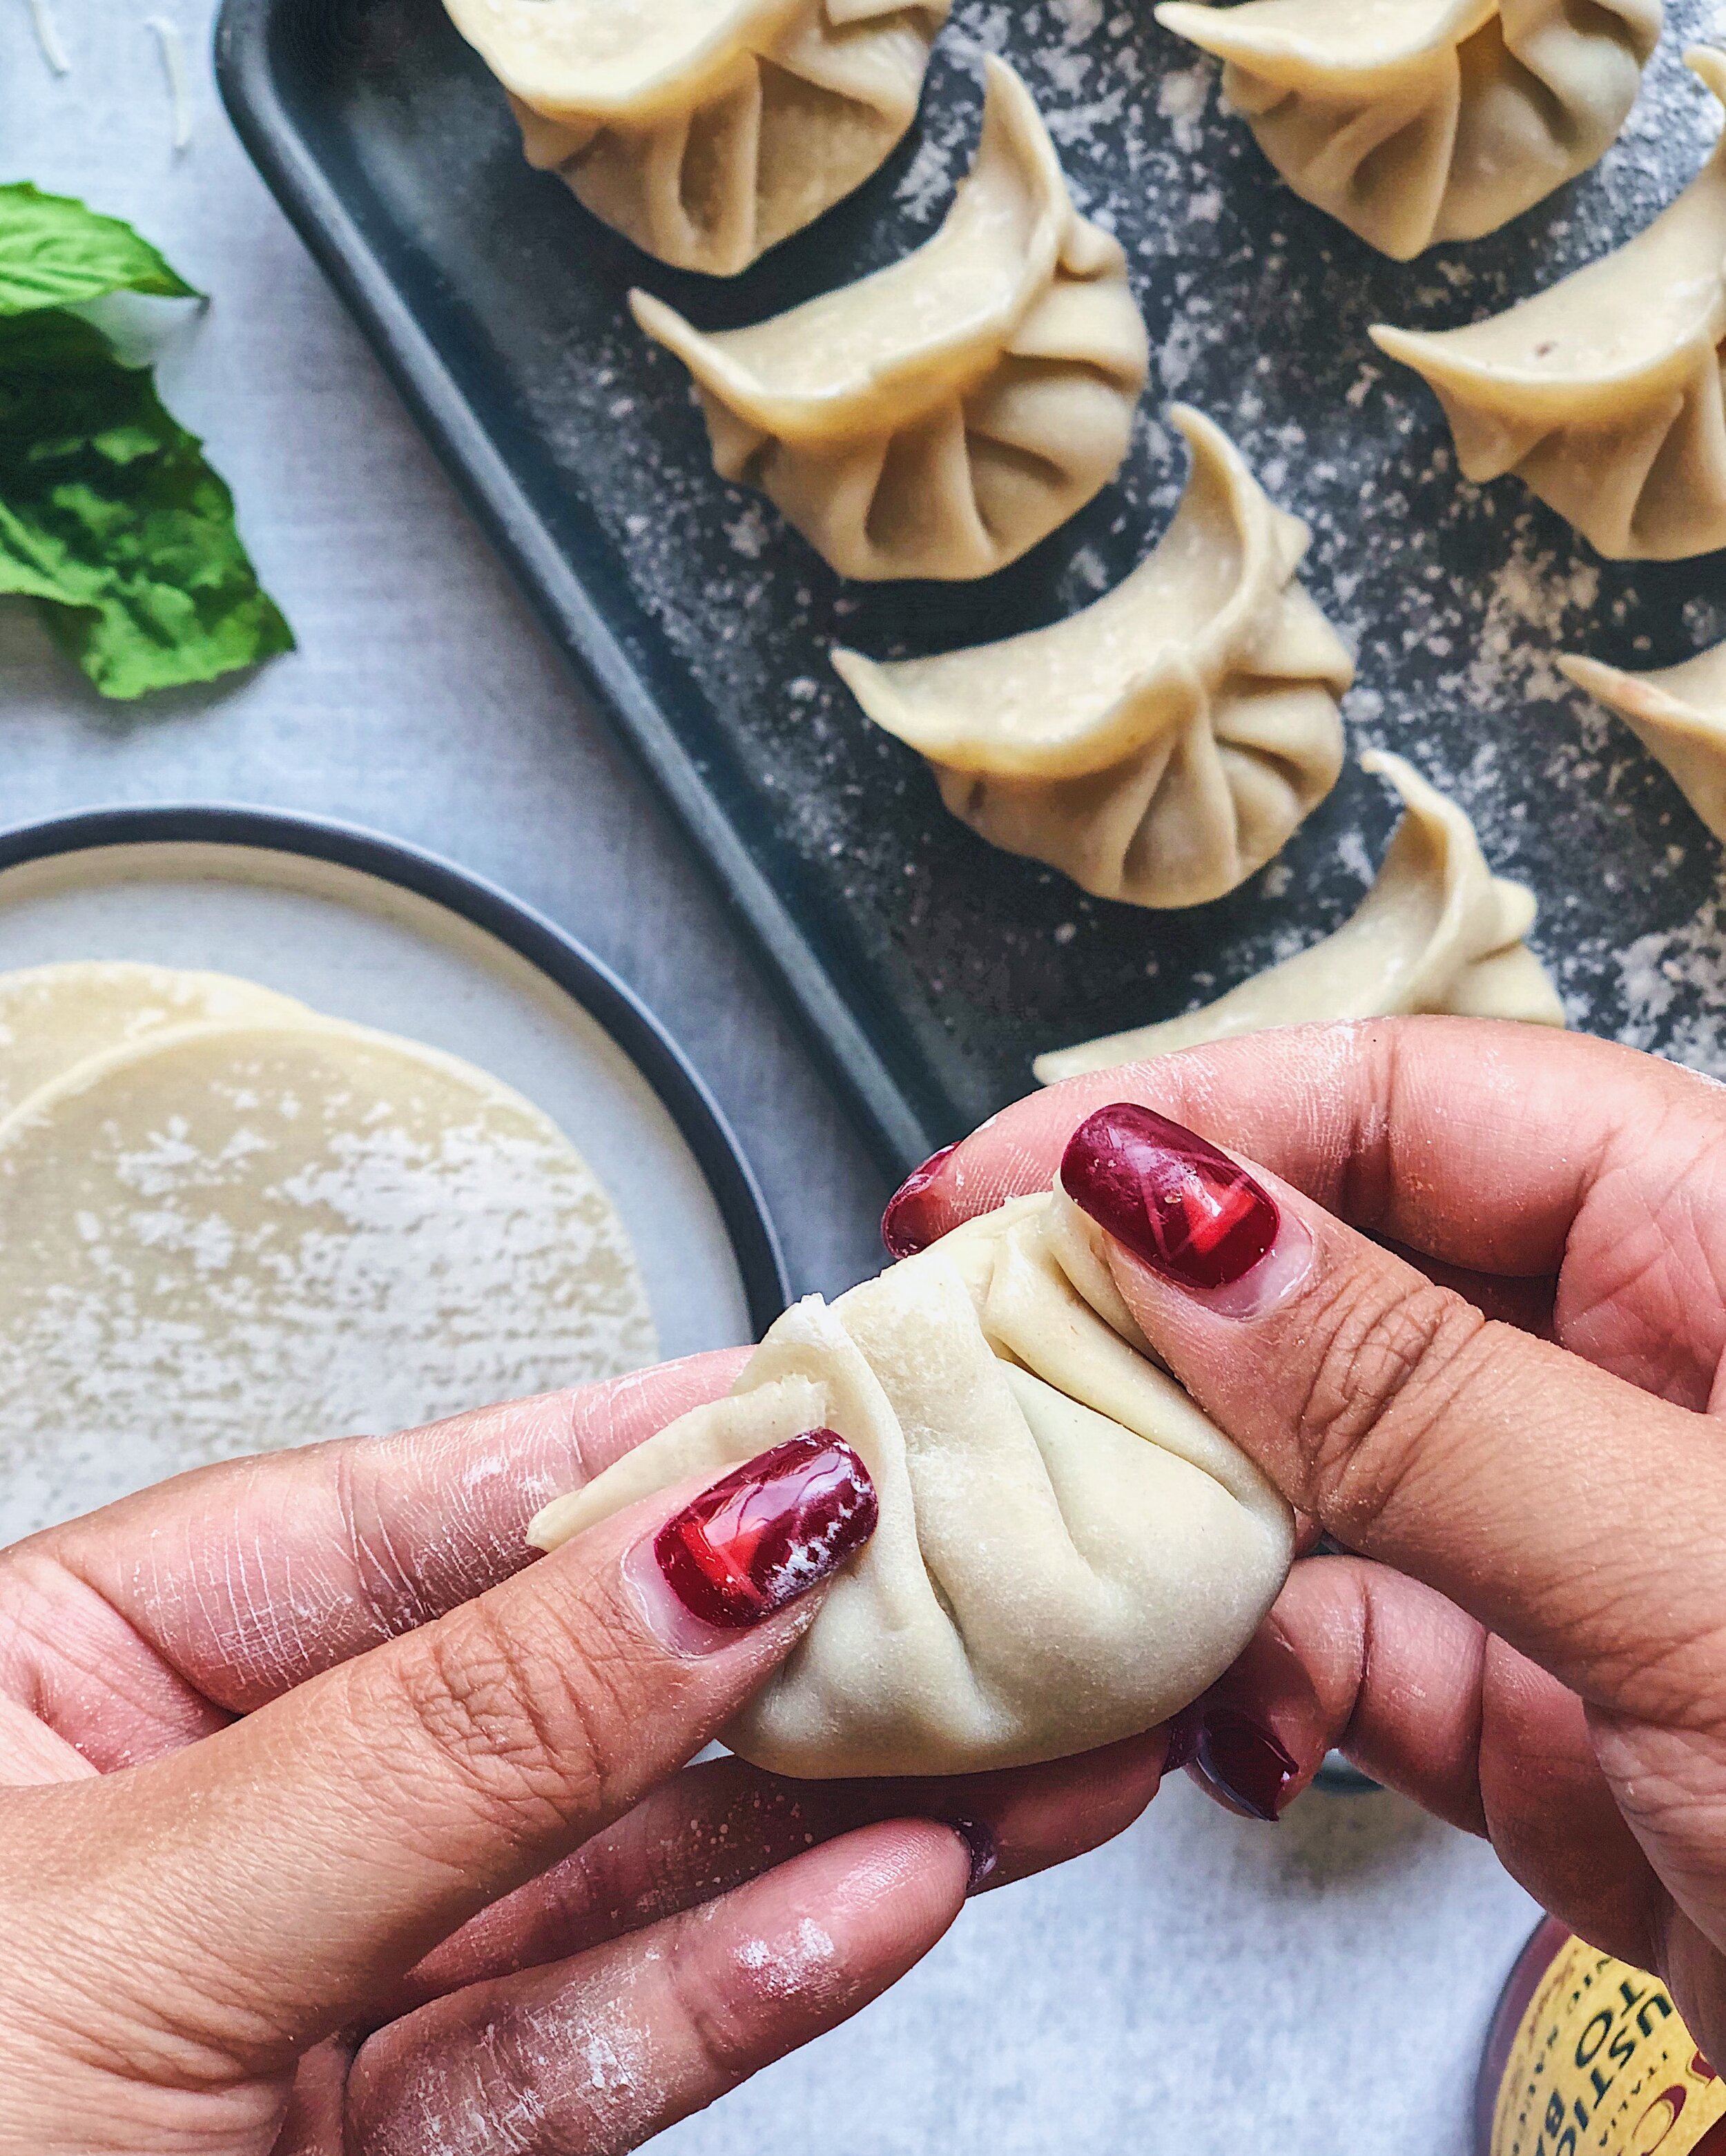
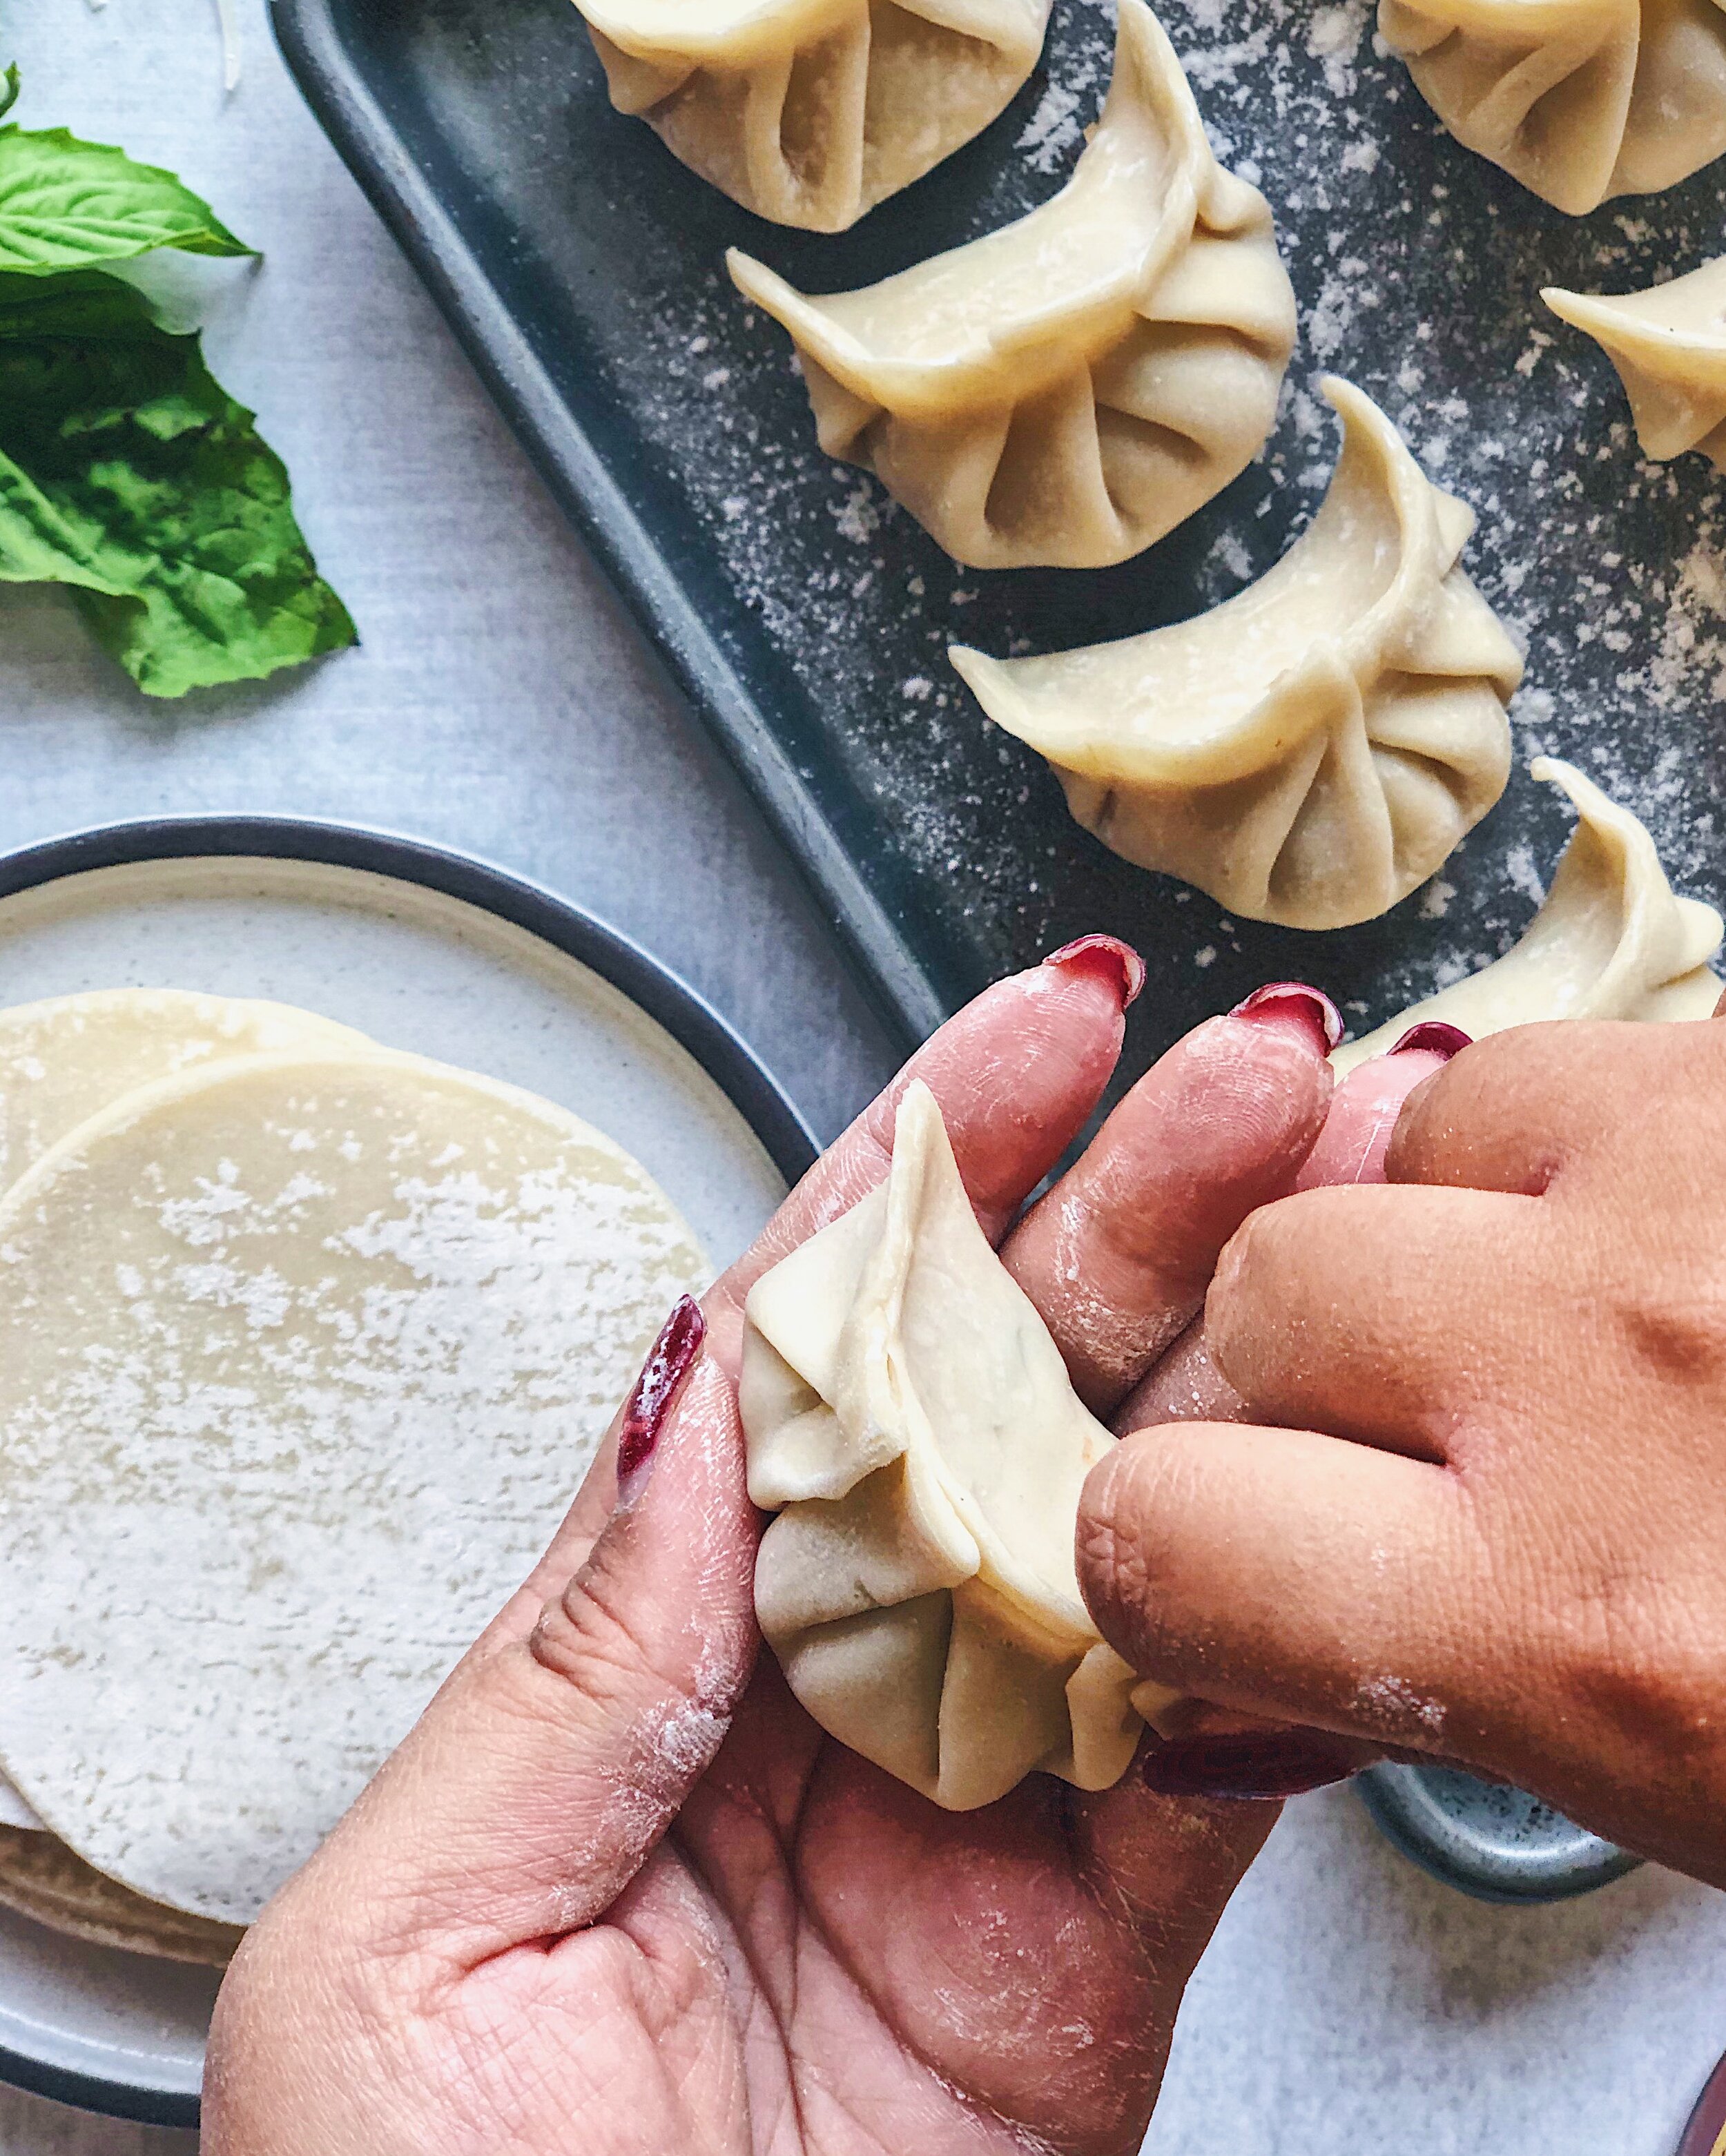
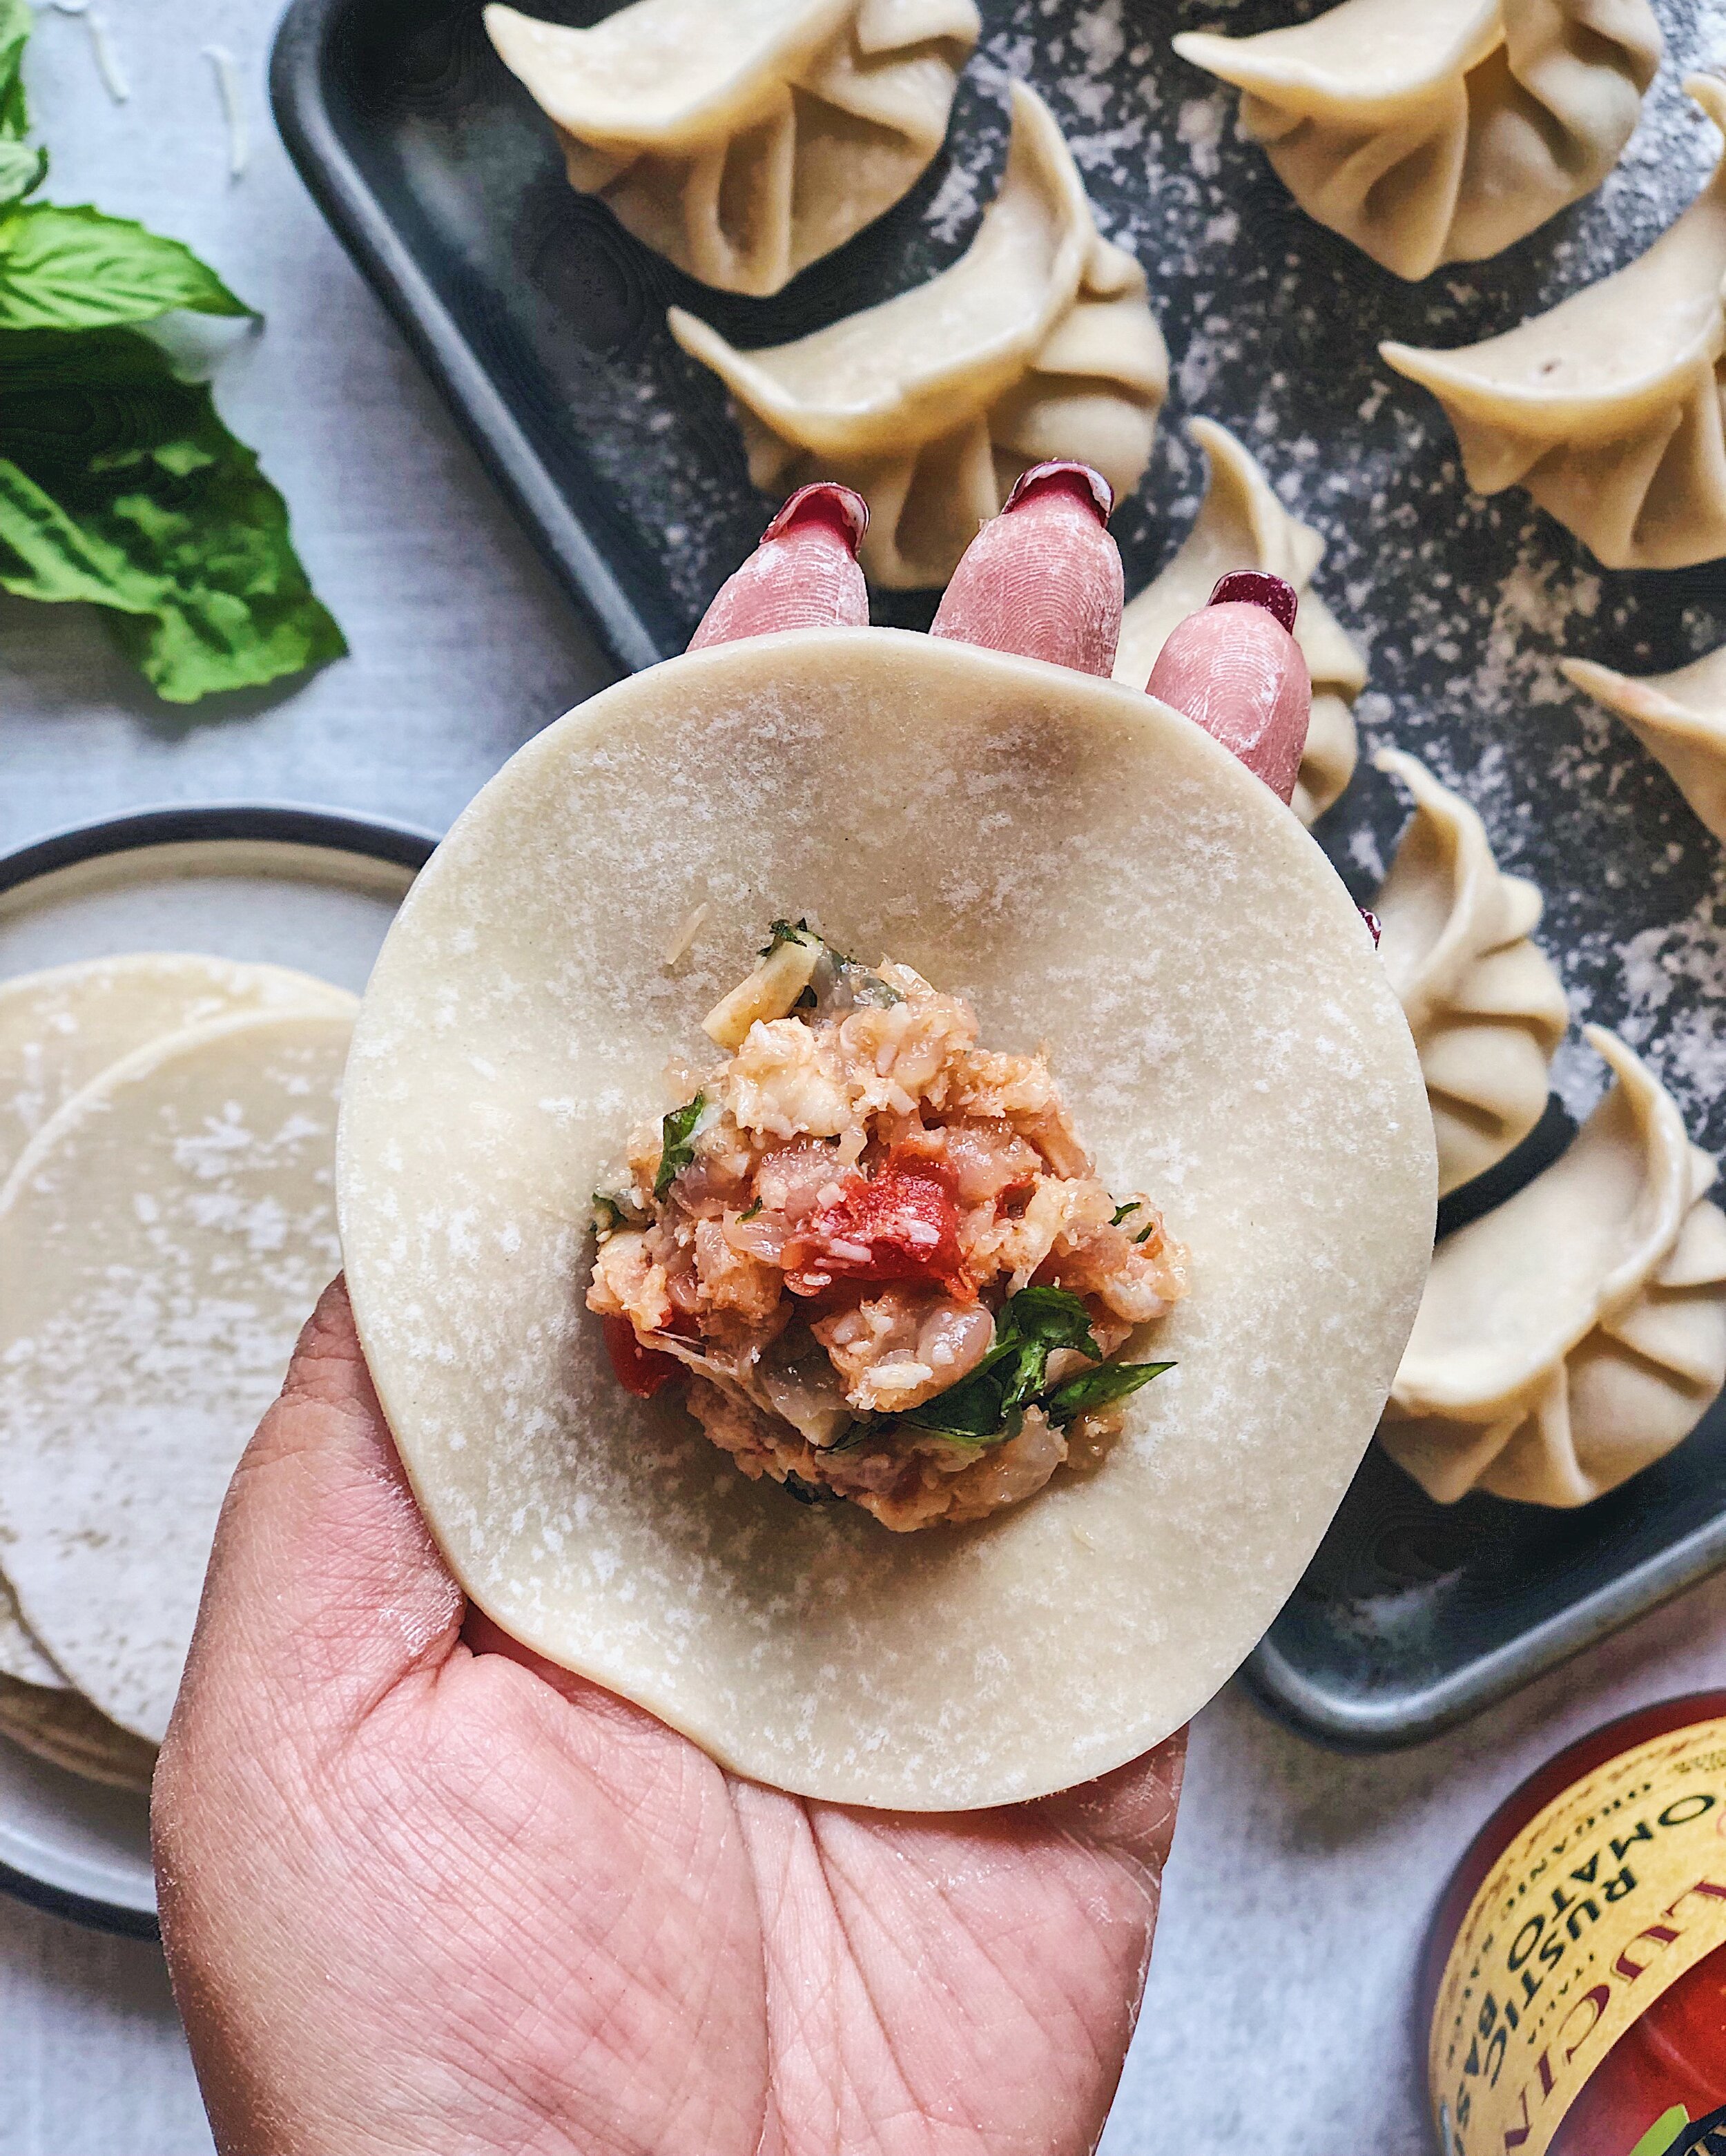
Remember that I was able to teach my spouse, whom I can barely rely on to boil pasta, how to pleat dumplings in the style shown in these photos. And now that I have the hang of it, it goes very fast. Here is a visual step-by-step for how I pleat dumplings. You can find more instructions in my Instagram highlights

LilyMorello_Lucini_10.JPG

How to make Chicken Parm Potstickers

Ingredients for the dumplings

20–24 round potsticker wrappers
1/2 lb ground chicken
1/2 cup low moisture skim mozzarella, grated
1/4 cup parmesan or romano, grated
2 cloves garlic, minced
1/4 cup panko breadcrumbs
1/3 cup Lucini Italia Rustic Tomato Basil sauce
salt to taste*
water, for sealing
flour, for storing

Ingredients for cooking

water
cooking oil (such as vegetable, grapeseed, or flaxseed)

Ingredients for the crunchy bottoms

1/4 cup water
4 tsp flour
1/2 tsp soy sauce
1 1/2 tsp cooking oil

*Note: 2 pinches of salt are recommended if you are using parmesan but I prefer the saltier romano cheese and didn’t need to add as much salt.

Procedure

Add all the dumpling filling ingredients to a large bowl and mix gently to combine.

Prepare a tray or some flat plates by dusting a small amount of flour on them. Fill a small bowl with water. Remove one dumpling wrapper from the package but keep the rest covered in the packaging or under a damp paper towel to prevent them from drying out. 

Add about a tablespoon of the dumpling filling in the middle of the wrapper. Wet a rim of water along the outer edge of the wrapper’s surface to help seal the dough. Seal the dumpling in your preferred style. Place the dumpling on the prepared tray. Repeat until all the filling is lovingly stuffed inside the wrappers.

Next, prepare the mixture for the crunchy bottoms by mixing all the ingredients together in a small bowl. Set aside.

You will need your most reliable nonstick pan with a lid—they don’t call them potstickers for nothing! Turning your stove on to medium, heat enough oil to see a thin coat covering the surface. Carefully place some of your dumplings in the pan, making sure not to overcrowd them. Allow the bottoms of the dumplings to brown for 1 minute.

Add about 1/4 cup water into the pan and immediately cover with the lid to allow them to steam. Be very careful with this step as water hitting the oil in the pan will certainly cause splatter. Keep the lid on for 2–2.5 minutes until you no longer hear loud sizzling inside. Remove the lid and allow the remaining water to evaporate (if any).

Reduce the heat to medium-low. Gently pour the crunchy bottoms mixture into the pan and swirl so it is distributed evenly. Cover the pan with the lid and turn the heat back up to medium. Cook for 2–2.5 minutes and remove the lid. Cook until the lattice on the bottom of the pan turns golden brown throughout. Remove the pan from the heat and allow it to rest for a couple of minutes, or until you see the edges of the lattice curl up away from the inside of the pan. Carefully remove the cooked dumplings with a spatula. Wipe down the pan with a damp paper towel and repeat with the remaining uncooked dumplings.

Garnish your dumplings with some additional fresh basil leaves and serve with lots of extra Lucini Italia Rustic Tomato Basil sauce for dipping!

LilyMorello_Lucini_14.JPG

Thank you so much to Lucini Italia for sponsoring this recipe!

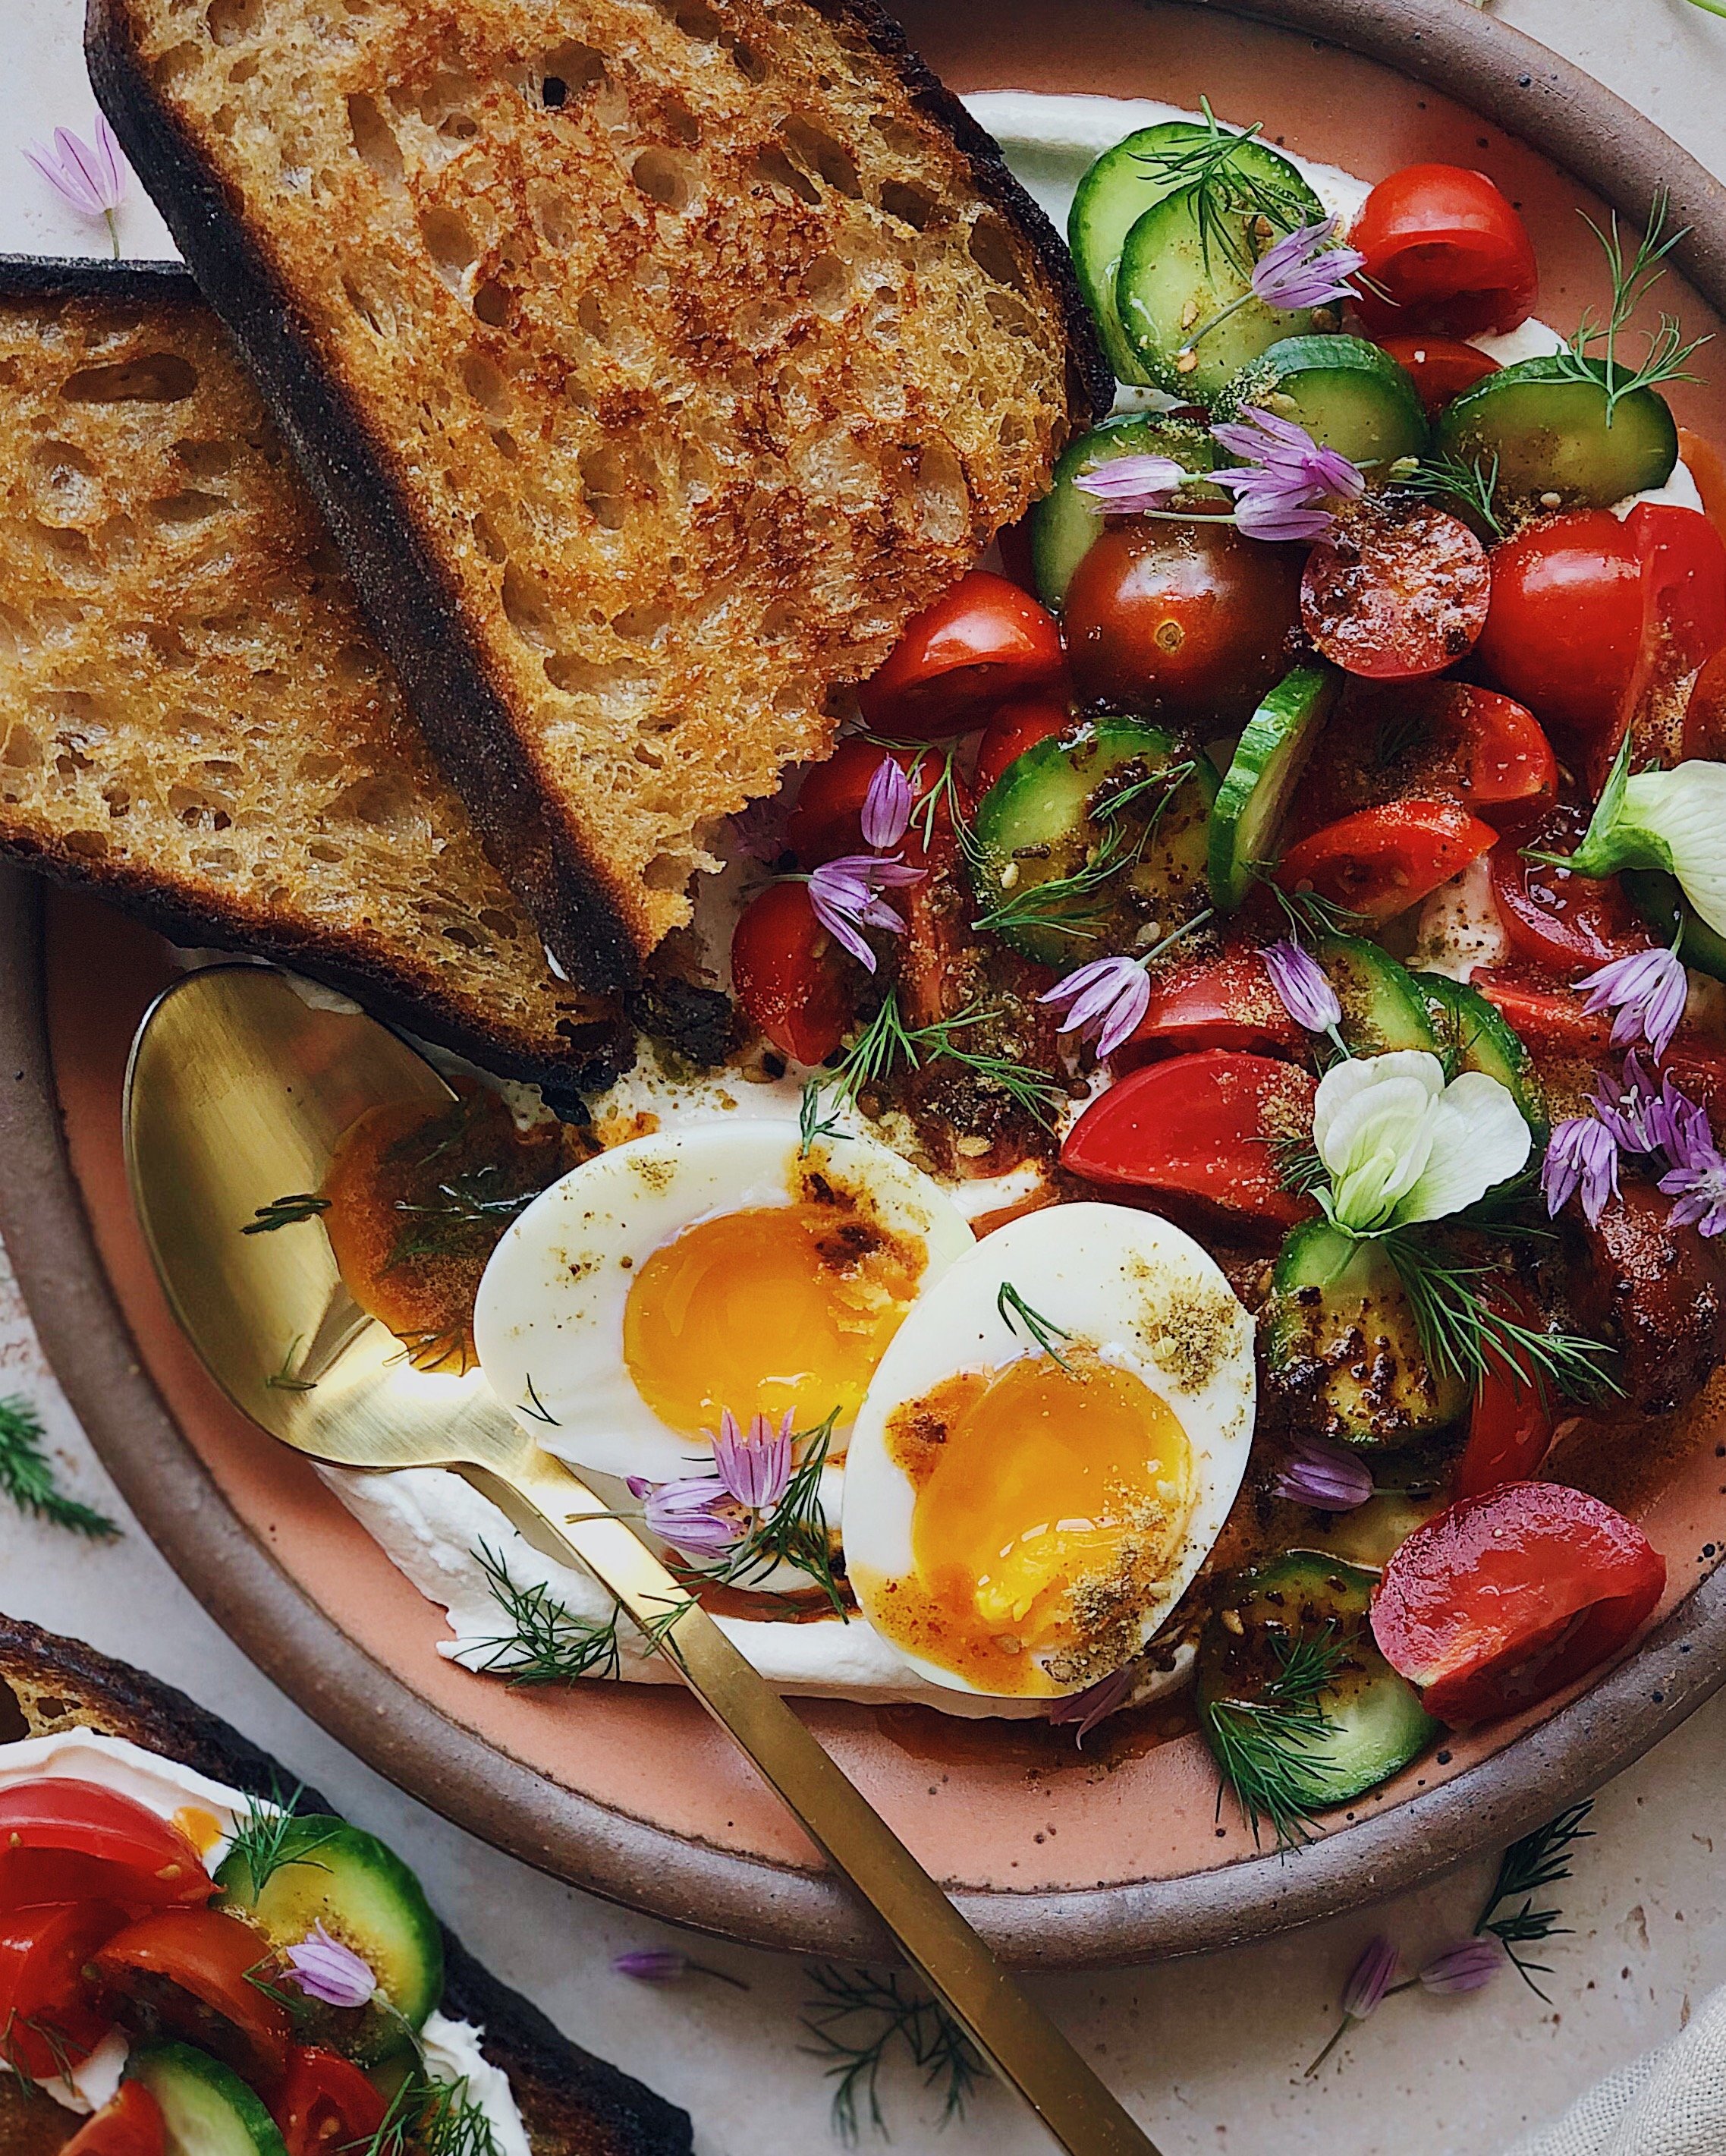
Recipe: Mashed Potatoes on Toast!

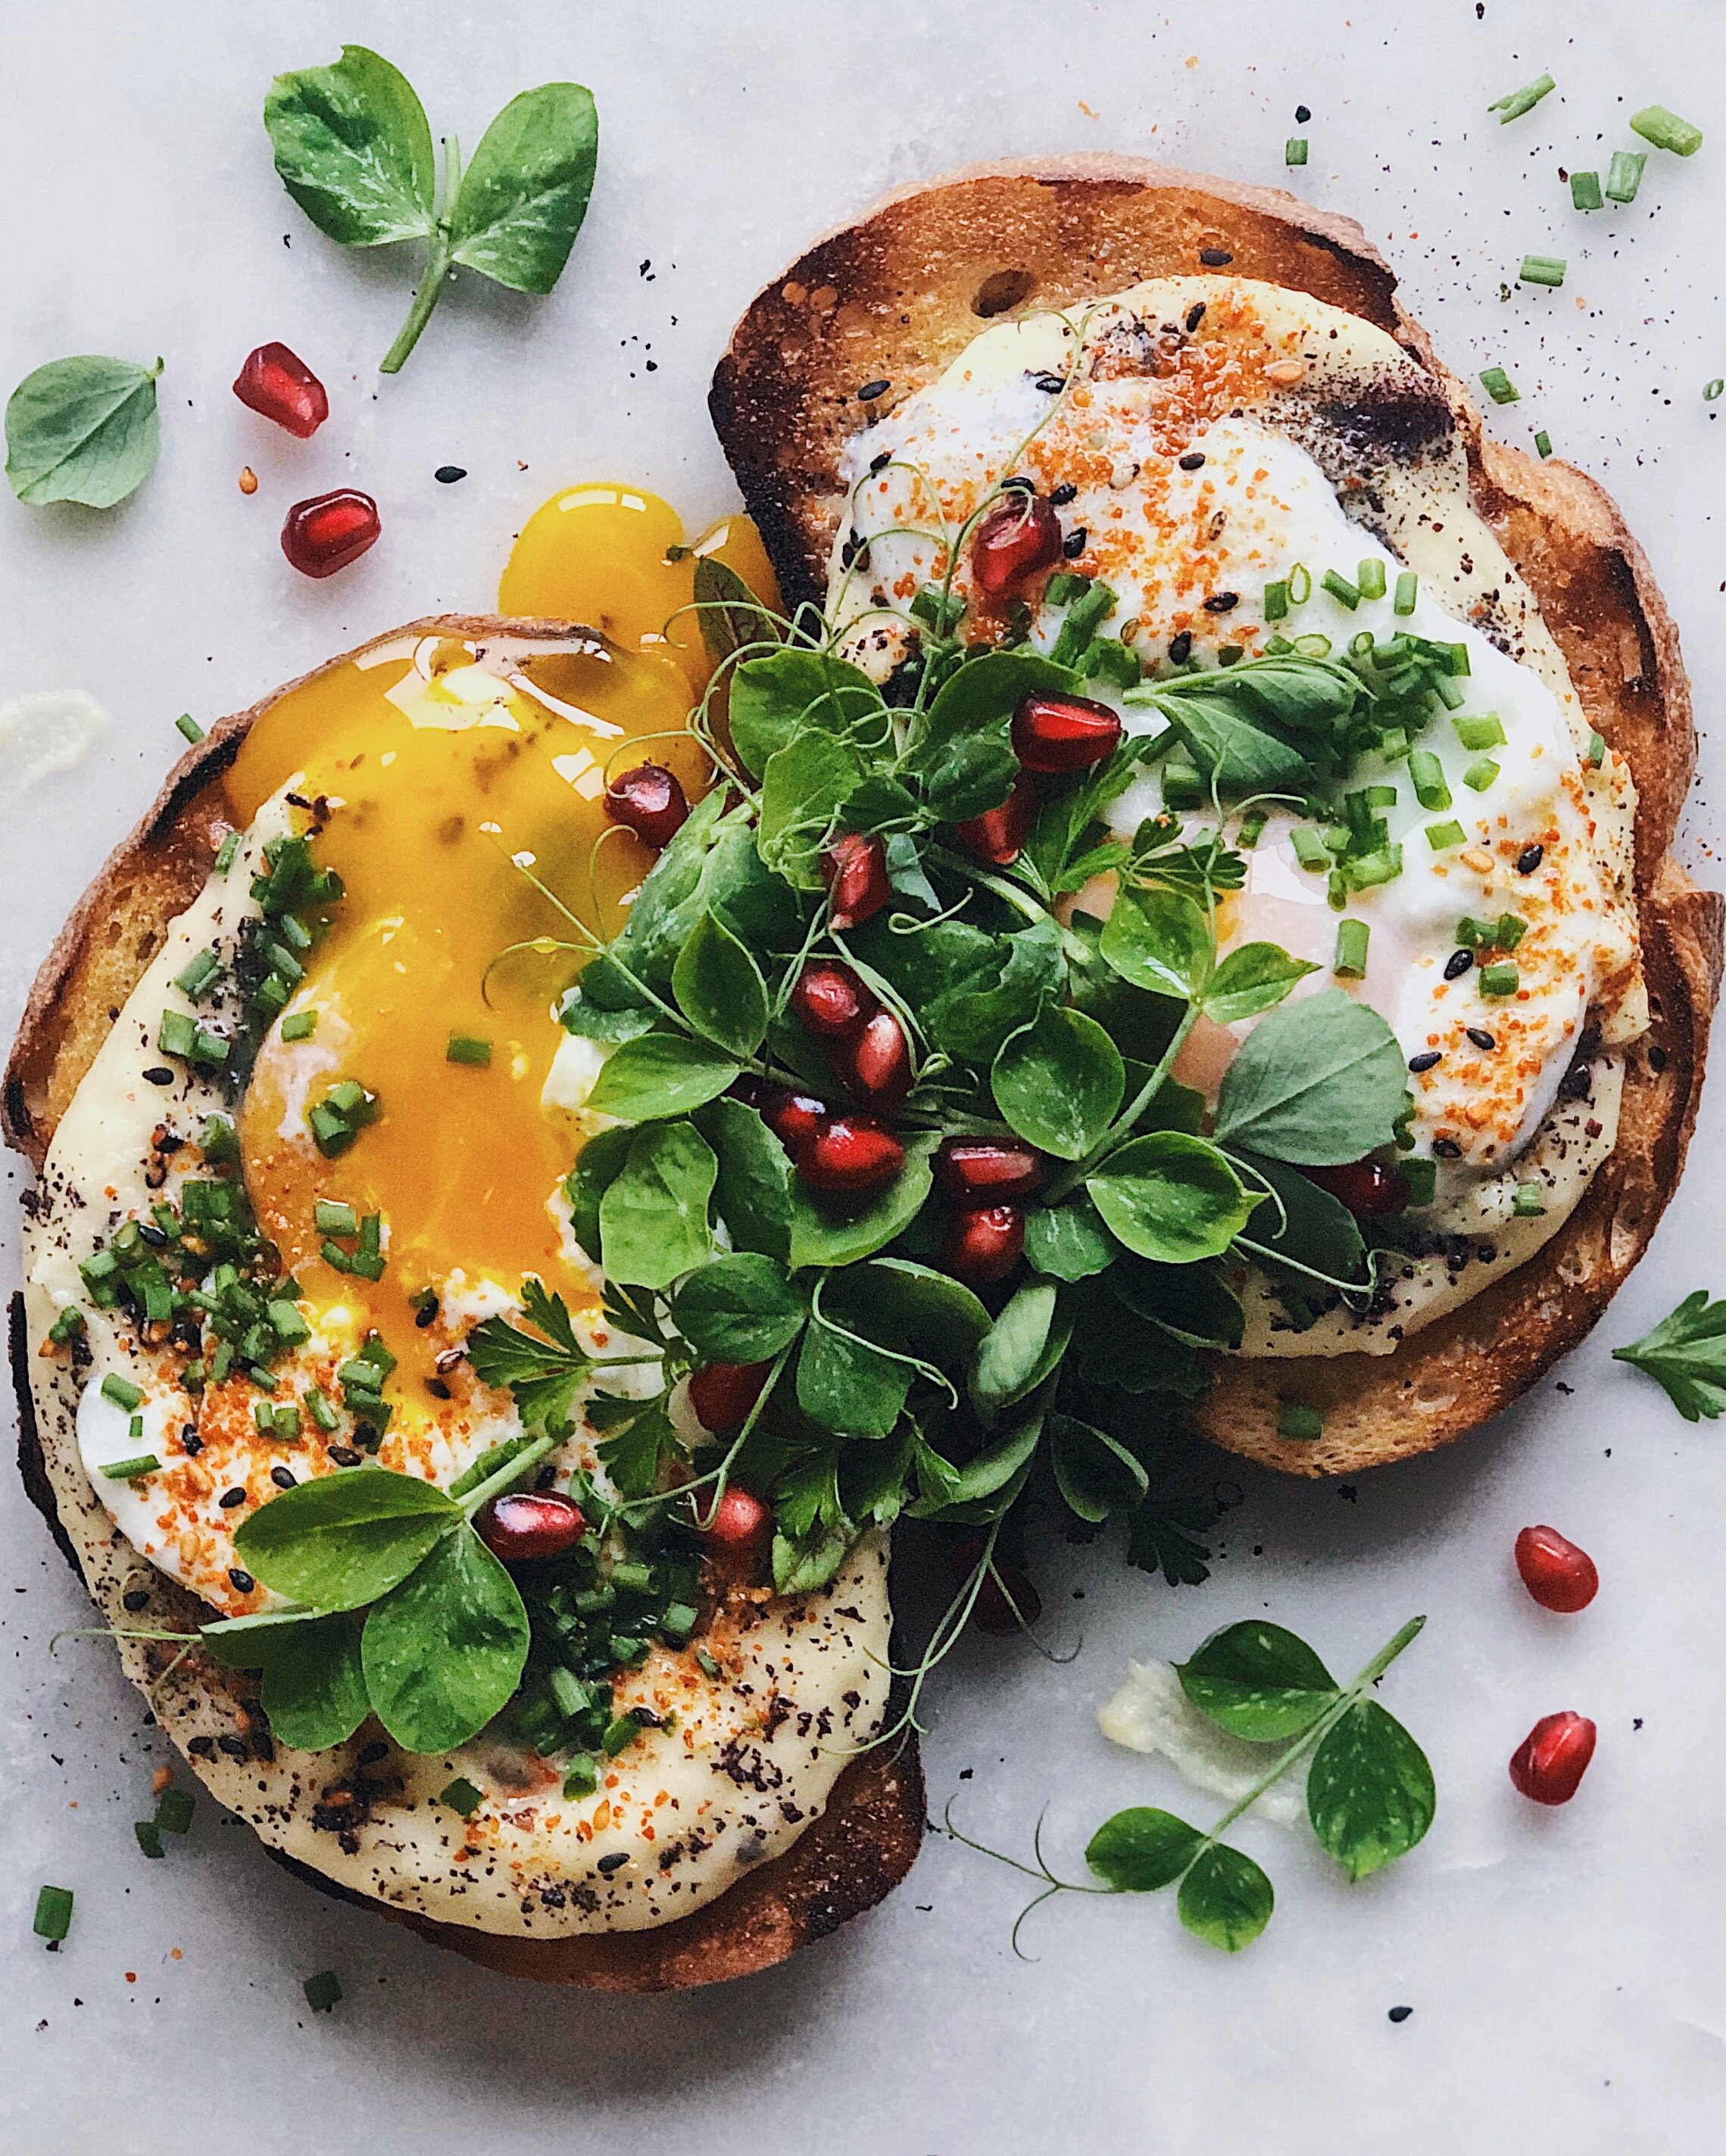
LilyMorello_MashedPotatoToast.JPG

I make extra mashed potatoes for Thanksgiving on purpose in order to use the leftovers for this toast.

I wish I could take credit for this genius idea but even I would never be so brazen as to put mashed potatoes and toast (the two best food groups of all time) together on my own. No—this is my copycat version of the Mash Up at @sprocoffeelab, a super cute coffee stand in San Francisco run by really nice people.

My version is topped with super-runny, Malaysian-style half-boiled eggs—iconic to my childhood but totally underrated everywhere else. I use these in place of “sous-vide” eggs because they have quite a similar texture and I don’t have a sous-vide device. However, regular poached eggs would also be great here if that’s your preferred method.

How to Make Mashed Potatoes on Toast

Ingredients for the Toast

2 slices of sourdough bread
1/2 cup-ish leftover mashed potatoes (the more garlicky, the better; bonus points if they also contain parm)
2 eggs
olive oil

For Garnishes

Use whatever you want or whatever you have lying around that looks pretty, depending on your priorities. For greens, I used a combination of stuff growing in my backyard and pea shoots that a random neighbor decided to plant in the communal planter in front of my house. An approximation of what is shown in the photo is as follows:

1 tbsp chives, chopped
1/4 cup mix of pea shoots, parsley, sorrel, nasturtium
1 tbsp pomegranate seeds
a few sprinkles of furikake
a few sprinkles of togarashi

Procedure

How to make Malaysian-style half-boiled eggs: Bring a small pot of water to a rolling boil. Gently lower the eggs into the pot and shut off the heat. Let the eggs cook for 8 minutes. Remove from pot and place in an ice bath to stop the cooking.

Heat some olive oil in a skillet on medium heat and toast the sourdough slices to your liking.

Meanwhile, reheat the leftover mashed potatoes.

Carefully crack open the half-boiled eggs and use a small spoon to loosen the egg whites from the shells. Pour each egg into a small bowl.

To assemble, scoop some mashed potatoes in a mound onto each piece of toast, then use your spoon to shape them into a nest that can contain the egg. Gently pour an egg into each nest. Season to your liking with furikake and togarashi seasonings. Top the eggs with chopped chives. Pile the rest of the green garnishes in the middle and finish with pomegranate seeds.

Recipe: Slow Cooker Short Rib Pho

shortribphonoodlesoup.JPG

Huge disclaimer: This is not a traditional/authentic or proper pho recipe in any way. I am very much a home cook, and this recipe is my practical solution for making a comforting noodle soup with all the pho flavors at home, without a lot of active maintenance. Things I associate with making a proper pho include: using a variety of beef bones for a rich complex flavor, using all whole spices, and skimming the scum and impurities off the top of the broth for several hours to produce a completely clear broth. This recipe does not involve any of these things! You could choose to run the entire broth through a fine sieve before serving, but I do not do this since I am not looking to impress anyone at home.

The key to compensating for the lack of effort in this recipe is using a good store-bought bone broth—this basically becomes the stand-in for buying, cleaning, roasting, and boiling all those aforementioned beef bones. For Bay Area folks, I recommend the one found in the frozen section at Berkeley Bowl, that seems to be made in-house. I’ve also tried Bonafide Provisions beef bone broth and that worked well too. You are looking for something that is heavy in natural collagen from the bones and doesn’t have other added flavorings; it’s usually kept frozen and something that is sold as shelf stable is not gonna cut it in terms of richness. You want a broth that sticks to the noodles.

Now let’s talk about fresh garnishes. In that first photo, you’ll see mint, red veined sorrel, and rau răm (Vietnamese coriander?) that I grew in my backyard. These are probably not authentic pho garnishes either! From what I understand, different regions in Vietnam tend to serve different herbs depending on what grows prevalently. At restaurants near me, I see Thai basil served with pho. I like to think I am keeping to the spirit of using regional produce by using what is growing in my garden. But again, I am not making any claims of being any sort of authority on the matter here. If making this in the winter when my garden is looking lackluster, I use Thai basil and cilantro from the store.

Although it does take (inactive) time, I think of this as a cheater shortcut pho recipe that will fill your house with the smell of pho and fill your belly with beefy joy—even though it’s a little on the scrappy unrefined side.

Recipe_ShortRibPho_01.JPG

How to Make Shortcut Slow Cooker Short Rib Pho

(Makes 4 servings)

Ingredients for Broth

4–6 short ribs (about 2.5 lbs), cut into separate rib pieces
five spice powder
salt
pepper
1 sweet onion, quartered
2–4 tbsp fish sauce
32 oz high-quality beef bone broth, defrosted
several cloves of garlic, crushed and peeled
several ginger slices
2 tbsp brown sugar
8–10 star anise
neutral cooking oil
water

Ingredients for Pho Assembly

1 package (14 oz) dry flat rice noodles
1 shallot or 1/8 small red onion, very thinly sliced
2 tbsp cilantro, chopped

Optional Garnishes for Serving

1 lime, cut into wedges
1 fresh jalapeño or serrano chili pepper, sliced
1–2 scallions, thinly sliced
fresh herbs, such as Thai basil, extra cilantro
sriracha and hoisin sauce, for dipping

Procedure

Generously (very generously!) rub salt, pepper, and five spice onto the rib pieces and heat up a large pan on the stove on high. Once hot, turn down to medium-high and add a splash of oil, then the beef short ribs and sweet onion. Seer all sides of the short ribs and onions, adding the garlic and ginger halfway through the process. After ribs are seared and aromatics are charred, dump everything into the slow cooker.

Turn the heat down to low and add 2 tablespoons of fish sauce and a splash of water to deglaze the pan. Add all the pan bits to the slow cooker along with the star anise and brown sugar. Add the bone broth plus about 32 oz of water

Set the slow cooker to high and cook for 4 hours.

In the meantime, prep the fresh ingredients.

Cook pho noodles according to the instructions on the package, or until they are just barely al dente. The hot broth will soften them even further.

Carefully remove the short ribs from the broth. If desired, remove the meat from the bone and slice (or, serve the bowls with meat attached to the bones). At this point, taste the broth for seasoning and add more fish sauce if desired.

To assemble, place cooked noodles in a bowl. Ladle the hot broth on top, add the short rib, and garnish with the thinly sliced onion and cilantro. Serve everything else on the side along with some Sriracha and hoisin sauce.

This recipe was originally written for my friends at Nomtastic Foods.