Recipe: Herby Roast Chicken with Schmaltzy Croutons

RoastChicken2.JPG

I’m going to state the obvious here: There are many ways to roast a chicken. This is the way that works best for me, fitting my personal circumstances—which are mostly that I am too cheap to buy a meat thermometer. I feel this is not a particularly niche circumstance, so my hope is that this recipe may be of use to some of you too. This recipe is based on a couple of YouTube videos: this one by Jamie Oliver, and the “pro chef level” from this Epicurious video. I admit that even armed with my recipe below, it is worth watching the Jamie Oliver one, as much of my bird prepping technique comes from there, and without the budget for even a meat thermometer it goes without saying that my video budget does not compare to his. However, following his technique directly did NOT work for me. It resulted in medium-done chicken legs, which is just not a good look. That’s why I am here, writing this recipe that DOES work for me!

While most of my recipes are intended to show that cooking need not be mysterious or intimidating, this recipe in particular does require having at least a touch of confidence in the kitchen. It involves heaving a big, heavy cast iron vessel in and out of an almost-500-degree oven, flipping a big chicken, and having calloused enough hands from prior kitchen wear and tear to not be afraid to truss the legs mid-roast. On the other hand, though, it may be less intimidating than, say, spatchcocking a chicken for those who are not confident about their kitchen shearing skills. Every cooking task involves at least a little bit of danger, so please just be smart and careful.

Not only is this THE recipe that allows me to get flavorful crispy skin and perfectly cooked juicy chicken each time, it makes full good use of one of the best outcomes of a roast chicken: the schmaltz! Schmaltz is the chicken fat that gets rendered out of the chicken as it roasts. In this recipe, that wonderfully flavorful greasy goodness, along with those chicken pan juices that also get expressed from the roasting chicken, get their proper treatment as a feature of the dish—rather than just an extraneous side effect. Adding torn pieces of bread into the pan partway through the roasting gives them time to really soak up these precious liquids, pulling them away from interfering with the crisping of the chicken skin and transforming the bread into something outrageous: schmaltzy croutons. Here’s what the whole dish looks like right out of the oven before garnishing:

RoastChicken3.JPG

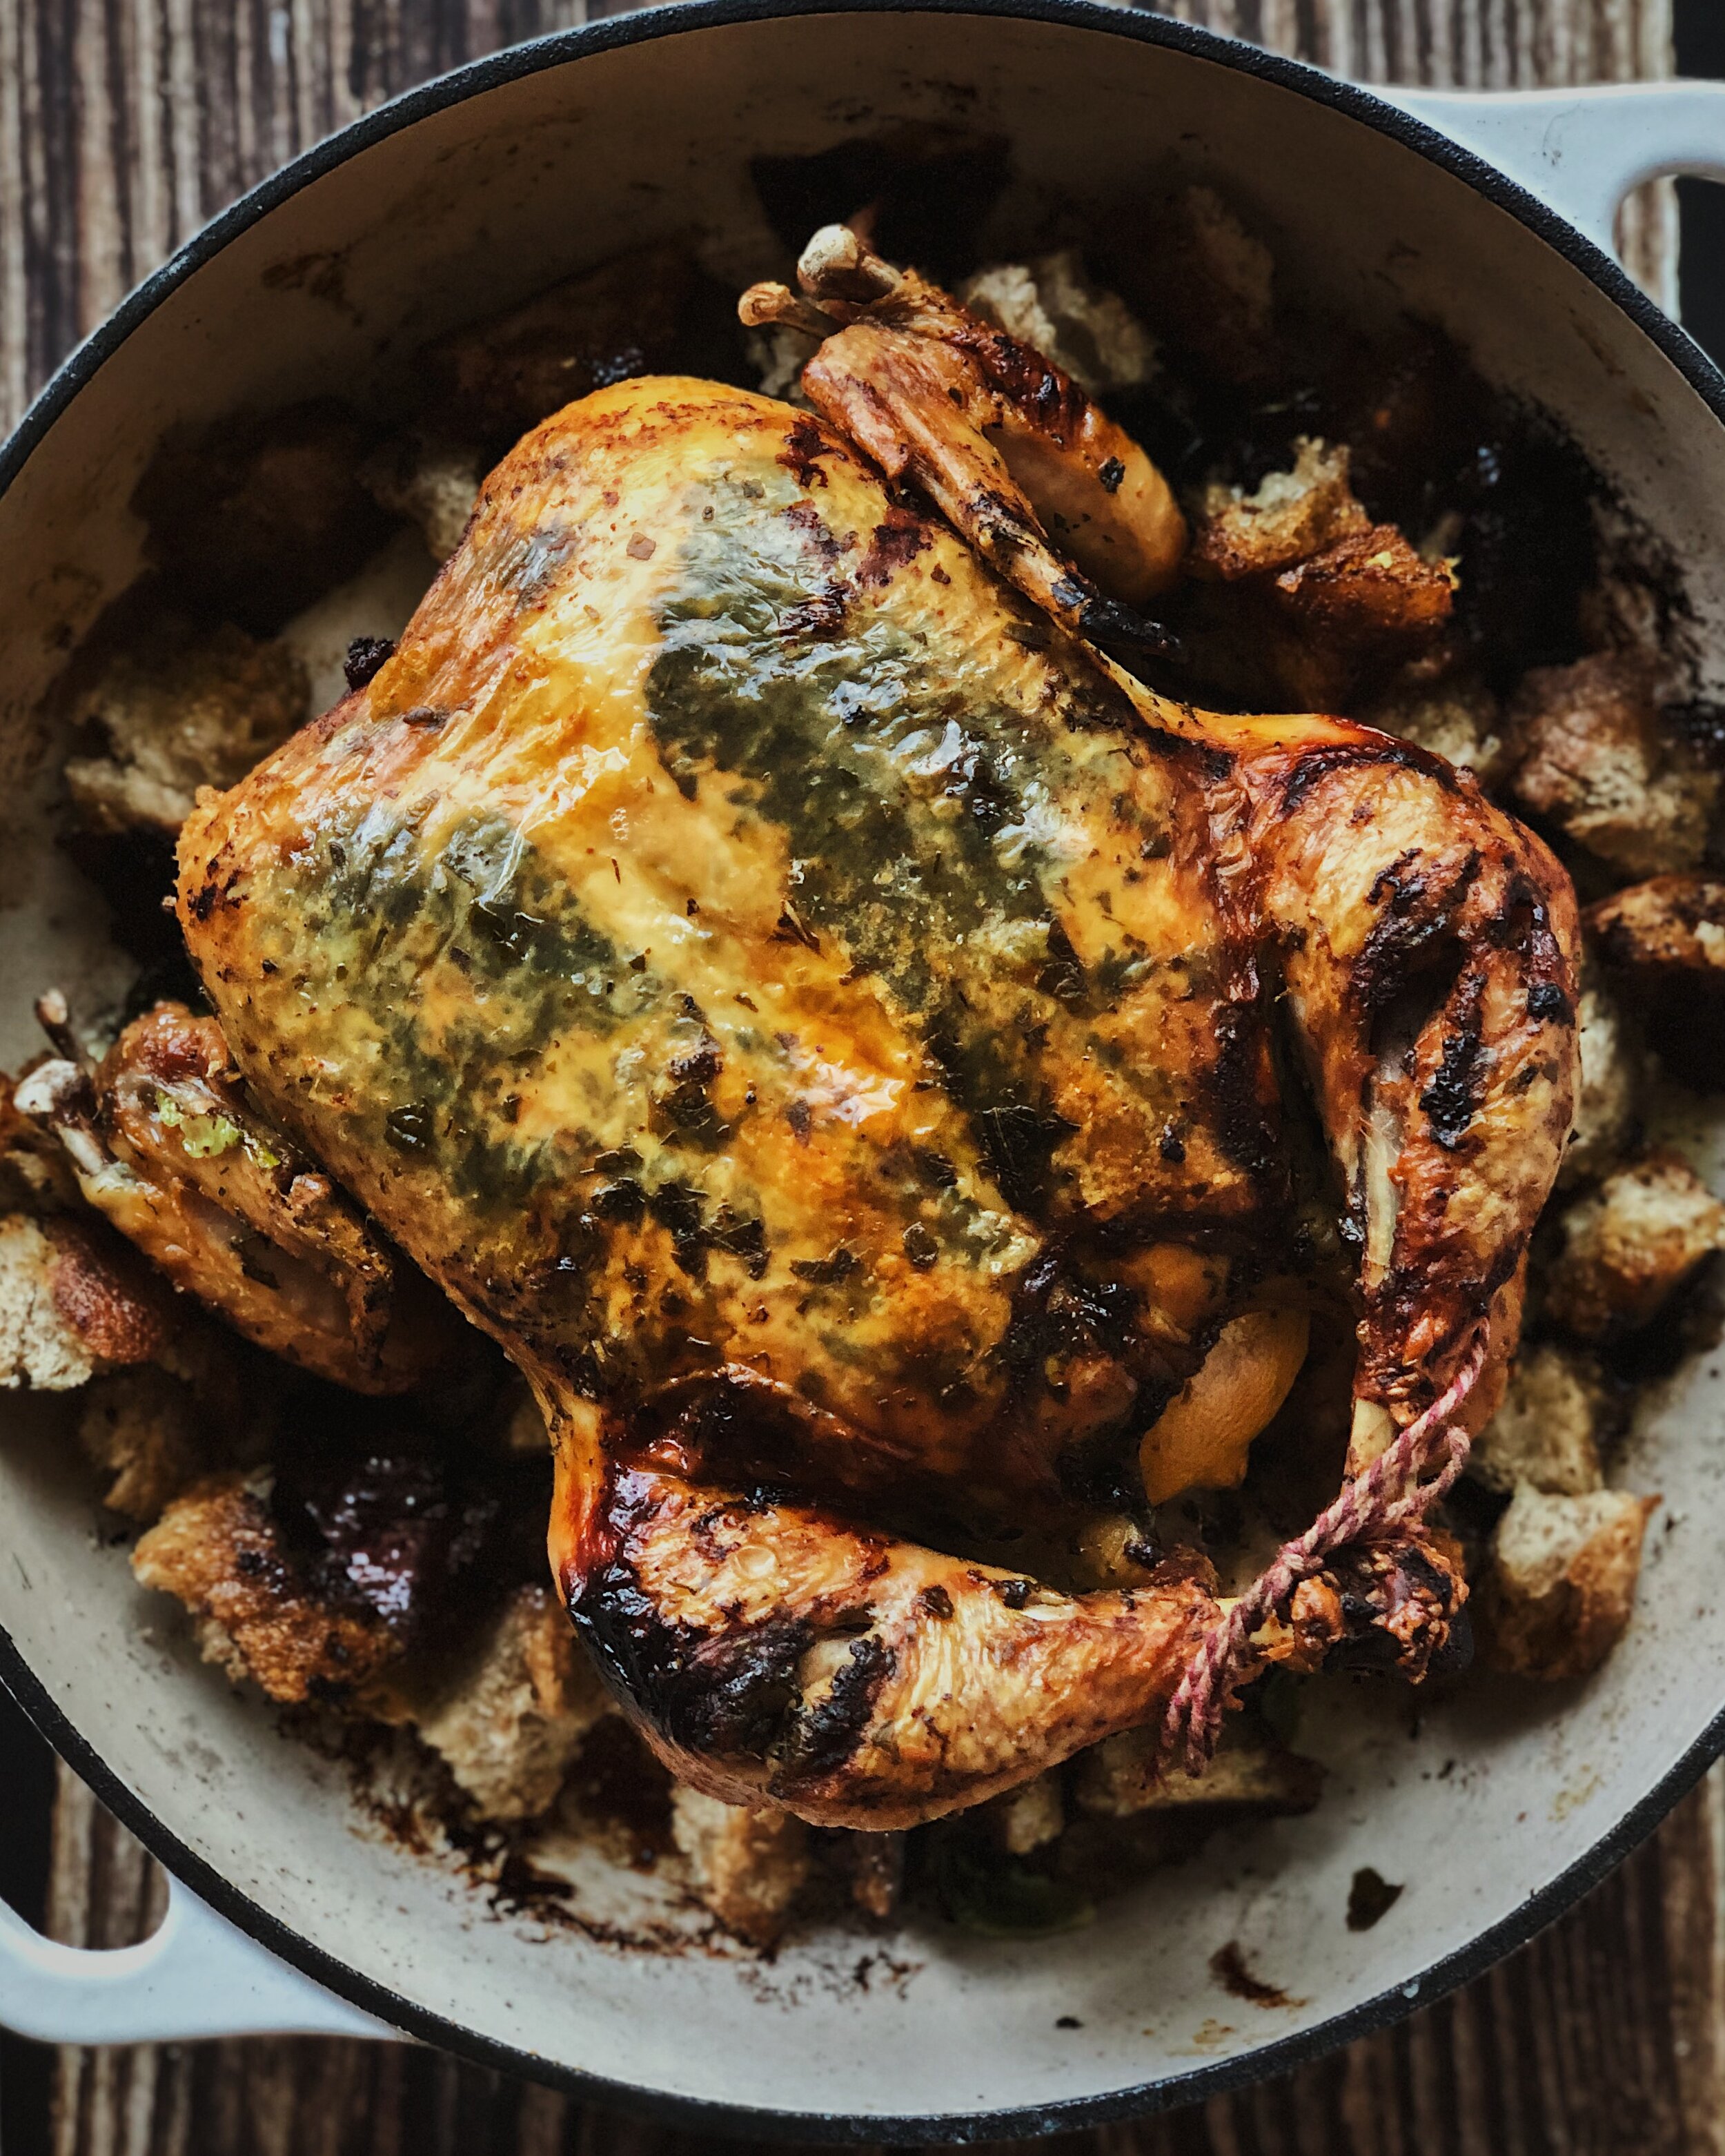
(The time that I made this for the photos, I forgot to tuck the wingtips and then had a failed attempted at correcting partway through…nothing that can’t be resolved later with garnishing magic.)

I’m using the term “croutons” here because I don’t know what else to call them; they are toasty on the top and soaked with chicken juice and fat on the bottom. After all is said and done with the chicken, these heavenly morsels can be used in a few different ways:

  • Stuffing/Dressing: While the chicken is roasting, sauté some chopped celery and chop up some rosemary and sage on standby. When the chicken is resting on the carving board, remove the garlic halves from the chicken cavity and scoop out the flesh; add those back into the pan of croutons. Remove the onion skins and mash the garlic and onion in the pan with a fork or potato masher. Add the sautéed celery and fresh herbs. Add other stuffing components to your liking. Beat together an egg and some boxed broth, pour it over the pan mixture, and fold everything together. Press it all gently into an even layer then put the pan back in the oven (turned down to 400°F) and bake until the egg is cooked through. (This is what I’ll be doing this year for my mini roast chicken Thanksgiving for two.)

  • Panzanella: Toss the croutons with some baby arugula, microgreens, and beautiful tomato chunks. Roughly chop the roasted onion and add that too. Remove the lemon that is stuffed inside the chicken cavity, squeeze it over the whole mess, and give everything another toss. Now you have a bread salad that perfectly complements your roast chicken.

  • You can also just straight up eat your chicken fat toasted bread cubes out of the pan as you wait for your chicken to rest. Sharing optional. Call it the chef’s special!

BiangBiang3.JPG

How to Make Herby Roast Chicken (with Schmaltzy Croutons)

Ingredients

1 chicken (about 4.5 lbs*), cleaned and giblets removed
2 tbsp butter
handful of fresh herbs
1 small red onion
1 head of garlic
1 lemon
lots of kosher salt
olive oil
1 tbsp wagyu fat or butter
1/2 loaf crusty bread, sourdough recommended
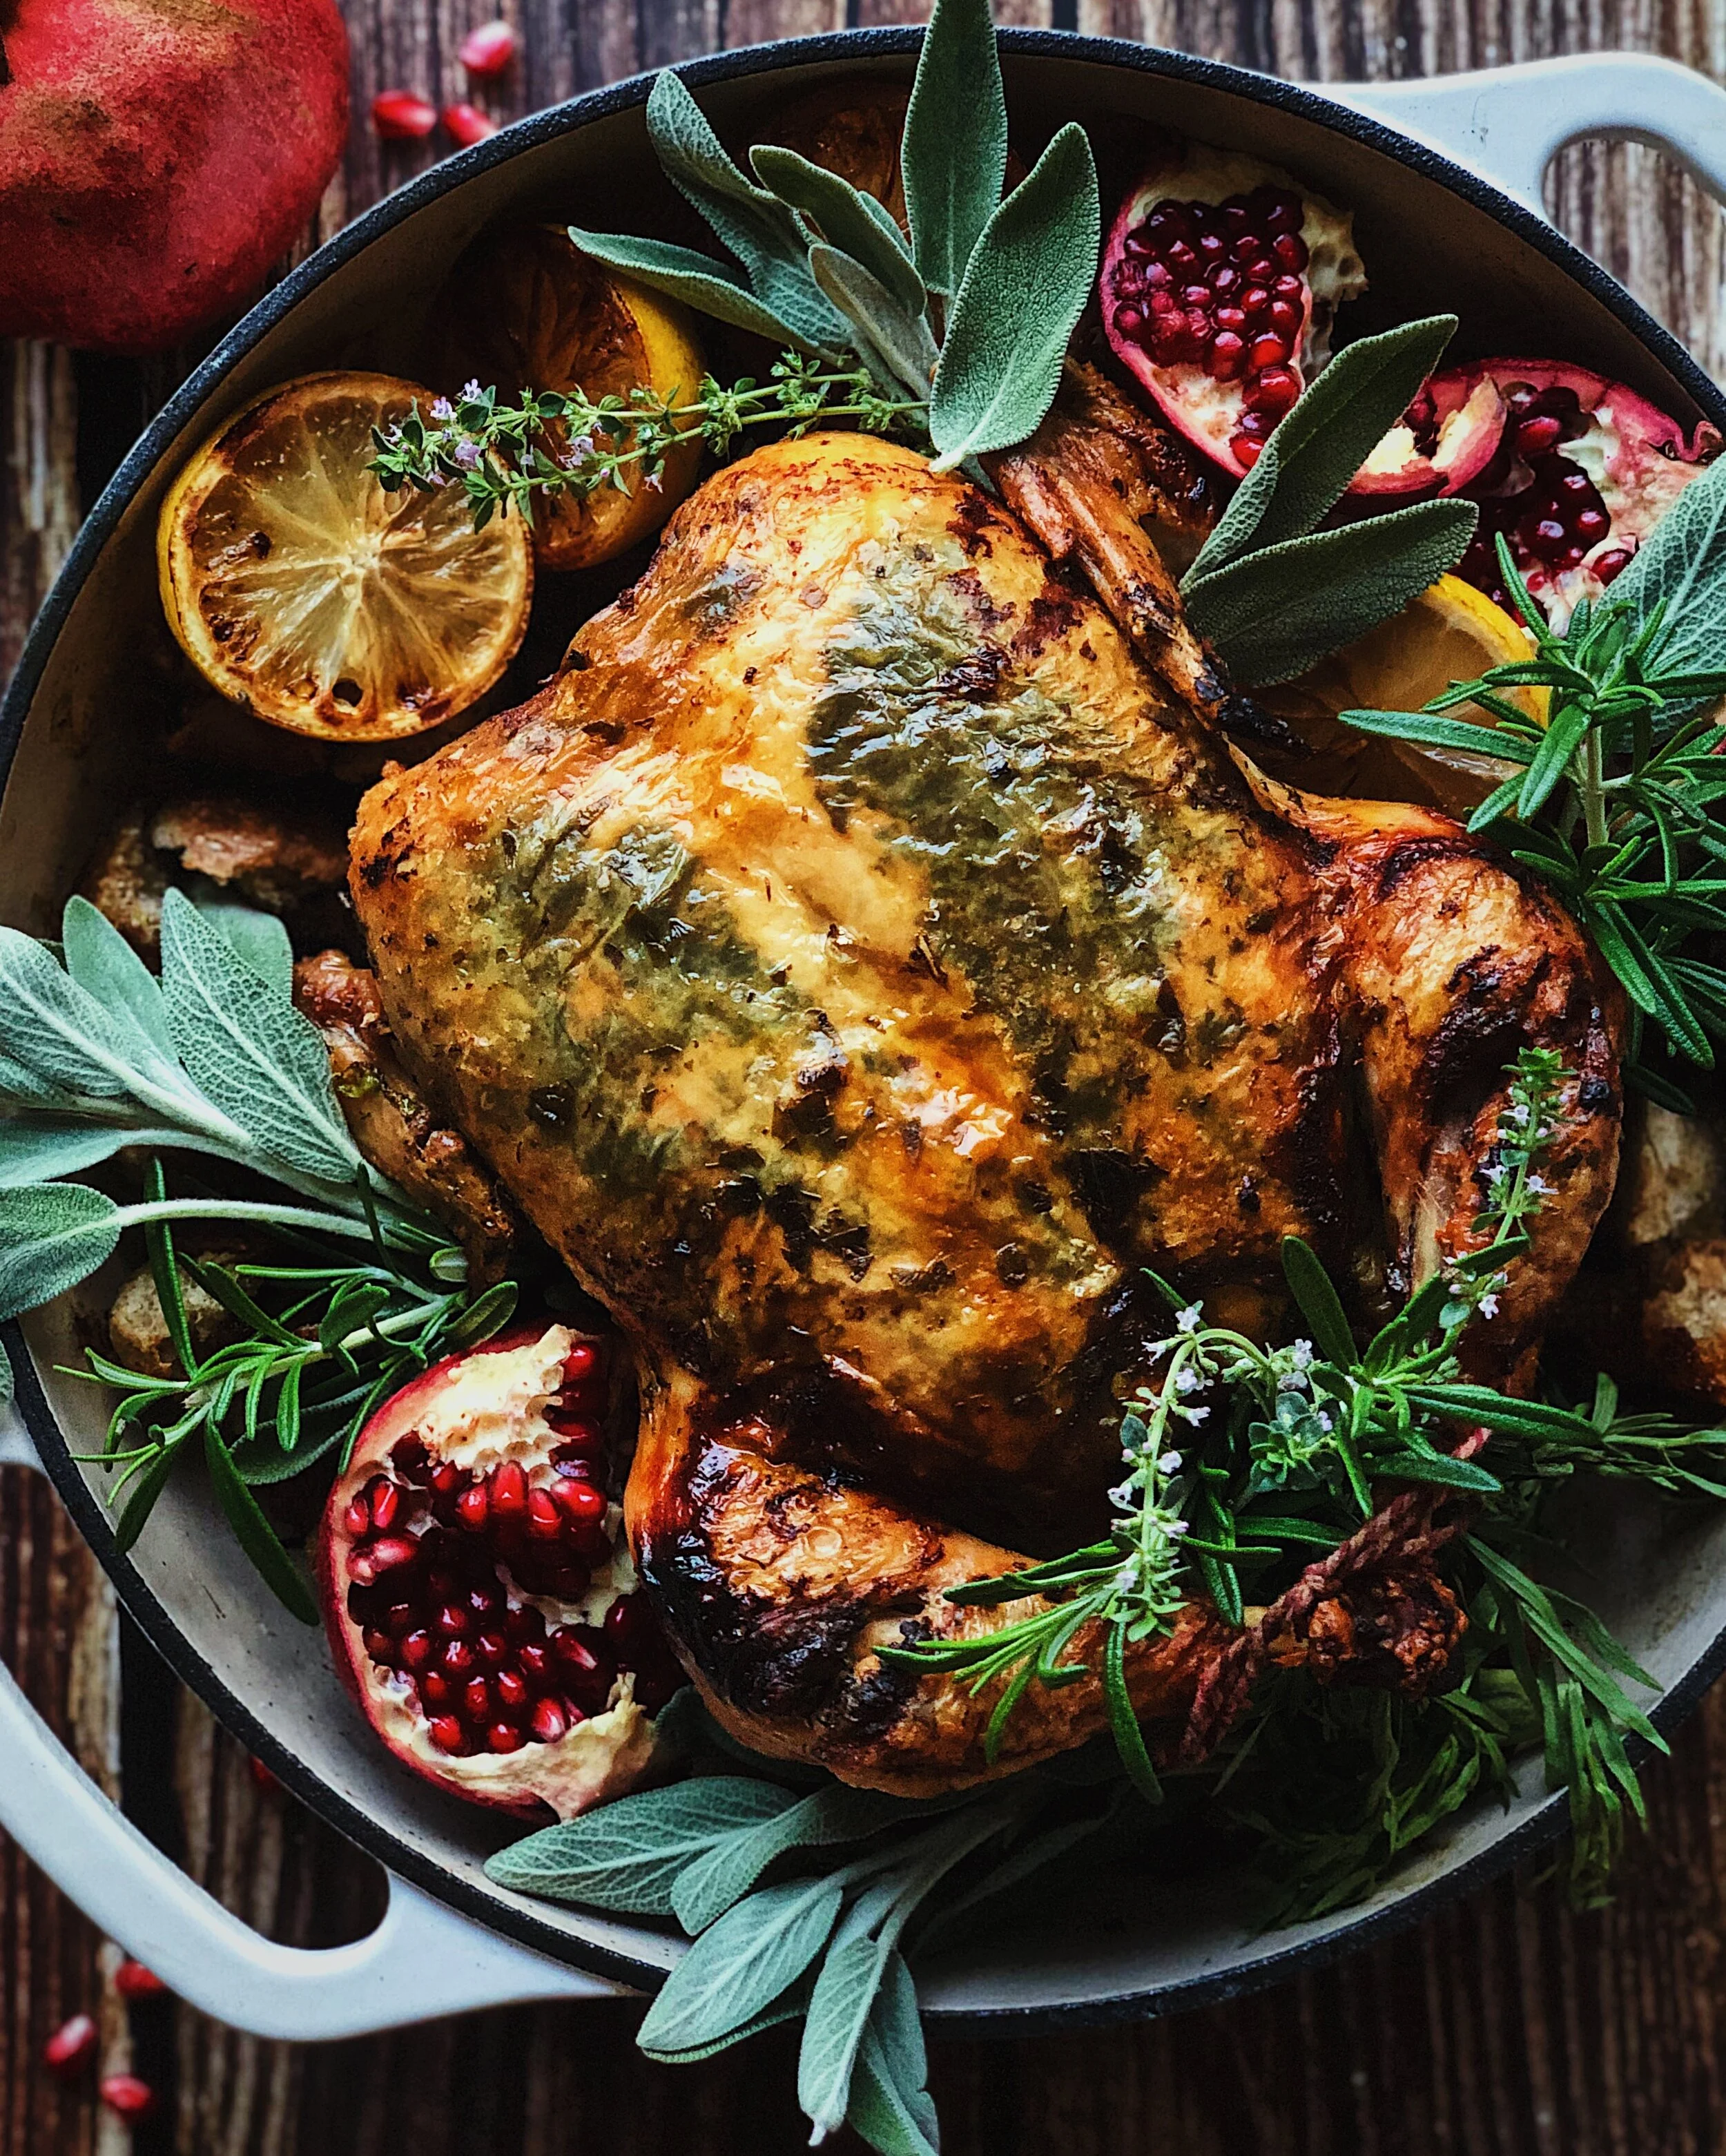
pomegranates, fresh herbs, lemons for garnish (optional)

* A 4.5-pound chicken requires 1 hour total bake time. For chickens ±0.5 lb, go with the formula (# of pounds) x 10 + 15 minutes to calculate the bake time, and adjust the following times proportionally. Chickens of sizes outside of this range, have not been tested with this recipe.

Procedure

The night before: Thoroughly rub the chicken dry, inside and out, with paper towels. You want it to be as dry as possible to produce crispy skin. Season generously with salt (but keep in mind you are not trying to salt-cure the thing; season as you would if you were cooking something right away). Place uncovered in the fridge overnight.

The next day, wipe off any excess salt or extracted moisture. With the chicken placed breasts-up, insert a small spatula or the back of a spoon from the bottom to carefully separate the skin from the meat. Remove the endcaps off the drumsticks, if desired. Then, on each drumstick, make the following 3 deep slits: in the thickest part of the drumstick, in between the leg and thigh, and in the thickest part of the underside of the thigh. (This is what will help cook the bird evenly.)

Place a shallow, large cast iron brasier or skillet on the middle rack of your oven, and preheat to 475°F. (Your vessel should be much larger than the chicken, to accomadate the bread and allow for airflow.)

Roughly chop a mixture of fresh herbs. Drizzle a bit of olive oil on top and season with a couple pinches of salt. Mix together with your fingers then stuff the herb mixture under the skin of the chicken, in both the breast area and through the slits you made in the drumsticks. Rub the residue from your hands onto the outside of the chicken. Stuff 1 tablespoon of butter under the skin over each breast. Tuck the wing tips under the torso of the chicken.

Cut the head of garlic in half and stuff into the cavity. Stab the lemon all over with a paring knife, then microwave for 30 seconds. Stuff into the cavity. Cut the onion (skin on) in half and set aside.

When the oven is ready, carefully add 1 tablespoon of wagyu fat or butter into the preheated cast iron pan and coat the bottom of the pan. Add the onion halves then place the chicken, breast-side-down, in the pan. Bake for 30 minutes.

After 30 minutes, flip the chicken over and tie the ends of the drumsticks together with kitchen twine. Return to the oven for another 15 minutes.

In the meantime, tear up the bread into about 1-inch chunks. Add the bread evenly around the chicken, then bake for another 15 minutes (or until juices run out clear when you stab the thigh with a toothpick).

Remove the chicken from the pan and place on a cutting board to rest. Cut off the twine and remove the lemon and garlic. Allow the chicken to rest for at least 15 minutes before carving. See notes above for what to do with the bread…or simply trust your instincts ;)

Recipe: Pumpkin-Shaped Pretzel Buns

Pretzel1.JPG

These photos of my finished and styled pumpkin-shaped pretzel buns are my favorite fall photos I have ever taken, so I really hope you like them too.

Having made pretzels several times now, I am still completely fascinated by them. I am awestruck and terrified by their traditional lye baths, and both relieved and amazed by how a baking soda bath can get the same brown look. I am mesmerized by the contrast in colors, and simply adore how such a relatively quick dough recipe can produce something so satisfying.

When fall rolled around and I started obsessing over pumpkin-shaped everything, I knew in my heart of hearts that pumpkin-shaped pretzels absolutely needed to exist. So, I decided to turn my go-to pretzel recipe into pumpkin-shaped pretzel buns. To be completely clear, this recipe will not produce the texture of a firm, chewy, traditional German pretzel. This is much more like the texture you’d find at a pretzel stand in an American mall (which I’ll shamefully admit I much prefer). Another disclaimer: I’ve made my soft pretzel recipe (adapted from Sally’s Baking Addiction) a few times, but unfortunately I only had a chance to try this pumpkin-shaped version once so far. So there are some caveats and learnings I want to share with you that won’t match the photos.

Some important notes:

  • Take a look at this photo below of the buns fresh out of the oven. This will show you the correct type of bakers twine to use. Do NOT use the coarse, textured brown twine seen in the beauty shots! That is clearly just there for the rustic aesthetic.

  • Also note that I tied the twine rather snugly around my dough balls. By the time I took the dough out of the water bath, I could already tell that I had made a mistake, as the dough does expand quite a bit with the boiling and baking processes. Keep your twine wrapped loosely to start, to avoid the twine getting so deeply embedded into your buns.

  • I went for rather irregular segments with my twine wrapping. Maybe go for a more symmetrical look so you don’t end up with heirloom-tomato-shaped pretzel buns.

  • UPDATE: I now have a step-by-step tutorial, with photos, for getting more symmetrical pumpkin-shaped buns. Check it out here!

But whether you do a better job than I did, or just the same regretful job as me, you’ll be able to enjoy them the same way. Tear those buns into wedges along those perforations, catch the smell of freshly baked pretzel rising out the middle, then dunk segment by segment into coarse mustard or cheese sauce. You certainly won’t regret that.

Pretzel3.jpg
BiangBiang3.JPG

How to Make Pumpkin-Shaped Pretzel Buns

Ingredients

3/4 cup warm water
1 tsp (slightly heaped) active dry yeast
1 tbsp honey
1 tbsp butter, melted and cooled
2 tsp brown sugar
1/2 tsp salt
2 cups AP flour, plus more for dusting
nonstick cooking spray
coarse salt, for sprinkling
6 pepitas/hulled pumpkin seeds

For the Water Bath

9 cups water
1/2 cup baking soda

Procedure

Combine warm water, yeast, and honey in the bowl of your stand mixer and stir gently. Allow yeast to bloom and foam up for 5 minutes.

Add butter, brown sugar, and salt, and stir together. Fit stand mixer with the dough hook and turn on to the lowest setting. Begin adding flour, 1/2 cup at a time, until a dough starts to come together. Use a rubber spatula to scrape everything together. If the dough is sticky, add a little bit more flour.

Turn the mixer to medium high and knead the dough for about 5 minutes until it feels smooth and bouncy. Turn the dough onto a clean worksurface and roll into a smooth ball. Grease the inside of the mixing bowl, and place the ball of dough back inside. Cover with a damp towel and allow to rest in a warm place for 20 minutes.

On a lightly floured worksurface, divide the rested dough into 6 equal pieces and roll each piece into a ball.

In a large pot, combine water and baking soda for water bath and bring to a boil. Preheat oven to 425°F.

While waiting for the water to boil, wrap cotton baking twine around the balls of dough to form the ridges of a pumpkin shape (see notes above) and tie together loose ends or follow the typing steps shown here.

Place buns in boiling water bath for 10 seconds on each side, then place on a parchment-lined baking tray. (I find it is easiest to do this one at a time, placing the pumpkin upside down into the water first, then flipping in the water, then scooping onto the tray.)

Sprinkle coarse salt onto the buns. Brush with additional water from the water bath if necessary for more salt adhesion.

Bake for about 15 minutes, until the buns are a rich brown color.

Allow buns to cool slightly before cutting and removing the twine. Stick 1 pepita into the top-center of each to form a leaf/stem.

Recipe: Spiced Honeynut Squash Toasts

Lily_Nov3_Social_v3.jpg

Note: This is not your #basic fall squash recipe!

As a diehard member of Team Savory, as much as I love the smell of pumpkin spice and everything nice come autumn season, my stomach never really craves baked sweets. So I am always trying to come up with ideas to capture fall flavors in ways that are appealing to my own tastes. I realized that pairing honeynut squash with Spice Tribe’s Masa Mole spice blend would be a lovely foundation for a savory fall-themed toast; it contains cinnamon—one of the usual fall suspects—but beyond that, it brings those warm vibes through toasted Mexican chilies.

It was at that point that I decided I was declaring honeynut squash mash toast a thing—the yummiest autumn-iest alternative to avocado mash toast!

If you haven’t heard of honeynut squash before, it’s like a smaller, super adorable, deeper-colored version of butternut squash. Just look at how it is barely bigger than spice bottle. Freakin’ cute!

If you take anything away from this recipe, I hope it is this combo of mashed squash and this spice blend. Much like avocado toast, and toast in general, it feels a little silly to me to set a strict recipe for a toast, so top that spiced honeynut sqaush with whatever you like! In this example, I opted for fried halloumi and crispy sage, followed by a drizzle of good-quality maple syrup because, admittedly, that little bit of sweet does really bring out the natural sweetness of the squash even in a savory dish. I sometimes find halloumi to be too salty though, so if you don’t have a halloumi brand you love but still want that fried cheese goodness on top of your toast, firm queso fresco is a great mild option that you can fry up the exact same way.

Are you ready to swap your avocado toast routine for THIS?:

Lily_Oct2_Banner.JPG

How to Make Spiced Honeynut Squash Toast

Ingredients

1 honeynut squash; peeled, deseeded, and cut into small cubes
4 slices of sourdough bread
12 sage leaves
5–6 oz halloumi cheese*, cut into 8 slices
3/4 tsp Spice Tribe Masa Mole blend
1/2 cup ricotta cheese
4 tbsp maple syrup
Olive oil
Kosher salt
1 sprig of tarragon (optional)
Sprinkle of Spice Tribe Maras Chile Flakes (optional)

* If you find halloumi to be too salty, queso fresco is a great alternative that fries the same way.

Procedure

Preheat oven to 425°F. **

Line a baking tray with parchment paper or foil. Add honeynut squash cubes and toss in some olive oil and salt to taste. Roast in oven until fork-tender, about 20–30 minutes.

In the meantime, toast bread slices to preference and set aside. (I like to heat some olive oil in a skillet, toast one side of the bread in the oil, flip, and then turn off the heat and let it sit in the pan while I prep everything else. This makes one side crusty and soggy-resistant for toppings without making the overall toast too hard.)

In a small skillet, add enough olive oil to cover the bottom in a thin layer, and heat the oil on medium. Carefully add sage leaves, trying to make them land flat in the oil. Remove the leaves when they start to crisp and look fully soaked with oil; they will continue to crisp up after being removed from the heat. Transfer to a paper towel to drain excess oil.

Using the same skillet and now sage-infused oil, fry slices of halloumi until golden brown on both sides. Transfer fried halloumi to a separate plate.

Sprinkle the Spice Tribe Masa Mole seasoning over the cooked squash, and mash squash with a fork until homogenous. 

Spread the ricotta equally on the toasts, followed by the spiced honeynut squash mash. Top with fried halloumi and crispy sage. Drizzle maple syrup over the top of each toast. Optionally, garnish with tarragon and Spice Tribe Maras Chile Flakes. Serve immediately.

**Shortcut version: Alternatively, you could steam the honeynut squash in the microwave until soft. Place cubes in a shallow bowl and cover completely with a wet paper towel. Microwave until fork-tender, about 3 minutes. Season with salt to taste before following the same directions as above for the cooked squash.

Thank you so much to Spice Tribe for sponsoring this recipe! Check them out on Instagram here or visit their website to purchase high quality spices and unique small-batch spice blends.

How to Make a Korean-Inspired Snack Board

Lily_Nov3_Social_v3.jpg

I have been really into themed nibble boards lately. Part of the appeal lies in them being another avenue for traveling the world at home through food, which has become the theme of my coping mechanism for staying home during the global pandemic. But I think I like nibble boards specifically because it takes the concept of eating meals family style—something I grew up with—and extends it to delicious snacks just being out all day for the taking.

I made this Korean-inspired board in partnership with Bibigo USA. In addition to using their super snackable mini wontons and putting a spin on pimento cheese spread by incorporating their gochujang sauce, I also tried to include crunchy snacks that I thought were really popular or iconic to South Korea. If you don’t live in Korea but you’d like to give this themed board a try, I recommend seeking out a local Korean grocery store if you have access to one, and seeing what snacks appeal to you there. (For my SF Bay Area friends, I got all the snacks, as well as the chestnuts and Bibigo mini wontons at The K Market.) If you don’t have access to a Korean shop, perhaps look into what other ethnic markets are available in your area, and try making a nibble board as a way to explore a cuisine that is new to you.

Lily_Nov3_Banner.JPG

How to Make a Korean-Inspired Snack Board and Gochujang Pimento Spread

Ingredients For the Gochujang Pimento Spread

4 oz cream cheese, room temperature
8 oz sharp cheddar, grated
2–3 tbsp Bibigo Hot & Sweet Go-Chu-Jang Sauce
2 tbsp mayonnaise 
1/2 tsp garlic powder
3 tbsp diced pimentos, drained
Salt to taste

Other Ingredients Requiring Prep

12 chestnuts
12 Bibigo Pork & Vegetable Mini Wontons
Oil for frying

Ingredients for Assembling the Board

Asian pear, sliced
Grapes
Honey butter chips
Honey butter almonds
Korean seaweed crisps
Sesame crackers
Sage, for garnish

Procedure

To make cheese spread: Combine cream cheese, cheddar, Bibigo Hot & Sweet Go-Chu-Jang Sauce, mayonnaise, and garlic powder in a food processor and process until homogenous. Transfer to a bowl and stir in diced pimentos. Salt to taste, if needed. (Can be made 1–2 days ahead; keep covered in refrigerator until ready to assemble board.)

To roast chestnuts: Preheat oven to 400°F. Using a sharp paring knife, carefully cut an X into each chestnut. Place cut-side up on a baking sheet and bake for 10–15 minutes until fragrant and cut part of shell curls back.

To fry the mini wontons: Fill a small pot about 1.5 inches deep with oil. Heat the oil and deep fry mini wontons in batches. Allow excess oil to drain on paper towels.

Assembling the board: Transfer cheese spread to a serving dish. Arrange cheese spread, chestnuts, and mini wontons on serving board. Fill in the remaining space with the other ingredients. Garnish with sprigs of sage. Allow cheese spread to soften slightly at room temperature before serving.

Lily_Nov1_Social_v1.JPG

Thank you so much to Bibigo USA for sponsoring this recipe! For more recipe ideas and to learn more about their products, visit their website!

Recipe: Candied Sweet Potatoes & Mini Wontons

Lily_Nov3_Social_v3.jpg

One thing that I find really lacking in the States (or at least in the San Francisco area) during the holiday season is the lack of festive markets and street food vendors. Traveling to other countries during the festive season, I absolutely love taking advantage of the charming activities that make holiday cheer and coziness spill into the streets; even when it’s cold and snowy, there’s a feeling of warmth as everyone is happily shopping for tasty treats. I also love when street foods double as hand warmers. In South Korea, piping hot sweet potatoes are the perfect street snack for this dual purpose of reviving numb fingers and filling bellies.

Another popular Korean way to have sweet potatoes at this time of year is goguma mattang—candied sweet potatoes. Chunks of sweet potatoes are deep-fried and then tossed in caramelized sugar, resulting in pieces that have the finest crackly sugar coating on the outside and are fluffy on the inside. When Bibigo USA asked me to incorporate one of their products into a Korean fall/winter snack, I realized that their mini wontons would go perfectly with that same candied coating as the sweet potatoes in goguma mattang.

Lily_Nov3_Social_v2.jpg

This is admittedly not the easiest recipe. There were many fails in the test kitchen (a.k.a. my home kitchen) before I got an outcome that was happy with. So, I have to say that this recipe is definitely for those who are more quick-handed and quick-footed in the kitchen. I found that the key was keeping the mini wontons and sweet potato chunks hot after frying, so that the sugar mixture doesn’t get a cold shock and immediately harden before it has time to coat them. If you get it right, though, you will be rewarded with a sweet-savory texture medley that is sure to be belly-warming.

Lily_Nov3_Banner.JPG

How to Make Candied Sweet Potatoes & Mini Wontons

Ingredients

1 medium Korean sweet potato, peeled
12–14 Bibigo Chicken & Vegetable Mini Wontons
1 tbsp neutral oil, plus more for frying
3 tbsp raw sugar
1 tsp sesame seeds, toasted


Procedure

Use the rangiri technique to cut the sweet potato into random, multi-faceted 1-inch pieces. Begin by cutting off a small piece from one end at an angle. Roll the sweet potato 90 degrees (or a quarter of the way) and make another diagonal cut in the middle of the previously-cut surface. Continue rolling and cutting the rest of the sweet potato.

Soak the sweet potato pieces in cold water for 10 minutes to remove excess starchiness. Drain, pat dry, and allow to dry completely, for about 10 minutes.

In the meantime, fill a small pot about 1.5 inches deep with oil. Fry the mini wontons, in batches if necessary, until golden. Drain on paper towels.

Then deep fry sweet potato pieces the same way. Drain on paper towels.

Place fried mini wontons and sweet potatoes in the oven on the warm setting, or at 180–200°F to keep warm. (This is important to help the sugar coating spread evenly on their surface without hardening too quickly.)

Prepare a large tray lined with parchment paper.

To a large, shallow pan, add 1 tablespoon of oil and swirl to distribute. Turn on heat to medium and scatter sugar over oil. (I found that it was better to not stir or agitate the mixture too much at this point.) Once sugar begins to melt, reduce heat to low. Once sugar is all melted, add the fried mini wontons and sweet potatoes and use a rubber spatula to gently mix together. Keep mixing for 1–2 minutes until everything is coated.

Pour contents onto the prepared parchment paper and quickly make sure none of the pieces are touching. Sprinkle with sesame seeds and allow sugar coating to harden before transferring to a bowl to serve.

Thank you so much to Bibigo USA for sponsoring this recipe! For more recipe ideas and to learn more about their products, visit their website!

Recipe: Chicken Jook with Ginger-Scallion Oil

Lily_Oct2_Social.JPG

Rice porridge is known by many different names—I learned the term “congee” in America, but grew up calling it the Cantonese term “jook”. But I think something that all Asian kids and former kids can agree upon is that it is THE dish for Asian parents to make as a cure for any and all under-the-weather situations. I’ve had several people tell me they don’t like jook because it reminds them of the one thing they ate while being sick as a kid…but I personally love jook in sickness and in health!

That being said, as an adult there are times when that cure-all feels desperately needed, and parents are no longer around to stand over the stove to slowly simmer that rice into a tummy- and soul-warming porridge. In those times, shortcuts are a necessity! So when Bibigo USA asked me to develop a jook recipe for flu season, I wanted to make sure the recipe was super easy and ready to provide comfort in 30 minutes.

The ginger-scallion oil was inspired by the kind that my mom used to make to go with Hainanese chicken rice, but I also included garlic to help boost immunity and ward off vampires. Not only is it awesome on jook, chicken, and rice, but I have been using it on biang biang noodles, roast duck, and pretty much anything.

Lily_Oct2_Banner.JPG

How to Make Chicken Jook with Ginger-Scallion Oil

Ingredients

1 Bibigo Cooked Sticky White Rice
2 cups bone broth or chicken stock
1 tbsp + 1 tsp ginger, grated and divided
1–2 scallions, thinly sliced
1 small clove garlic, minced
Coarse Kosher salt, to taste
2 tbsp avocado oil*
1/3 cup rotisserie chicken, shredded

*Can be substituted with other neutral, high smoke point cooking oils, but not olive or sesame oil

Procedure

Microwave Bibigo Cooked Sticky White Rice according to instructions on packaging for 90 seconds.

Combine the broth, microwaved rice, and 1 teaspoon ginger in a small pot and bring to a boil. Turn down the heat to medium and allow to boil for 10 minutes. Add 1/2 cup water, and continue to simmer, stirring occasionally, until the jook becomes homogeneous, about 10 minutes. Add salt to taste.

While jook is boiling, prepare the ginger-garlic-scallion oil. Gently blot excess moisture from the remaining ginger. In a small heat-safe bowl, combine ginger, scallions, and garlic, plus a generous pinch of salt. Heat oil in a small saucepan until it just starts to smoke (or test by throwing in a small piece of scallion to see if it sizzles). Carefully pour oil over aromatics and mix well. 

When jook is the desired consistency, transfer to a bowl and top with shredded chicken. Top with ginger-scallion oil and serve.

Thank you so much to Bibigo USA for sponsoring this recipe! For more recipe ideas and to learn more about their products, visit their website!

Recipe: Mandu Jeongol

Lily_Oct1_Social_v2.JPG

I can’t wait for hot pot season. Despite usually preferring sunshine, I do have a deep appreciation for gloomy weather that is motivated mostly by my stomach.

I think budae jjigae has gotten some spotlight in recent years—a trendy dish among younger adults in South Korea but a dish borne out of a deep and sad history. (I learned a lot from this article on Food52 and this video from Munchies). So for those who already know and love budae jjigae in its modern revival, the easiest way I describe mandu jeongol to you is a healthier, more veggie-forward version. While budae jjigae night feels like going all in on processed, salty favorites (no sarcasm here; I LOVE Spam), mandu jeongol night feels like a nice cozy night in, eating lots of fresh veggies and loving it. It can definitely still involve lots and lots of soju though, too!

For me, the most key ingredients to a good mandu jeongol are the crown daisy greens (also known as chrysanthemum greens, I find these at Asian markets); gray squash (I get this from my neighborhood Mexican market), and of course ready-made mandu/dumplings. While even the first two can be improvised if you do not have access to less mainstream produce, do not skimp on the mandu! As I have said many times before on my blog, Bibigo Beef & Vegetable Mandu are my absolute fave when it comes to frozen dumplings. They are so juicy and flavorful! So, obviously that is what I used here. Veggies are great and all, but obviously these mandu were the best part of the hot pot.

As with any hot pot, the ingredients and amounts are just guidelines. Eat things as they get cooked to your liking, and adding more ingredients as you go!

Lily_Oct1_Banner.JPG

How to Make Mandu Jeongol

Ingredients for soup base

4 tbsp coarse gochugaru
2 tbsp soy sauce
2 tbsp fish sauce
5–6 cloves garlic, minced
1 tbsp Korean plum extract or Chinese plum sauce
32 oz bone broth or chicken stock
Salt to taste

Ingredients for Hot Pot

1/2 medium onion, sliced
3 scallions, cut into 2-inch pieces
1/2 block firm tofu, sliced
1 gray squash, sliced
1 carrot, sliced*
6 cremini or shitake mushrooms
3 ounces enoki mushrooms
12 ounces napa cabbage, cut into chunks
2 cups crown daisy leaves
8+ Bibigo Beef & Vegetable Mandu
1/2 cup kimchi (optional)
1/2–1 cup tteok/fresh rice cakes (optional)

* I used mini bento vegetable cutters to cut my carrot slices and give them that scalloped edge.

Procedure

Make soup base by combining gochugaru, soy sauce, fish sauce, garlic, and plum extract/plum sauce. Mix together and set aside.

In a wide, shallow pot, evenly distribute the onions and white parts of scallions. Add kimchi, if using. Stir together sauce mixture with a splash of broth and pour evenly over onions.

Arrange remaining vegetables and tofu (and rice cakes, if using) in the pot as desired. Top with frozen mandu. Fill the pot using the remaining broth. Cover, and place on a portable cooktop/burner at the table. Bring to a boil, remove the lid, and enjoy eating the ingredients with your table companions as they get cooked.

Thank you so much to Bibigo USA for sponsoring this recipe! For more recipe ideas and to learn more about their products, visit their website!

Photoshoots for La Playa Carmel and Brophy's Tavern

Last month, I went down to Carmel and shot some photos for a returning client, Classic Hotels & Resorts; they have two lovely properties in Carmel-by-the-Sea: La Playa Carmel and Hotel Carmel. When I shoot at a restaurant, I always try to capture their unique vibe and I love it when this results in a look and feel that is a bit different from what can be seen on my own Instagram account or blog. I am really happy with how the photos from these shoots came out, so I thought I would share some of my favorites here.

LilyMorello_Brophys_17.JPG
LilyMorello_Buds_01.JPG
LilyMorello_Brophys_04.JPG
LilyMorello_Brophys_20.JPG
LilyMorello_LaPlayaCarmel_06.JPG
LilyMorello_Buds_11.JPG

Downloadable Pumpkin Wallpaper

Just popping in to share a casual photo of some cool looking pumpkins that I took last weekend at Clancy’s Pumpkin Patch. The staff seemed nice and attentive there and they had a cool variety of pumpkins of all sizes. I went home with some mini white ones and mini orange ones with really interesting looking stems, but I would have liked to bring home this big gray one!

Save the images to your phone to use them as your wallpaper (these are sized for the iPhone X).

>> Click to download Pumpkin Patch wallpaper <<

LilyMorello_Wallpaper003_PumpkinPatch.JPG

Please note that these are for personal use only and not to be used for any commercial purposes. All copyright of these images is retained by me, Lily Morello.

How to Make an Instant Noodle Soup Jar

Lily_Oct3_Social_v1.JPG

So, I really really like instant noodles. But I try to only indulge in them in desperate times of need when my fridge is barren or I am too incapacitated to make something of nutritional substance. However, I have always wanted to make instant noodle soup jars at some. The idea of packing one of these up for a loved one’s lunch, seeing the colorful, fresh ingredients in layers through the glass, and thinking about converting them into a comforting soup with just the addition of hot water—just like an instant cup noodle—gives me all the hygge feels for some reason.

Thus, I collaborated with Bibigo USA to make a Instant Kimchi Noodle Soup Jar. The recipe below shows you how to make a great slightly spicy base for a noodle soup but the other ingredients are totally just guidelines. Experiment with other veggies or types of noodles if you like! The whole point is to create a custom instant noodle soup that suits your tastes and is full of the nutritional substance that is pretty dang lacking in a storebought instant noodle cup. Just make sure to par-cook anything that’s really firm, because you will want everything that goes into the jar to soften and cook in the same amount of time.

Lily_Oct3_Banner.JPG

How to Make Instant Kimchi Noodle Soup Jars

Ingredients for soup base

2 tbsp Bibigo Hot & Sweet Go-Chu-Jang Sauce
1 clove garlic, minced
1 tsp ginger, minced
2–3 tsp doenjang or soybean paste
1 tsp kimchi juice

Other Ingredients

1/2 bundle soba noodles
1/3 cup kimchi
1 scallion, thinly sliced
1/3 cup beech mushrooms
2 large fried tofu puffs, sliced
1/2 cup baby spinach leaves
1/2 tsp black sesame seeds (optional)

Procedure

Combine Bibigo Hot & Sweet Go-Chu-Jang Sauce, garlic, ginger, doenjang, and kimchi juice in a bowl and mix until well incorporated. This is your soup broth base.

Bring a large pot of water to a boil. Par-boil soba noodles just until they are no longer brittle, about 2–3 minutes. Immediately remove noodles from pot and rinse with very cold water. Allow to drain thoroughly.

Pour sauce mixture into the bottom of one 32-ounce jar or two 16-ounce jars. (One 32-ounce jar will fill a large ramen bowl when emptied.) Add kimchi, scallions, mushrooms, tofu puffs, and par-boiled noodles. Top with spinach and sesame seeds, if using. Place lid on jar(s) and store in refrigerator until ready to use.

When ready to eat, bring kettle of water to boil. Fill jar with boiling water until the level reaches the bottom of the spinach layer. Allow noodles to soften and finish cooking, about 3 minutes. Carefully stir everything together before consuming.

956C3A63-60D2-4AEA-B65F-EE4260252BA0.JPG

Thank you so much to Bibigo USA for sponsoring this recipe! For more recipe ideas and to learn more about their products, visit their website!

Recipe: Organic Potsticker Farmers Market Bowl

Lily_Sept1_Social.JPG

September is Organic Harvest Month, so Bibigo USA asked me to create something for this theme using their Organic Potstickers range. I decided I wanted to put together a bowl that embodied the joy of a good farmers market haul and this is what I came up with. I find it to be such a feast for the eyes when I enter a farmers market or a very well stocked produce aisle and all the piles of leafy greens and fruits are just waiting to be taken home. I wanted to capture that in bowl form. I was also inspired by falafel buddha bowls, and thought that swapping out the falafel for Bibigo Vegetable Organic Potstickers would be a fun twist.

The recipe below is just a guideline, or a place to get you started with this concept. I encourage you to go to your local farmers markets and organic independent grocers and select the greens that really appeal to you. Just keep in mind a variety of textures—that’s what makes for a good grain bowl like this. Try to have soft leafy greens (like watercress), hardier greens (like kale), something crisp/crunchy (cucumber). I also recommend including something that feels creamy and satisfying, like the avocado, but you could also include more potstickers instead!

Lily_Sept1_Banner.JPG

How to Make Organic Potsticker Farmers Market Bowls

Ingredients

10 Bibigo Vegetable Organic Potstickers
2 tbsp cooking oil
1/2 cup quinoa, washed
1 cup water
1/4 cup parsley, finely chopped
2 tsp lemon juice
3 tbsp extra virgin olive oil, divided
1/2 bunch watercress
1 cup baby kale leaves
1/4 cucumber, sliced
1 avocado, pitted and sliced
Salt, to taste
Tahini, to taste
Black sesame seeds
Edible flowers (optional)

Procedure

To prepare the potstickers, heat a large nonstick pan over medium-high heat and add cooking oil. Once oil is hot, place potstickers into pan. When bottoms are golden brown, add a small amount of water into the pan and immediately cover. (Be careful, as oil can splatter.) Allow potstickers to steam until water has evaporated and potstickers are heated through, about 2 minutes.

To cook quinoa, pour raw quinoa in a small pot and heat on medium until slightly toasted. Add 1 cup water and pinch of salt. Bring to a boil, then reduce to a simmer and continue to cook uncovered until the water appears to be absorbed, about 15–20 minutes. Cover, turn off the heat, and allow to steam for 5 minutes.

Combine 1 tablespoon olive oil with baby kale and massage the oil onto the leaves until glossy. Set aside.

Combine parsley, lemon juice, 2 tablespoons olive oil, and 2 pinches of salt in a small bowl and whisk together.

When quinoa is ready, add half of the herb dressing and toss to combine.

Divide baby kale, watercress, cucumber, and avocado between two bowls. Add prepared quinoa and top with potstickers. Drizzle remaining herb dressing over the bowls and drizzle tahini to taste. Top with black sesame seeds.

956C3A63-60D2-4AEA-B65F-EE4260252BA0.JPG

Thank you so much to Bibigo USA for sponsoring this recipe! For more recipe ideas and to learn more about their products, visit their website!

Recipe: Honey Butter & Matcha Salt Mini Wontons

Lily_Sept2_Social.JPG

For this recipe, I partnered with Bibigo USA to come up with a fun way to serve their Pork & Vegetable Mini Wontons, in honor of National Dumpling Day (September 26th). I genuinely love how this product is just the perfect bite size, and how they are a lot juicier and more flavorful than most frozen dumplings. So, I thought why not serve them up in a way that really takes advantage of their snackability?

In South Korea, it is common for snack foods and finger foods (like fried chicken) to come in this half-half style of two different flavors that taste great individually but also are better together. I love this, because whenever I am faced with a menu of lots of flavor options, I always get weirdly anxious about having to make a decision and the possibility of choosing the wrong one. Since it is also common in South Korea for snack foods to mix together sweet and savory elements, I wanted to try to do the same thing here.

Honey butter is an extremely popular flavor there, so I decided to capture that in my mini wontons snack platter. Believe it or not, making a good honey butter sauce to toss with Bibigo Pork & Vegetable Mini Wontons, popcorn, almonds, or whatever your heart desires is truly as easy as combining equal parts honey and butter.

I wanted my savory flavor to be a little unique, and to also bring some color to my mini wontons snack platter. I love when snack foods are seasoned with seaweed seasoning, so I wanted to do something in that vein, but with a sorta trendy twist. Here in the States, matcha so popular but typically only associated with sweet drinks and desserts; however, the sweetness only comes from added sugar. Matcha on it’s own, to me, as a bit of a savory quality to it and it is not uncommon in Asian cooking for matcha/green tea to be an ingredient in savory preparations. I often see matcha salt served with Korean BBQ, and love how the matcha adds a fragrant and very subtle grassy component to the salt. So, I decided to season my savory half with matcha salt and roasted seaweed.

Serving up seasoned wontons in the same manner as party wings or popcorn chicken probably would not have occurred to me were it not for this brand partnership, but I am so excited for this recipe now. This is one I will definitely be making over and over again, and I hope you will, too.

Lily_Sept1_Banner.JPG

How to Make A Honey Butter & Matcha Salt Mini Wonton Snack Platter

Ingredients

35–40 Bibigo Pork & Vegetable Mini Wontons
Vegetable or canola oil, for frying

For the Honey Butter

1 tbsp honey
1 tbsp butter
1/2 tsp sesame seeds, toasted

For the Matcha Salt

3/4 tsp culinary grade matcha powder
1/4 tsp fine Himalayan sea salt
3 sheets roasted seaweed snack

Procedure

Combine matcha and salt in a small bowl until salt is completely coated by the matcha powder. Set aside.

Place seaweed snack sheets into a zip-top bag and crush into small flakes. Set aside.

Fill a small heavy pot about 1.5 inches deep with oil. Heat the oil and work in batches to deep fry the mini wontons. Allow excess oil to drain on paper towels.

While mini wontons are still hot, divide into two equal portions. Sprinkle 1/4 teaspoon of the matcha salt over one portion.

In a small saucepan, heat butter on low until it just finishes melting. Stir in honey and keep stirring until the mixture starts to foam. Pour over the remaining unseasoned mini wontons and gently toss to coat.

Right before serving, toss together matcha salt mini wontons with an additional 1/4 teaspoon matcha salt and the crushed seaweed (you will have some seasoning left over). Plate both sets of wontons on a single plate. Sprinkle sesame seeds on top of the honey butter wontons.

Thank you so much to Bibigo USA for sponsoring this recipe! For more recipe ideas and to learn more about their products, visit their website!

Recipe: Corn Cheese With Mandu

Lily_Sept1_Social.JPG

Corn-based snacks/drunchie foods are some of my absolute favorite indulgences ever. So when I go to a Korean bar or KBBQ place, I am always in search of the corn cheese. There used to be a Korean snack/karaoke place here in San Francisco that would give you corn cheese FOR FREE as a sort of appetizer before the banchans, and ever since it closed there has been a dark void in my heart. It really never occurred to me until pantry recipes came in vogue with the pandemic lockdown, and I was keeping more cans of corn around than per usual, that I could make my beloved corn cheese at home. After all, it is literally just corn + cheese.

Or is it???

Yes, I found that you really can just make corn cheese with canned corn and melted cheese. BUT you can also elevate it to the next level of awesomeness with really not that much additional trouble at all by adding some elote-inspired seasonings and garnishes. And then at that point, you may as well add some juicy dumplings so you can justify eating corn cheese as a full on meal. After all, you only live once. I recommend serving this incredible masterpiece on some sort of tabletop burner if you have one, to keep the corn cheese melty and dippable while you indulge.

Lily_Sept1_Banner.JPG

How to Make Easy Corn Cheese with Mandu

Ingredients

8 Bibigo Beef and Vegetable Mandu
Cooking oil, for frying
1 cup canned corn, drained
6 oz mozzarella cheese, freshly grated*
2 oz cream cheese, softened

Toppings

Gochugaru, finely ground
Cilantro, chopped
Cotija cheese, crumbled
Mayonnaise

* Pre-grated mozzarella contains stabilizers that keep the cheese from clumping together, and also keep them from melting smoothly. It is worth the effort to grate it yourself!

Procedure

Fill a heavy medium pot with enough oil to submerge the mandu. Heat the oil and deep fry the mandu, working in batches if necessary. Allow excess oil to drain on paper towels.

Mix together canned corn, mozzarella, and cream cheese. Spread mixture in even layer in a cast iron skillet. Heat on medium until the cheese is completely melted, about 5–6 minutes. If desired, place under broiler for an additional 3 minutes or until the surface starts to develop golden brown spots.

Arrange prepared mandu on top of corn cheese. Top with gochugaru, cilantro, cotija, and mayo as desired. Serve immediately.

956C3A63-60D2-4AEA-B65F-EE4260252BA0.JPG

Thank you so much to Bibigo USA for sponsoring this recipe! For more recipe ideas and to learn more about their products, visit their website!

Easy Chimichurri Shrimp Tacos

Recipe_ChimiShrimpTacos_03.JPG
Recipe_ChimiShrimpTacos_01.JPG

Ever since we have been sheltering in place, I have found that keeping a big bag of jumbo “e-z peel” shrimp in the freezer has been super useful. They are quick to defrost and cook, and they feel pretty luxurious when they are a nice large size.

This taco recipe that I developed for my friends at Nomtastic Foods is summery, fresh, and pretty dang easy to put together. While the shrimp make it super satisfying, the star is the chimichurri—a raw Argentinian condiment that is typically served with steak but really goes great with everything.

CLICK HERE to get the recipe!

How to Steam Dumplings Without a Steamer

With a bonus Chili Garlic Dipping Sauce recipe!

JUMP TO RECIPE >>

Lily_Aug2_Social.JPG

Yes, this is a sponsored post, but in all honesty, Bibigo makes the BEST frozen dumplings I have ever had. Don’t believe me? Then at least take the word of Korean home cooking queen, Seonkyoung Longest.

Specifically for me, Bibigo Beef & Vegetable Mandu in particular are the most amazing. They are crazy juicy and flavorful. I don’t see a lot of beef filled frozen dumplings out there, so I think the taste of the filling is also quite unique as far as frozen dumplings go.

My favorite way to have these dumplings is pan-fried, but Bibigo USA asked me to share a hack for folks who want to have them steamed yet don’t have a bamboo steamer (or any sort of device designed for steaming) at home. I totally get it because my kitchen storage space is very limited as well, and I avoid buying new gadgets (especially bulky ones) as much as I can. So, I hope this hack is useful!

Lily_Aug2_Banner.jpg

How to Steam Frozen Dumplings Without a Steamer

Ingredients

10 Bibigo Beef & Vegetable Mandu
5 napa cabbage leaves

Equipment

cooling rack (for baking)
shallow, wide pot or pan
aluminum foil

Ingredients for Chili Garlic Dipping Sauce

5 tsp soy sauce
1 tbsp black vinegar
1 tbsp sugar
1 clove garlic, minced
2–3 red Thai chilies, sliced
1 tsp sesame oil
1 tbsp water

Procedure

Place a pot of water on high heat and bring up to a simmer. In the meantime, tear each napa cabbage leaf in half. Place leaves on top of a metal cooling rack to prevent the dumplings from sticking, then place a frozen mandu on top of each piece. Cover the cooling rack in aluminum foil, forming a loose tent over the dumplings but crimping around the edges of the rack to form a seal. Place cooling rack with dumplings carefully over the pot of simmering water and allow them to steam for 7–8 minutes.

While waiting for dumplings to steam, combine all the dipping sauce ingredients in a small pot on medium-low heat and bring to a simmer. Then transfer to a small dish.

When dumplings are ready, remove the pot from heat and, wearing an oven mitt, carefully remove the foil.

Serve steamed dumplings with dipping sauce.

Thank you so much to Bibigo USA for sponsoring this recipe! For more recipe ideas and to learn more about their products, visit their website!

Recipe: Bulgogi Tteokbokki

Lily_Aug1_Social.JPG

I had very little appreciation for the simple stir-fry growing up; I always longed for those Western foods (macaroni and cheese, spaghetti) that felt so very novel and different from my parents’ homecooked meals. But as an adult, I see now how one-dimensional those other foods are (keeping in mind I only knew them in boxed and jarred forms at the time) and how layered in flavor and diverse in starring ingredients even the quickest of stir-fries can always be. I now know how handy it is being able to quickly bring together some veggie scraps and some sort of rice-flour-based carb, and with the power of my Asian pantry of seasoning sauces and the magic of the maillard reaction, everything gets transformed into a quick and tasty lunch.

My spouse is quite enthusiastic about Korean rice cakes, or tteok, so I am always tossing them into a meal when I see the opportunity. They are quite fun to chew, like a more firm version of mochi or rice noodle roll. They come in various shapes and sizes and can usually be found at any Asian supermarket. I believe they are most commonly known for swimming in a sweet-spicy bright red tteokbokki sauce but they also work really well as part of a stir-fry, as you’ll see here.

For this recipe, bulgogi beef slices, marinated in Bibigo Original Korean BBQ Sauce, serve as the protein for the dish, hence the name, Bulgogi Tteokbokki!

Lily_Aug1_Banner.JPG

How to Make Bulgogi Tteokbokki

Ingredients

1/2 lb sirloin steak, sliced thinly against the grain
4 tbsp Bibigo Original Korean BBQ Sauce
1 lb Korean rice cakes, or tteok
1 tbsp soy sauce
1 tbsp sesame oil
1 carrot, sliced
1/4 onion, sliced
2–3 oz beech mushrooms, ends trimmed
1/2 green bell pepper, sliced
1 scallion, thinly sliced
1 tbsp sesame seeds, toasted
Cooking oil

Note: Vegetable types and quantities are just a suggestion. Use whatever suits you!

Procedure

Combine the steak and marinade in a bowl and place in the refrigerator.  Allow to marinate for at least 30 minutes.

If rice cakes are frozen, soak in cold water for 10 minutes to thaw. (I always keep some on hand in my freezer!) Skip this step if rice cakes are fresh.

Bring a pot of water to a boil and add rice cakes. Boil, stirring occasionally until rice cakes begin to float to the surface of the water, about 2–3 minutes. Cook for an additional minute after they float, then drain. (Note: Different brands of rice cakes tend to have slightly different textures. Be sure to try one and make sure the texture is to your liking before draining.) Combine rice cakes with soy sauce and sesame oil and set aside.

Heat a large skillet or wok. Drain most of the excess marinade from beef. Add enough cooking oil to coat the bottom of the pan, then add beef. Stir-fry for 2–3 minutes, then add carrot, onion, and bell pepper in that order, giving a quick stir in between each. Stir-fry for 2 minutes, then add mushrooms and rice cakes. Stir fry for an additional 4 minutes, or until parts of the rice cakes are lightly browned and everything is cooked through.

Transfer to a serving dish and garnish with scallions and sesame seeds.

Thank you so much to Bibigo USA for sponsoring this recipe! For more recipe ideas and to learn more about their products, visit their website!

Recipe: Chicken Satay

SatayRecipe_01.jpg

Satay is a common street food in Malaysia, where my parents are from. Any sort of meat can be cut into small pieces and grilled on a skewer to be satay and it is fun (for me at least) to taste all the offal-ly bits. Vendors repeatedly fan the charcoal grill and flip handfuls of skewers back and forth for that signature char. I have fond memories during visits with my relatives where we would go to bigger satay joints and they would bring piles of satay to our table and we would feast on them stick by stick. Back when I was a kid those places used to bill by a somewhat honor system of counting the number of empty sticks we had at the end…and boy, did we have a lot.

Satay made of marinated chicken thighs is the easiest for me to recreate on my grill at home. Chicken thighs stay relatively moist when grilled and cook quickly. I developed this recipe from my memories of what it should taste like so I am not sure if it is the most authentic, but it does taste right to me!

JUSTEggFolded_Story3.JPG

How to Make Chicken Satay

Ingredients

1 1/2 lbs boneless/skinless chicken thighs, in 3/4–1” cubes
1 tbsp ginger, grated
3 tbsp brown sugar
2 tbsp fish sauce
2 tsp cumin
1 tsp turmeric
1/2 cup coconut milk
2 tbsp neutral oil, plus extra for grill
peanut butter, to taste
hoisin sauce, to taste

For Serving

cucumber, cut into small chunks
red onion, cut into small chunks
cilantro
peanuts, chopped

Procedure

The night before, place 12 bamboo skewers in water and let soak overnight. This will help prevent them from burning to a crisp on the grill.

Also the night before, whisk together grated ginger, brown sugar, fish sauce, cumin, turmeric, coconut milk, and oil to make the satay marinade. Combine with chicken cubes and coat the chicken thoroughly. Cover/seal and store in refrigerator to marinade overnight.

Spear chicken onto the skewers and leave covered in the refrigerator until ready to grill. (If making ahead, wrap exposed bamboo with a damp paper towel to prevent from drying out.)

Pour the leftover marinade into a small sauce pan and bring to a full simmer. Whisk in hoisin sauce and peanut butter to taste. Set aside until ready for serving.

A charcoal grill is recommended to get that smoky grilled satay flavor. When grill is ready, brush the grill rack with a bit of extra oil. Add chicken skewers to the grill, turning occasionally until the chicken is cooked through. As the pieces of chicken are small, these will cook fairly quickly, so be sure to monitor.

Transfer peanut sauce to a serving dish and top with chopped peanuts. Serve satay with cucumbers, onion, cilantro, and peanut sauce.

This recipe was originally written for my friends at Nomtastic Foods.

Recipe: Bulgogi Rice Balls

Lily_Aug3_Social_v2.JPG

Korean rice balls, or jumeokbap (translation: “fist rice”), are typically a pretty humble food, served as a snack or as a common component in a dosirak, or packed lunch box. They get compared to their fancier-looking Japanese onigiri or temari sushi counterparts, but I think there is a lot to love about the Korean version. They are super easy to make (as easy as mixing some fun seasonings and cooked rice together and forming them into golf ball sized balls), really kid-friendly and picky-eater-friendly what with the lack of raw fish and with cute portions, and they are a visually interesting way to present a staple side dish without a whole lot of extra effort. The rice balls here feature bulgogi beef in two ways: some of them have strips of steak placed on top, while others have flavorsome ground beef mixed into the rice itself. You can make them as simple or as complicated as you’d like, and the garnishes that you see here are entirely optional (but I personally had a lot of fun decorating them).

I will seize any opportunity to decorate my food with edible flowers from my garden. I am sure among professional circles there is some culinary school of thought that garnishing food in this manner is superfluous. But you know what?—I am not planning on opening a restaurant any time soon and my objective is to help you, the home cook, make something that brings joy to your dinner table. I think that a little edible flower magic is an easy cheat to accomplish that. So, when Bibigo USA asked me to develop a bulgogi rice ball recipe for them, I bugged them to let me exercise some creative license with the garnishing. I encourage you to get creative with your own versions, too! Don’t worry about having the exact same ingredients that are listed in the recipe; those are meant to be guidelines, and to clarify what it is that you see used in the photos. Use what you have handy. For example, sometimes on stemmed herbs like basil, the large leaves wilt and break down first but there are still teeny leaves clinging on in relatively good shape; this would be a great way to let those shine instead of going to waste. If you don’t have access to edible flowers, cutting slices of carrot or radish into flowers are a great (and honestly more functional) alternative. Jumeokbap are so fun to eat, so I hope you have fun making them as well!

Here’s a before and after of these bulgogi rice balls before and after garnishing:

How to Make Bulgogi Rice Balls

Ingredients

4–5 oz ground beef
1–2 oz sirloin steak, sliced thinly against the grain
4 tbsp Bibigo Original Korean BBQ Sauce, divided
1 cup uncooked rice, washed and drained
1 1/2 cups water
1/4 cup Korean crushed seasoned seaweed snack*
1/2 tsp salt
3 perilla leaves, thinly sliced (optional)
1/2 tsp soy sauce
Sesame oil
Cooking oil

For Garnishing

Chives, chopped
Scallions, sliced thinly
Radish shoots
Pickled daikon, sliced thinly
Edible flowers
Sesame seeds, toasted

*I found this at a Korean grocery store and it’s specifically for jumeokbap, but if you don’t have it, feel free to substitute with furikake or crush up seaweed sheets and mix with a little salt.

Procedure

Soak rice in some water for 5 minutes, then drain. Combine rice and 1 1/2 cups water in rice cooker and set to cook.

Combine steak with 2 tablespoons Bibigo sauce and set aside to marinade. 

In a separate bowl, mix together ground beef and the remaining sauce, making sure to break down any clumps of beef.  Pour mixture into a small pan on medium heat and simmer until cooked, about 3 minutes. Set aside. 

Add enough cooking oil to coat the pan, turn up to medium-high heat, and sear the pieces of steak in a single layer for about 30 seconds on each side. Remove from pan and set aside.

When rice is cooked and slightly cooled, divide into two portions. For one of the portions, combine rice, cooked ground beef, seaweed, perilla, and salt into a bowl and gently mix to combine. For the other portion, combine rice with soy sauce.

Pour some sesame oil into a small bowl. Dip clean hands into the oil and lightly coat them to prevent sticking. Use hands to form the ground beef and rice mixture into small balls, about 1 to 1 1/4-inches in diameter. Repeat the process with the soy sauce rice, continuing to dip hands in sesame oil as needed to prevent rice from sticking.

Plate rice balls. Top soy sauce rice balls with pieces of steak. Then garnish all the rice balls as desired.

Lily_Aug3_Banner.jpg

Thank you so much to Bibigo USA for sponsoring this recipe! For more recipe ideas and to learn more about their products, visit their website!

Downloadable Peony Wallpapers

Peony Season 2020 has come and gone. But back in mid-May, I shot a couple of photos that I thought would make lovely iPhone wallpapers, so I thought I’d share them here. I am trying to think of other types of blog posts and other forms of content that I want to share on here besides recipes, so I am hoping that more wallpaper-worthy photos can be shared here on occasion.

Save the images to your phone to use them as your wallpaper (these are sized for the iPhone X).

Please note that these are for personal use only and not to be used for any commercial purposes. All copyright of these images is retained by me, Lily Morello.

Recipe: Mini Wonton Tangsuyuk

017E9D3A-458D-4068-B8F1-B28647CEDF0B.JPG

I am a total sucker for funky mashups when it comes to food, and I am really happy with how this turned out. I love how my partnership with Bibigo USA has challenged me to think of creative ways to use frozen dumplings, such as in place of salad croutons, or in place of regular ol’ strips of meat here. (Credit to the YouTube channel Aaron and Claire as well, for inspiring me to find creative ways to use Korean frozen and pantry items while in quarantine. Their videos make me so happy!)

Tangsuyuk is typically the Korean version of sweet and sour pork/beef. There are some similar elements to its Cantonese-American counterpart, like crisp veggies and chunks of pineapple, but it tends to be more naturally colored and does not rely on tomato for its sweet-sourness. Instead, like many savory-sweet Korean sauces, it turns to fruits to get that natural fresh sweetness. (Yes, I know tomato is a fruit too, but I do feel it’s in its own category separate from apples and pears and pineapples.) For this recipe, I swapped the meat for adorable and flavorsome Bibigo Pork & Vegetable Mini Wontons. Heating them up by pan frying, and then keeping them hot in the oven until the very last moment before tossing with the sauce keeps them crisp and satisfying.

5723F90B-6EFB-4D19-A945-D3303F0840DF.JPG
Lily_July3_Banner_v1.JPG

How to Make Mini Wonton Tangsuyuk

Ingredients

40 Bibigo Pork & Vegetable Mini Wontons
1/2 carrot, sliced
1/2 green bell pepper, cored and cut into chunks
1/2 red bell pepper, cored and cut into chunks
1/2 small red onion, cut into chunks
3/4 cup canned pineapple chunks
2 tbsp cornstarch
3/4 cup + 2 tbsp water, divided
1/4 cup sugar
4 tbsp apple cider vinegar
4 tsp soy sauce
3/4 cup canned pineapple juice
1/2 tsp sesame seeds, toasted
Salt
Cooking oil

Procedure

Heat a large skillet or wok. In batches, pan-fry mini wontons with cooking oil according to package instructions. (Alternatively you could also deep fry them.) Transfer to a baking tray and place in the oven at 200°F to keep warm.

Add enough cooking oil to coat the bottom of the hot skillet or wok. Add carrot slices and stir-fry for 1 minute. Next, add bell pepper chunks and stir-fry for 1 minute more. Then, add onion chunks and a pinch of salt, and stir-fry for an additional 1 minute. Remove from heat and set aside.

In a small bowl, whisk together 2 tablespoons water with cornstarch to form a cornstarch slurry. Set aside.

Bring 3/4 cup water and pineapple juice to a simmer in a small pot. Add sugar and stir to dissolve. Add apple cider vinegar, soy sauce, and a pinch of salt and stir to combine. Add the cooked vegetables and pineapple. Bring to a gentle boil, then give the cornstarch slurry another whisk before adding to the pot. Stir contents of the pot until the sauce becomes homogenous and syrupy. Remove from heat. 

Transfer mini wontons to a serving bowl and pour sauce and vegetable mixture on top. Garnish with sesame seeds.

Thank you so much to Bibigo USA for sponsoring this recipe! For more recipe ideas and to learn more about their products, visit their website!