One-Pan Çılbır-Inspired Poached Eggs Yogurt Bowl with Burst Tomatoes and Chili Butter

poached eggs with burst tomatoes over yogurt

Here is my latest riff on my ongoing obsession with çilbir, which is known in English as Turkish eggs. Çilbir is a dish that, from what I’ve read, dates back to the Ottoman Empire, and it is a dish of garlicky yogurt topped with poached eggs and then drizzled with a chili butter made with a Turkish chili. This—and the various offshoots I’ve come up with—is my favorite type of breakfast.

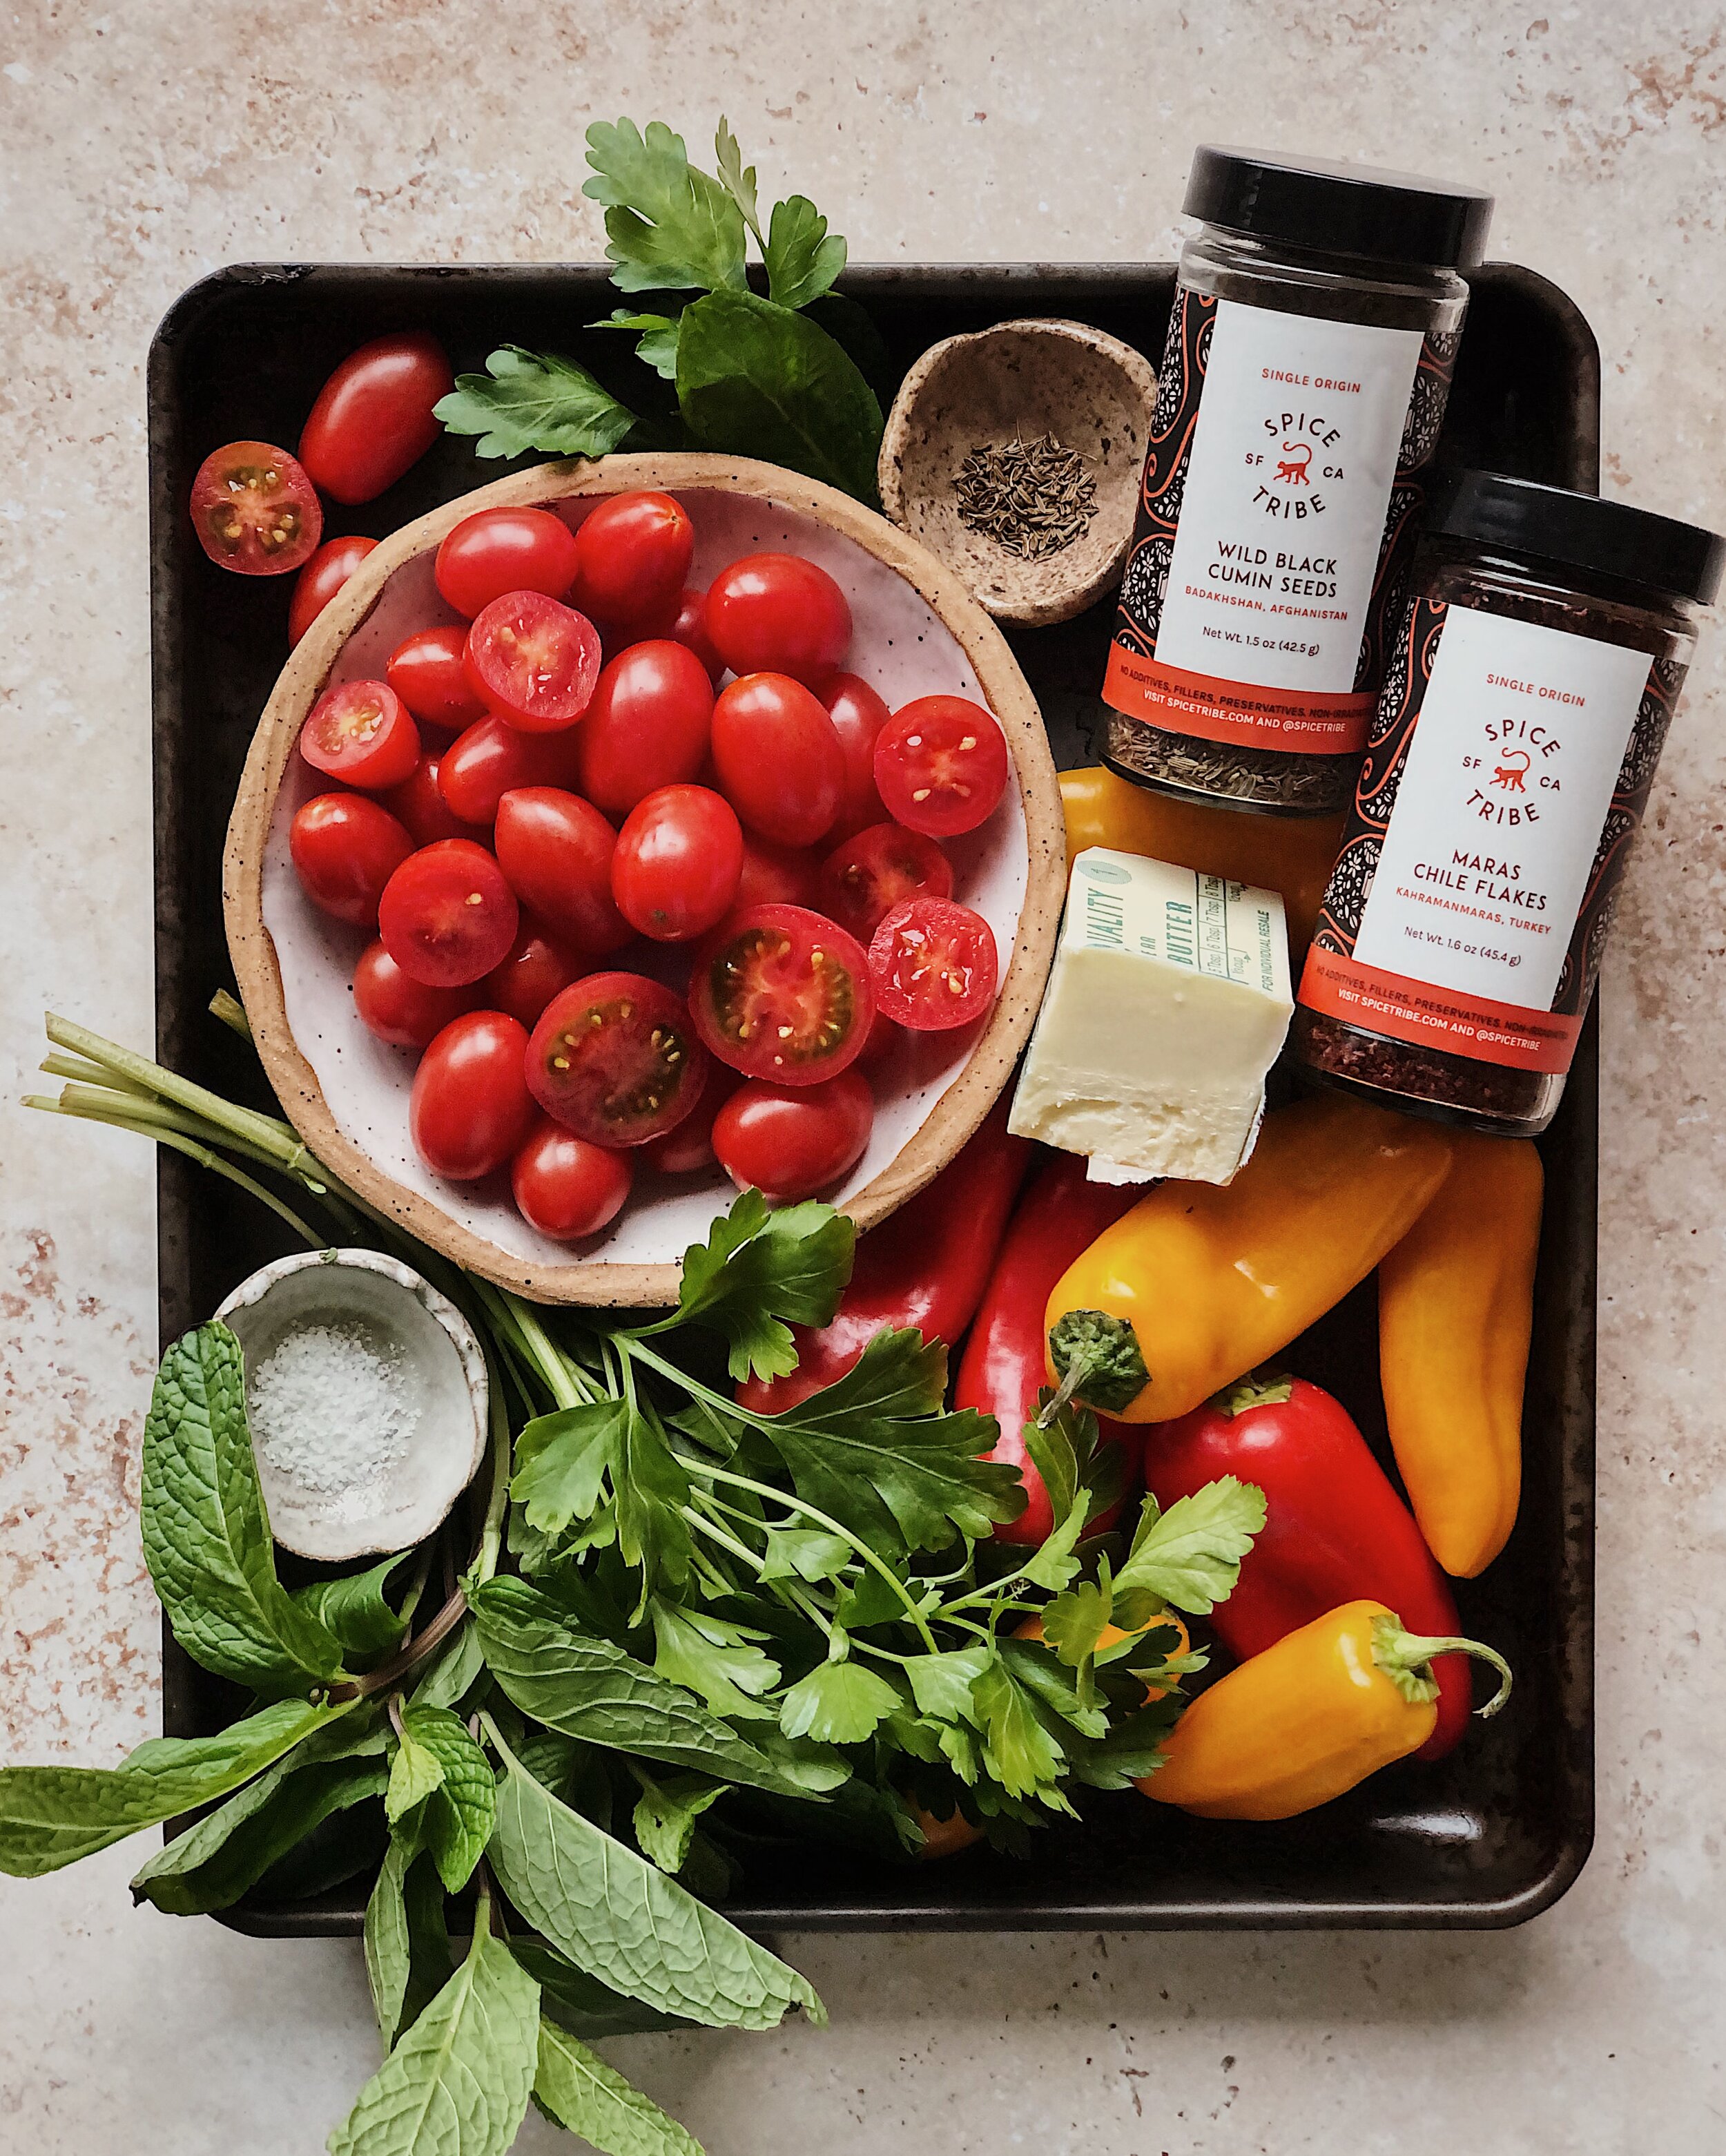
In this lazier version, I opted to just use regular yogurt straight out of the refrigerated container to make things easier. But to make up for the lack of garlic in the base, instead, I top the poached eggs and yogurt bowl with blistered cherry tomatoes. While I eagerly await for tomatoes to be in season once summer rolls around, this recipe makes the best of even sub-par off-season cherry tomatoes by letting them burst in oil and melted chili butter so the flavors that are present get concentrated and complex. Be warned that it does cause a bit of splatter when you’re dealing with juicy tomatoes in a pan with hot oil but it is totally worth it.

This is one of those recipes that doesn’t need precise measurements. After all, it’s a lazy morning recipe, and to me that means not having to find or wash your measuring spoons. You can fill the bowl with Greek yogurt, or not. Go big on the chili powder, or don’t. Have a few extra springs of herbs left over from some other overly-precise recipe? Use them here. In the photos, I used dill, micro cilantro, and flowers from the three-cornered leek that I foraged near a creek. Chive flowers would be amazing here too, as the light onion-y flavor goes really well with the dish. But just use what you have and follow your heart with this one.

poached eggs with burst tomatoes over yogurt

This super easy idea only requires one little (8-inch) pan to do everything you need to make a luxurious breakfast that will surely impress others and more importantly, yourself. The use of this pan can be broken down into three phases.

The three phases of this One-Pan Breakfast:

  • Poaching the eggs: It might take a bit of practice to get it just right but poaching eggs in a shallow pan allows the egg whites to stay tidy and gives you a great looking poached egg. After the water is boiling, I add a splash of white vinegar and turn the heat down for a gentle simmer. Then I crack the eggs into small bowls, and gently tip them into the pan near opposite edges. After that, I turn the heat back up to medium-low for a more vigorous simmer and cook the eggs for 3 minutes before scooping them out onto a paper towel. (If you accidentally don’t fill the pan with enough water to fully submerge your eggs, you can just use a spoon to gently baste the tops with the boiling water.) If you are continuing on with the recipe and eating it right when it’s assembled, I find it is not necessary to plunge the eggs in an ice bath. If making multiple servings, you’ll obviously want a pan wide enough to keep some separation in between eggs.

  • Toasting the bread: This phase is actually optional but trust me, you’ll want bread to scoop and mop up all that rich egg yolk, yogurt, and wonderful melted chili butter. I like to put enough olive oil in the pan to coat the bottom and then essentially fry one side of the bread slices in it. I let one side get crisp and keep the other side untoasted so it stays more flexible for making a scooping motion with the contents of the breakfast bowl.

  • Making the tomatoes and chili oil topping: This phase involves cooking the cherry tomatoes in hot oil until the skins blister and they explode, releasing and concentrating their juices. Then the heat gets turned down and those juices get to mingle with sizzling butter and chili powder before the mixture gets poured over the yogurt and eggs. I use Korean gochugaru for the chili powder because it’s what I have in a huge shaker that I always keep out on the kitchen counter. Aleppo chili pepper powder would also be perfect for this, but you can use what you like.

poached eggs with burst tomatoes over yogurt

Awkwardly Vague instructions for One-Pan Cilbir-Inspired Poached Eggs with Burst Tomatoes and Chili Butter

Ingredients

Greek yogurt
white vinegar, for poaching eggs (optional)
2 eggs
extra virgin olive oil
2 small slices of bread (optional, but recommended)
a handful of cherry/grape tomatoes
a pinch of kosher salt
1–2 tbsp butter
1–2 tsp chili powder (gochugaru or another variety of your choice)
fresh herbs or microgreens (optional)

Procedure

Scoop some Greek yogurt into a shallow bowl, bowl plate, or blate. Use the back of the spoon to create swooshes where the chili butter will be able to pool.

Make the poached eggs: Fill the pan with water and bring to a boil. Add a small amount of vinegar. Turn the heat down to low. Crack each egg into a small bowl. Gently tip the eggs into the pan near opposite edges. Turn the heat up to medium-low and poach for 3 minutes. Remove immediately with a slotted spoon and place the eggs on paper towels to drain excess water. Then place them on top of the yogurt. Carefully pour away the water from the pan and allow any residue to evaporate.

Toast the bread: Add enough olive oil to coat the base of the pan and set the heat to medium-high. Add the bread slices and toast until the desired crispness. If desired, repeat with the other side of the toasts.

Cook the toppings: Add a generous splash of olive oil into the pan and heat it on high. Carefully add a handful of tomatoes and season with salt. Allow the skins to char and blister, occasionally tossing the tomatoes around in the pan. (Note: there will be oil splatter, so please be careful.) Once most of the tomatoes look like they have burst, turn the heat down to low and add the butter. Once the butter starts to foam, add the chili powder. Use a spatula to gently stir the contents of the pan and incorporate the chili powder with the butter. Continue stirring until all the butter is sizzling.

Pour the tomato and chili butter mixture over the eggs. Top with fresh herbs or microgreens, if using.

Enjoy with the toasts on the side for dipping and scooping.

Lastly, if you are as obsessed with çilbir as I am, you may also want to check out my other variations: poached eggs in burrata and sambal butter, and Turkish eggs with charred tomatoes and sweet peppers.

How To Make Perfect Jammy Eggs

turkish eggs tomato and cucumber salad

I am pretty sure the term “jammy eggs” is a term that only exists on Instagram. It is used to describe when the yolk of a boiled egg still has a ways to go before becoming the dry, chalky grossness called for in old-school deviled egg recipes, but it holds together much better than a completely runny or raw yolk. There’s a supple, gooey, almost gelatinous look and consistency to the yolks in this in-between zone, and that’s why they end up getting called jammy eggs.

But there is more to the perfect jammy egg (I’ve also seen them sometimes referred to as soft-boiled egg) than getting the texture of the yolk just right. There’s also the look of the egg as a whole when you cut into it. Even if your timing is perfect for cooking the egg to get that jammy yolk consistency, there are still things that can prevent your egg from being picture-perfect, such as a yolk that is completely off to one side, a big air bubble causing the shape to look completely wonky, or a bunch of the egg white getting stuck to the shell when you try to peel it.

I’ve made a lot of eggs for the ‘gram over the past few years. A lot of this is largely thanks to my ongoing partnership with Pete & Gerry’s who have been a wonderful supporter and sponsor of my work. (This blog post is NOT sponsored but I can honestly say their eggs are delicious and gorgeous, and that very lovely people work at the company.) But making eggs for sponsored work or a client shoot means even more pressure to get them to look perfect, which can be stressful for shooting a food preparation where so much can go wrong. So after cooking probably several dozen eggs in this style, I can share all that I have learned to set all the rest of you up for success in your future egg-making ventures too!

tamago sando closeup

Phase 1: Choosing What Eggs to Use for the Best Looking Jammy Eggs

  • Use good-quality eggs that are fresh from the grocery store. (I have not used eggs directly from the body of a chicken before so can’t attest to the nuances of eggs that fresh.) There is info online about how the shells will be harder to peel off when the eggs are fresher, but I’ll address how to overcome this in Phase 3.

    • What happens if you skip this tip: You want fresher eggs because the air bubble inside of them will be smaller, resulting in a nicer boiled egg shape. Over time, due to moisture loss within the egg, the air bubble at the wider end of the egg gets bigger. Using an old egg will result in the boiled egg having a big crater in the bottom, because the big air bubble prevents the egg white from fully taking on the shape of the egg shell.

Phase 2: Boiling the eggs

  • Step 1: Use a safety pin to poke a hole in the wider end of each egg. This allows airflow in and out of the egg and can also help mitigate the impact of the air bubble inside the egg on the shape of the final result. Keep the eggs out on the counter to bring them closer to room temp after this step.

    • What happens if you skip this tip: Pressure can build up as the contents of the egg get heated in the boiling water. This could cause the egg to crack and some of the white to leak out, ruining your perfect boiled egg shape.

  • Step 2: Bring a pot of water to boil on high heat. Make sure there’s enough depth to fully submerge the eggs. While you’re waiting, you could also get an ice bath ready for the end.

  • Step 3: Gently lower the eggs into the boiling water. Set your timer according to the guide below:

    • 6.5 minutes: Fully set whites and runny yolks. Perfect for ramen.

    • 7 minutes: Jammy yolk consistency on the outer parts of the yolk, liquid gold right in the middle

    • 7.5 minutes: Perfect jammy yolk consistency throughout

    • 8 minutes: Jammy yolks that aren’t going anywhere. Perfect for tamago sandos like the one shown above.

  • Step 4: Keep the eggs moving! Use a slotted spoon to continuously spin the eggs around their own axes as well as occasionally lift them out of the water and immediately lower them back in. Do this for the entire cook time. The centrifugal motion will keep the yolk positioned nicely as the egg white cooks, and lifting the egg in and out might help with reducing the impact of that pesky air bubble (if the eggs are relatively fresh).

    • What happens if you skip this tip: The yolk will settle in the egg before the egg white has had a chance to cook/solidify. When you cut it open, you will find that the yolk is in a weird spot and you have an ugly cross-section.

    • Credit to Eat With Your Eyes Closed for teaching me about egg yolk centrifuge.

  • Step 5: When the timer is up immediately transfer the eggs into an ice bath to stop the cooking. Move them around for a bit to really allow the heat to disperse and get the eggs to cool down.

Phase 3: Cooling and Peeling the Eggs

You could cook the eggs perfectly and still end up with ugly eggs if you don’t get this post-production phase right. If you followed Phase 1 correctly and used store-fresh eggs, they can be notoriously hard to peel, resulting in frustration and little bits of egg white (and all your hopes and dreams of a perfect-looking egg) being lost. Patience and cooling time are the keys to doing this phase right.

  • After your eggs are cool to the touch from resting in the ice bath, gently knock them against each other or a countertop to make little hairline fractures in the shells. I like to grasp the egg and encircle it with my palm when I do this, to help support the egg structure.

  • Especially concentrate on creating fracture lines at the wider bottom of the shell. Due to that air bubble, it will be easiest to start on this end anyway when you peel.

  • Place the unpeeled eggs in a bowl of cold water and put them in the fridge. Let them continue to chill for as long as you can, up to overnight! The cold temperature will cause things to shrink inside the shell and water will seep in between the cooked egg and the shell, creating separation.

  • When it is time to peel, start from that wider end and go gently and slowly, continuing to fracture the shell into little pieces as you go, rather than trying to peel off a big chunk at once.

    • What happens if you skip these tips: The egg white may stick to the shell!

Phase 4: Enjoying the Eggs!

Now you are ready to take photos of your eggs if you so choose, but more importantly, you are ready to eat them! Below is some inspiration for how to incorporate jammy eggs into your meals. I hope you found this blog post helpful, and I wish you eggcellent jammy eggs in your future!

brunch board
Spicy tomato noodle soup, hot pot inspired
eggsontoast

Poached Eggs in Burrata and Sambal Butter

I don’t have an exact recipe for this but it is maybe my favorite breakfast that I have ever made for myself so I had to document it here, if anything so that I could remember what I did. This is another poached egg bowl born out of my obsession for çilbir, which is known in English as Turkish eggs. Çilbir is a dish of garlicky yogurt topped with poached eggs and then drizzled with a chili butter made with a Turkish chili. This one has those general components (creamy base, eggs, spicy melted butter) but done a little differently in favor of some of my other obsessions.

This post is not sponsored but it uses some of my favorite storebought products to bring together a most epic of flavor combos:

  • Toom garlic dip: I love this when I am too lazy to make Lebanese toum from scratch

  • BelGioioso black truffle burrata: My absolute favorite burrata, I’m obsessed! Great stracciatella action inside with a thin casing and the perfect amount of truffle flavor.

  • Azalina’s sambal: A Malaysian company local to me in SF! I feel grateful to have them around to stay connected to the flavors of my heritage.

  • Mizkan Sushi Seasoning: This is my cheat for when I want a simple salad vinaigrette and I am too lazy to make one.

This dish also includes a beautiful little salad that I made out of mostly things I “foraged” from my backyard garden. Now that my edible garden is well underway and in full bloom, I love being able to go out there and snip little bits of leaves from here and there to make an herbaceous salad whenever I want to bring some freshness to a dish. This would also be great with a salad of any tender herbs you have remnants of in your fridge, or mild cresses, or baby arugula.

Oh yes, and a delicious bread is an absolute must to serve with this dish, to spoon on all the creamy goodness and mop up the bowl. Here, I had it with slices of a garlic loaf from my favorite Bay Area bakery, Wild Flower Bread!

Awkwardly Vague instructions for Poached Eggs in Burrata and Sambal Butter (with a little herby salad)

Ingredients

2 eggs
white vinegar, for poaching eggs (optional)
scoop of Lebanese toum (garlic dip)
4 oz ball of black truffle burrata
1 persian cucumber, sliced into ribbons with a veggie peeler
4 tbsp salted butter
Malaysian sambal
a small handful of fresh tender greens
seasoned sushi vinegar
chopped dill
chopped chives

Procedure

Make the poached eggs. (I keep wavering between doing the whirlpool method vs not. In this case I thought the shape would be better for the dish without the whirlpool so here’s what I did instead:) Bring about 4 inches of water to boil in a pot. Crack the eggs into small bowls. Turn the heat down to low, add a small splash of vinegar, and slowly tip in the eggs. Turn the heat up to medium-low and allow eggs to poach for 3 minutes. Transfer eggs to an ice bath.

Smear a scoop of toum into the bottom of your bowl. Break up the burrata and add it evenly on top of the toum to form a base for the eggs.

Arrange the cucumber ribbons and poached eggs on top.

In a small pan, melt the butter on medium-low heat. When it starts to foam, add in as much sambal as is to your taste. Break down the sambal paste with a spatula and mix it in with the butter until fully incorporated.

Toss your little collection of greens with a splash of the sushi seasoning.

Pour the sambal butter over everything in the bowl. Add the salad to one side and then sprinkle dill and chives over everything.

Serve with some amazing bread.

Recipe: Chili Cheese Scones

For this recipe, I partnered with Cabot Creamery to create my version of a baked goodie that I think gets totally overlooked: savory scones! I feel like sweet scones get all the love, but as a diehard member of Team Savory for life, what I like about savory scones is that they can be such a satisfying handheld snack or a way to round out a real meal. 

These scones are filled with a combo of green chilies, scallions, black pepper, and lots of high quality Cabot Vermont Sharp Cheddar. The inspiration for this flavor grouping comes from Indian-style chili cheese toast, which I first experienced at a Bombay-inspired restaurant in London called Dishoom. There, the pairing of chili cheese toast and eggs is called Eggs Kejriwal. I’ll still go to Dishoom whenever I’m in London, but at home, I was happy to find it was easy to replicate the chili cheese toast and was blown away by how good the simple combo of chopped green chilies, scallions, black pepper, and melted cheddar tasted together. It really is an example of the whole being more than just the sum of its parts and I think a lot of credit can be given to the power of a high-quality sharp white cheddar, when it is all gooey and melty, for bringing everything together.

So when Cabot Creamery asked me to come up with a recipe to show off one of their wonderful cheddars, I thought it would be tasty to put the flavors of one of my favorite toasts into the lovely portable format of a scone. But despite the inspiration coming from London, these aren’t going to be the dry, crumbly, or bland scones you might get with an afternoon tea service. These are flavor-packed American style scones and they are super tender and light!

I opted to use Cabot Vermont Sharp Cheddar for this recipe, which has such a nice bold sharp cheddar taste. Cabot is a co-operative owned by farm families throughout New England & New York and 100% of profits go back to the farmers, which I think is so cool for a brand that is so widely distributed. They are also the world’s first dairy co-op to get a B Corp certification. This particular cheese offering from them has a creamy texture and buttery richness to it, and is equally as good for just snacking on alone as it is getting baked into scones—which made it really hard for me to resist eating it while I was prepping the ingredients to shoot this recipe. 

These scones are nice and cheesy, with a little bit of kick from the chilies, and a unique spiced undertone from the coriander seeds and black pepper. I hope you’ll give them a try!

What you need to know about the key ingredients for this Chili Cheese Scone recipe:

  • Butter: Freezing the butter and then grating it is my go-to technique for any sort of baked pastry that I want to be airy and flakey. No one wants overly-dense, hard scones. In contrast, the frozen butter, and keeping everything as cold as possible in general, allows for the creation of steam inside the scones as they bake, which form air pockets that keep the texture light. I used Cabot Salted Butter for this recipe to add an extra note of rich savoriness.

  • Cheddar: The cheddar is really the star of these cheesy scones! I went for the Cabot Vermont Sharp Cheddar, which I think has a great classic sharp cheddar taste that really holds up nicely mixed into these scones. However, I think that Cabot Creamery’s Seriously Sharp Cheddar would also be great here. Be sure to grab one of their cheese bars and grate it fresh for this recipe.

  • Green Chilies: The green chilies are what give the scones a nice little spicy kick. I used a mixture of jalapenos and serranos here (2 very large jalapenos and 1 long serrano) but you could also choose one or the other. I removed the pith and seeds from the jalapenos because I don’t care for the texture but kept it all in for the thinner serrano and this brought a noticeable amount of heat to the scones. If you remove all the pith, the scones will be much milder.

  • Scallions: Chopped scallions add a nice savory and aromatic flavor to the scones. They get sweeter when the scones are baked and taste so good with the cheddar!

  • Black Pepper: This adds a zingy spiced component to the scones. Please do not use the ground pepper that comes out of a store-bought spice jar. Whole black peppercorns and a pepper mill on a coarser setting, and subsequently nice freshly-cracked pepper, is what will give you the flavor impact you want.

  • Coriander Seeds: Sometimes when I make chili cheese toast, I also include cilantro, or coriander. For my scones, I opted to include coriander seeds because I think they bring such a great mysterious and complex spice flavor without adding any extra spicy heat. I measured out the whole seeds first, then toasted them in a dry pan until they became fragrant, then pulsed them a couple of times in a spice grinder. If you have a mortar and pestle that would be even better. You want to crush them up and get them to release their aroma but you don’t need a fine powder.

A couple of other techniques to get the best scones:

  • Like I mentioned before, keeping everything cold is what gives you scones that are tender and airy instead of dense and firm. Popping the scones in the freezer while you wait for your oven to heat up will help the scones poof up instead of spreading out.

  • Creating letterfolds with the dough before cutting out the scones is what gives them those nice layers similar to an American style biscuit. You can definitely just gather the dough together and cut out the scones right away, but this extra step of flattening it out and folding the slab of dough a few times is a quick trick that makes them extra special.

How to Make Chili Cheese Scones

(Makes 8 scones)

Ingredients

2 cups AP flour, plus extra for dusting
2 1/2 tsp baking powder
1 tbsp sugar
1/4 tsp kosher salt
1 tsp freshly cracked black pepper
1 tbsp whole coriander seeds, toasted and then coarsely ground
2/3 cup heavy cream
1 egg
6 oz Cabot Vermont Sharp Cheddar, grated
1/2 packed cup scallions, chopped
1/2 cup jalapeno or serrano peppers, cut into 1/8” dice (see note*)
1/2 cup (1 stick) Cabot Salted Butter, frozen
1 tbsp Cabot Salted Butter, melted
Cilantro leaves, for decoration (optional)


Notes

* You can control the level of spicy heat in the scones by how much of the pith you choose to include. The majority of a chili pepper’s heat comes from the pith.

Procedure

Combine the flour, baking powder, sugar, salt, pepper, and ground coriander seed in a large mixing bowl and whisk together.

Set aside a few pinches of the grated Cabot Vermont Sharp Cheddar for topping off the scones later.

Into the dry ingredients, stir in the rest of the cheddar, plus the chopped scallions and chilies.

In a separate bowl, whisk together the heavy cream and egg.

Working quickly with cold hands, grate the stick of Cabot Salted Butter into the dry ingredient mixture, tossing together the ingredients along the way to ensure even distribution. 

Drizzle in about one-third of the wet ingredients. Incorporate gently with some of the dry ingredients. Continue gradually incorporating the wet and dry ingredients together, taking care to not overstir. (Mixture can be clumpy and uneven.)

Dump the mixture onto a work surface and gently press together with your hands until it all sticks together. Lightly flour a work surface, then shape the dough into a rough rectangle, about 6x9. Lightly flour the surface of the dough, then fold down the top third and fold up the bottom third (like you would fold a letter). Flip and rotate 90 degrees and repeat the shaping, rolling, and folding sequence. Flip and rotate again, then do the sequence one more time, for 3 sets of letter folds total.

Then, fold the dough in half and shape it into a flat circle, about 7-8 inches in diameter. Cut the dough into 8 equal wedges. Transfer to a parchment-lined baking sheet and place in the freezer for 15 minutes.

In the meantime, place an oven rack one-third from the top of the oven and preheat oven to 400°F.

Brush melted butter on the tops of the chilled biscuits. Sprinkle remaining cheddar on top. If desired, decorate with fresh cilantro leaves.

Bake for 25–27 minutes, or until tops begin to get golden.

Thank you so much to Cabot Creamery for sponsoring this recipe! Visit their website to find out where you can get their delicious cheeses, such as their naturally-aged cheddars, near you!

Recipe: Mini Frittata Muffins with Lap Cheong and Scallions

I used to make these mini frittata muffins as a go-to recipe for parties and potlucks when I was in college and into my early twenties. It is a super easy recipe with the help of instant buttermilk pancake mix, and you can add whatever fillings you would normally enjoy inside a quiche or frittata. Over a decade later, and with much more appreciation for the flavors associated with my Chinese heritage, I decided to revisit the old tried and true recipe and incorporate lap cheong (Chinese sweet sausage) and scallions. (I’m actually pretty obsessed with the combo of lap cheong, scallions, and cheese these days. You can find my recipe for stuffed cheesy bread with these ingredients here.) The end result is the flavors you’d expect in a Chinese-American fusion breakfast, in a nicely portable format.

Back when I was making this recipe all the time, I called them “quiche muffins” because I didn’t really understand the nuances of all the different baked egg dishes out there but in reality the texture is much more like a frittata—a frittata that is slightly leaning in the direction of a biscuit, in a muffin wrapper.

About substitutions: Feel free to swap things out according to your tastes or put your own cultural spin on it. Approach the ingredients as you would if you were making a quiche or omelette; if it makes sense to pre-cook the ingredient for one of these preparations, you should do the same here. Any grated semi-soft cheese would work, as well as crumbled chèvre or feta (though you may want to reduce the amount if using a soft cheese due to the added moisture).

Now, about the edible flowers. This recipe is great for the completely unnecessary but very Instagram worthy edible flower treatment because the batter is quite wet. Anything where the delicate flowers petals and herbs are in contact with moisture in the oven is going to help keep their color and shape better (compared to, say, a shortbread cookie). Here, I used calendulas, wood sorrel, violas, wild fennel, lemon balm, and oregano—a combination of foraged and home grown. As these were baking, I also watched over them like a wistful (but much less anxious) Great British Bake-Off contestant. Because the calendula flowers have layered petals, I would gently press down the top layers as they curled up in the oven to stay in contact with the batter, and that’s how I was able to help maintain their shape despite the heat. Here is what these cuties looked like before baking:

This recipe was adapted from Allrecipes.

How to Make Mini Frittata Muffins with Lap Cheong and Scallions

(Makes 6 muffins)

Ingredients

3 eggs
2/3 cup American style dry buttermilk pancake mix
~2 cups grated cheddar
2 lap cheong sausages
2 scallions, chopped
nonstick spray or 6 muffin liners

Procedure

Preheat oven to 350°F. Line or grease muffin tins.

Peel off and discard the outer casing of the lap cheong and cut into 1/8”–1/4” pieces. In a small skillet, fry the lap cheong on medium heat until cooked through. Drain on a paper towel and allow to cool slightly.

Beat eggs thoroughly in a mixing bowl. Stir in pancake mix. Then fold in cooked lap cheong, scallions, and cheese.

Divide the batter among the muffin tins, filling them only two-thirds of the way. If desired, decorate with herbs and edible flowers.

Bake for 12–15 minutes or until an inserted toothpick comes out clean. Allow them to cool and set slightly before removing and enjoying.

These photos were shot in partnership with Pete and Gerry’s. To find their free range organic eggs near you, click here.

How I Make Crispy Smashed Potatoes

smashedpotatoes.JPG

Smashed potatoes have become one of my favorite formats of potatoes in my life. And they are super easy to make, though—like all good things—they do take a little bit of time. First you have to boil the potatoes until they are completely soft, then you smash them to expose some fluffy creaminess from inside, and then you roast them until their the paper thin skins and the craggy surfaces created by smashing get browned and crispy. I didn’t realize until I started making these that even though I eat a lot of potatoes, I rarely eat them in a way where I can truly taste the pure flavor of the potato itself. In the photo above there are mini red skinned potatoes and purple ones. Spouse and I found that while we enjoyed every potato on the tray, there was something about the red skinned potatoes that had a little bit of extra something in their natural flavor that we preferred over the little purple ones. I encourage you to get whatever types of tiny potatoes you can find and try making this recipe with them, to see if you can taste a difference—for science.

Below is my recipe for how I make my smashed potatoes, which have become a go-to side or snack on many an occasion in my household. Some suggestions for how to enjoy them are:

To season the potatoes shown here, I used Spice Tribe’s Haitian-inspired Mama Manje blend and this made the house smell SO GOOD while the potatoes were baking, so I definitely recommend this blend. (I received this product as part of a paid partnership with Spice Tribe but this recipe is not sponsored and I gladly use their products in my everyday cooking). This blend does not contain any salt, so I have control over how much salt I add to the potatoes. However, you can use whatever seasoning blend you want; just check to see if it has salt and avoid oversalting if it does. For herbs, I used chopped chives, oregano, and lemon thyme, but you can use whatever fresh herbs you love; potatoes are great with pretty much anything, after all! The flower petals are dianthus from my garden; they are safe to eat but really there for the aesthetics.

How to Make Crispy Smashed Potatoes

Ingredients

1 pound mini potatoes
1 1/2 tsp kosher salt, divided, plus more to taste
3 tbsp extra virgin olive oil, divided
1/2 tsp low-sodium or salt-free spice blend*

*I like to use Spice Tribe’s Mama Manje blend or Fly by Jing’s Mala Spice Mix.

Procedure

Add cleaned potatoes to a pot and cover with water. Bring to a boil and add 1 teaspoon of salt.

In the meantime, preheat the oven to 450°F.

Continue boiling potatoes until very soft and a fork pokes through with no resistance, about 20–25 minutes. Drain and allow to cool slightly.

In a large mixing bowl, combine potatoes, 2 tablespoons olive oil, 1/2 teaspoon salt (or to taste), and the spice blend of your choice. Toss to coat the potatoes in the oil and spices.

Dump the potatoes and any excess oil/seasoning onto a large sheet pan. Use the back of a fork to gently press down and smash the potatoes. Drizzle with the remaining olive oil.

Bake for 25 minutes or until you notice some browning on the fluffy parts.

Recipe: Eggs in Easy Red Pepper Sauce with Chili Butter

I love myself some shakshuka but there is just one problem: every time I think about making it, I am hit with anxiety over how the eggs will turn out. Either I make the wells in the sauce too small and the egg whites end up running away all over the surface of the dish or the yolk ends up breaking or getting overcooked. I have tried maybe over a dozen times and getting those perfect sunny-side-up eggs poached in the shakshuka tomato sauce has felt completely impossible (I am now convinced that all those photos online of perfect shakshuka were photoshopped).

So, I started brainstorming ideas for shakshuka-adjacent recipes that are just as big on flavor and runny egg deliciousness without the anxiety. I feel confident in my ability to make regular poached eggs, so this recipe involves making the sauce and eggs separately and then plating them together at the end to form a low-stress dish that you won’t be able to resist scooping into with a nice crusty piece of toast.

For the sauce, I thought I’d go for something as easy as possible, which is one of those sauces where you literally just throw everything in a blender and blitz it together. Since it is not tomato season at the moment and I have been feeling rather uninspired by the winter produce that is in season, it was a good time for me to play around with just using up pantry items. Whether you are still burnt out from cooking up a storm during the holidays or you are just feeling lazy about venturing out to the grocery store in the cold, this is the recipe for you. The sauce is inspired by romesco sauce, a Catalonian roasted tomato and pepper sauce, but it utilizes jarred bell peppers and tomato paste instead. To make up for the sort of one-note flavors of the jarred ingredients, seasoning is everything in a blender sauce like this! I reached for my go-to all purpose seasoning blend—Spice Tribe’s Haitian-inspired Mama Manje—and it instantly transformed the sauce from tasting rather flat and bland to having incredible depth of flavor. I’ve found in general that this seasoning blend is capable of rescuing anything from blandness with its unique combination of green bell pepper, onion, thyme, cinnamon, garlic, ginger, habanero, and star anise.

And then to add a little something extra to the dish, it all gets finished off with my favorite recipe for chili butter. The dish has plenty of flavor already with the romesco-like sauce and the perfectly poached eggs nestled into it, and a sprinkle of fresh herbs and cheese, but a finishing touch of melted butter infused with Spice Tribe Maras chile flakes takes the whole thing from a casual breakfast affair to an indulgent brunch for kicking off a gorgeous lazy Sunday. There is just something about the flavor that blooms out of bubbling together some salted butter and those chile flakes that is so good with those luscious runny egg yolks. It’s the kind of melted chili butter you’d typically find on top of Turkish eggs or çılbır and I started making it when I developed this recipe for Spice Tribe but I find myself finishing off many dishes this way.

This dish is simple to make but it certainly won’t taste like it! It’s also pretty flexible as long as you capture the basic ideas. Here are the different components that make up the dish:

  • The sauce: Kind of inspired by Spanish romesco sauce but way way easier because you just throw jarred bell peppers, almonds, tomato paste, good quality spices, garlic, olive oil, and vinegar into a blender and blend until smooth. You can use whatever almonds you have on hand as long as they are unsalted, and you might even be able to get away with salted almonds and just not add more salt. Don’t skimp on the Spice Tribe Mama Manje blend though, or you’ll end up with something that tastes rather flat and boring.

  • Eggs: The soft poached eggs with runny yolks that ooze into the yummy sauce are what make the dish, in my opinion. But if you don’t feel confident in your ability to poach eggs, fried eggs would also work great for this dish. Soft-boiled eggs, boiled for 6–7 minutes, would also be amazing. It’s meant to be low-stress so do what is easiest for you.

  • Fresh herbs and cheese on top: A little bit of freshness from some green herbs and some extra creamy umami from cheese are not critical, but they do much to enhance the dish in terms of taste, texture, and visual impressiveness. You can definitely use whatever herbs and crumbly cheeses you have on hand.

  • Melted chili butter drizzle: The finishing touch, this is what takes the dish to another level of brunch luxury, to see the spicy butter flow and pool in all the swirls of the sauce. And this extra little step is super easy too—just melt some butter, add the Spice Tribe Maras chile flakes, and allow the flavor the bubble and bloom for a bit before spooning it over your masterpiece.

How to Make Eggs in Easy Red Pepper Sauce with Chili Butter

Ingredients For the Red Pepper Sauce

12 ounces jarred roasted red bell peppers, drained
1/3 cup unsalted roasted almonds, roughly chopped
3 tablespoons tomato paste
3 garlic cloves
1 1/2 teaspoons Spice Tribe Pimentón de la Vera
1/2 teaspoon Spice Tribe Mama Manje Haitian Blend
2 tablespoons extra virgin olive oil
2 teaspoons red wine vinegar
1/2 teaspoon kosher salt (or to taste)

Ingredients For the Chili butter

1/4 cup salted butter
2 teaspoons Spice Tribe Maras Chile Flakes

Ingredients to Assemble the Dish

4 eggs, poached
1/4 cup queso fresco or feta, crumbled
Fresh herbs, such as parsley or dill, for garnish
Black pepper, to taste
Toasts, for serving

Procedure

Combine all sauce ingredients in a blender and blend until smooth. Transfer to a small pot and simmer on low until heated through and slightly thickened, about 5–10 minutes.

In a separate small saucepan, melt butter on low. Just as butter starts to bubble, add the Spice Tribe Maras chile flakes. Stir gently and continuously until foamy and fragrant. Remove from heat.

Spoon sauce into serving bowl(s). Nestle poached eggs into the sauce and top with cheese, herbs, and pepper as desired. Briefly warm up spicy butter again if needed, then pour over the plated ingredients. Serve with toasts on the side.

Thank you so much to Spice Tribe for sponsoring this recipe! Check them out on Instagram here or visit their website to purchase high quality spices and unique small-batch spice blends.

Loaded Sweet Potato Breakfast “Toasts”

For this recipe, I’ve swapped out my usual beloved toasted bread for autumnal slabs of roasted sweet potato and topped them with twists on all the goodies from a big savory breakfast.

  • roasted sweet potato slices: These serve as the main carb here, and the vehicle for transporting all the other delicious toppings to your main face hole. Sweet potatoes have that subtle natural sweetness that is in all good fall recipes. Roasting them turns them into soft comfort food, yet they stay sturdy enough to act as “toasts”.

  • crispy prosciutto: Crisping up the prosciutto on the same sheet pan while you’re roasting the sweet potatoes turns them into these super savory chips that are like a dainty version of bacon.

  • cheddarized scrambled eggs: This is what I call my favorite way to make scrambled eggs. They’re based off Gordon Ramsey’s low and slow method but at the very end before the eggs are fully cooked, some sharp cheddar gets folded in so there’s also gooey, melty cheesiness in the mix.

  • crème fraîche: Inspired by the sour cream that tops a perfect loaded baked potato, I finished these off with a dollop of crème fraîche to pull everything together before sprinkling on a little bit of fresh thyme and microgreens for freshness, and some smoky paprika.

Click here to get the recipe on the Pete and Gerry’s site!

Thank you so much to Pete and Gerry’s for sponsoring this recipe!

A Festive Champagne Brunch Done My Way

As the weather is finally starting to cool over here in San Francisco and we’ve finally started to get some much-needed rain, it finally feels right for me to shift my creative brain towards thinking about the festive season. It’s at this time of year that my mind is pulled to two extremes—I either want to be cozied up at home, warming my house with the smell of things baking in the oven and simmering on the stove, or traveling off to snowy places with charming town squares illuminated with holiday lights. Now that I’ve started busting out the fall-scented candles, I’m daydreaming about styling big platters of food and finding excuses to invite friends over for bubbly (but also about the prospect of actually getting to travel to someplace festive for the holidays this year). I am not big on family gatherings, but I do love so much the opportunity to celebrate small things with the people who are dear to me, and while that’s something we should do all year round, there is something about crisp cool air and gloomy skies that makes me crave that togetherness in my home.

For this blog post, I got to partner with Champagne Taittinger; founded in 1734, they are one of the last remaining family-owned and operated champagne houses. I am sharing an idea for a festive brunch idea to pair with Taittinger’s Les Folies de la Marquetterie, a wine that was created to be a tribute to autumn and those feelings of being at home. It mirrors a fall palette in its golden color and has delicate bubbles that remind me of the twinkling lights of the European Christmas markets in my daydreams. To me, it tastes very bright at first and then has a finish that is kind of oaky; in the tasting notes, it says it is “full-bodied and fruity on the palate with golden peach flavors leading to a finish with light woody notes”. It is a full flavored and complex champagne, so they recommend that it be paired with something robust like roasted meats.

I paired Taittinger’s Les Folies de la Marquetterie with Cantonese roast duck from a local restaurant and homemade waffles with scallions and lap cheong (sweet Chinese sausage) in the batter. The combination of duck and waffles was inspired by a brunch restaurant in London that I visited during Christmastime in 2019, so when I think of a festive brunch, I think of this combination! I thought it would be fun to style them together on this big vintage platter that I recently found on one of my antiquing hunts and I filled it out with slices of cara cara oranges, fresh jujubes, and lots of fresh herbs.

When you think of champagne pairings, you probably do not think of Cantonese roast meats. However, I recently came across this article on Food52 about why champagne goes with Chinese takeout. The article goes into how the two are perfect for one another because the bubbles of champagne allow you to better savor foods that are greasy by cleansing the tongue with every sip and its acidity provides balance when you are eating foods that are savory-sweet. So, although a Cantonese roast duck was probably not top of mind when roasts were noted as the recommended food pairing for Les Folies de la Marquetterie, I saw an opportunity to present a food from my childhood and my culture in a different light. And what I learned from that article was totally true! The succulent duck tasted sooo delicious with the champagne; taking a sip of it in between bites made each bite feel as if I was tasting the yummiest duck for the first time. 

I think most Westerners do not see Cantonese roast duck as a delicacy because of its typical presentation—I am talking about the ones you see hanging in the windows of bakeries in Chinatown or in the hot deli of Asian supermarkets—but for me, it is very much a special occasion food. If you go to one of these at Chinese New Year, they will be absolutely packed with uncles and aunties trying to order their siu ngap (roast duck) and siu yuk (roasted pork belly with crackling skin). Getting a roast duck was always a special treat when I was young, and I loved everything about it from savoring the fattiest parts of the skin that the rest of my family didn’t want to the soup my parents would make by simmering the bones with pickled mustard greens afterwards. Now that I am grown and living in an area with so many local shops that sell them, I can get a roast duck whenever I want and I can make whatever sides I want—even waffles!—but it will always feel like a special occasion when I bring one home.

I was thrilled that Taittinger was willing to give me the opportunity to share this idea of pairing Chinese roast duck with their beautiful champagne. As you may know if you’ve read the captions of many of my Chinese food posts on my Instagram, I have been actively trying to present the foods of my culture in a way that showcases its complexity and deliciousness, as well as its worth. For too many too often, Chinese food is only known as cheap and ugly, despite its rich history and the sheer volume of possibilities it brings to the palate with all of its regional nuances. I am always so grateful to work with a brand that supports my efforts to rewrite the narrative of Chinese food in America and it means so much to me that Taittinger allowed me to showcase their special festive offering alongside a nostalgic dish. I am so proud to work with a brand that has such a rich heritage and prestige of its own, yet is still so open to diverse ideas. 

Truth be told, I am not an expert when it comes to sparkling wines and their pairings, but duck is prominent in French cuisine just as it is in Chinese cuisine, and both cultures have iconic ways of preparing it that are absolutely delicious. So to me, sharing the duck dish that I grew up with as a pairing with this lovely champagne made lots of sense. No one would question pairing champagne with duck confit or duck à l'orange so this meal is my Chinese-American spin on that. If you are like me and colder days put you in the mood for celebrating things big or small, I hope you will consider making one of Taittinger’s champagnes a part of your celebration, and I hope that this post inspires you to think outside of the typical pairings to bring along a dish that is special to you.

Thank you so much to Champagne Taittinger for sponsoring this post!

Jammy Eggs in Sambal

SambalEggs_Vertical2.JPG

This recipe was inspired by Malaysian sambal telur (eggs in chili sauce) which I associate with nasi lemak, the national dish of my parents’ home country. However, I altered the idea in a couple key ways:

  • tomatoes in the sambal: I don’t think of tomatoes as being common in Malaysian cooking and when I think of Malaysian sambal, it does not using contain tomatoes. However, I find spicy tomato sauces to be so addicting, and I wanted the sauce for this dish to be something that heat lovers would want to keep coming back to, scooping up over and over with their roti or naan. So my version is a tomato-y sambal. If you leave a lot of the chili seeds in, it will definitely pack a punch, but the acid from the tomatoes makes it even more pleasing.

  • jammy eggs: With typical sambal telur you tumis or fry/sauté hard boiled eggs, so not only are the yolks fully cooked but the outside of the whites have a unique, firm brown skin from the frying. I prefer soft and gentle eggs that have a luxurious mouthfeel so I opted to nestle jammy 6.5-minute eggs into my tomato sambal for this dish.

Click here to get the recipe on the Pete and Gerry’s site!

SambalJammyEggs_Horizontal1.JPG
SambalJammyEggs_Horizontal2.JPG

Thank you so much to Pete and Gerry’s for sponsoring this recipe!

Recipe: The Easiest Strawberry Galette

strawberry-galette.JPG

This is for sure the easiest strawberry galette recipe because the very first time I made it was under pretty stressful circumstances, and I still managed to pull it off on the fly; it turned out so well despite my totally just winging it that I decided to make it again to write the recipe down and share it with you guys.

The first time I made this strawberry galette was for my friend’s big 30th birthday bash in Palm Springs. His husband had gone all out organizing a gorgeous multi-casita private resort rental for our group of 10 for a long weekend and it was everyone’s first post-vaccination group outing so we were all a little giddy with the culture shock of spending time with other humans again. Prior to the event, all the planning was coordinated through a group chat on Instagram and during our first meal all together, I learned that most of the party had already checked out (stalked) each other’s Instagram accounts, and were very intrigued as to why one of the party members (ME) had thousands of followers. Everyone was incredibly kind and curious to learn about my career as a food blogger, but of course in my mind the pressure was on for the brunch that I had planned to contribute to a couple days later. THEN, I learned that the plan for the entire group to contribute to said brunch was scrapped and that there was no backup plan other than my enthusiasm (which, thankfully, was shared by one other party-goer who wanted to cook too). My original plan has been to make my Everything But the Bagel Galette for the group cookout, but since no one but myself and one other person would be cooking, I knew I had to make another dish, and I tried to come up with something as easy as possible that would still look beautiful on a brunch table. And this is what I came up with!

Despite the ease with which I can describe myself cooking, I get pretty dang nervous cooking for anyone but my spouse and my family. So when I found myself in an AirBnB kitchen I had never used before, cooking for more people than I had ever cooked for before at any one time, and with a reputation to uphold—can you see why I said the circumstances were stressful? And yet, I was still really happy with how the galette turned out! If I could pull it off then, I think you can pull it off now.

strawberry-galette-unbaked1.JPG
strawberry-galette-unbaked2.JPG

This recipe is also super riffable (I hate that word) in that you can follow the same steps but switch up the fruit or the cheese for completely different flavors. You can change up the toppings for the crust, or add nothing at all if you want it keep things the absolute simplest. Strawberries are in season now and that is something I get very excited about, but I am eager to try this out with other fruits too.

Here are the simple steps to fruit and cheese galette glory:

  • Prep the ingredients: Move a ready-made frozen pie dough sheet to the fridge the night before to thaw, and then leave it on the kitchen counter to warm up for 30 minutes before rolling it out. (Or, if you didn’t plan ahead, leave the frozen pie crust out for 1–2 hours until it’s malleable.) You’ll also want to macerate the strawberries for that same amount of time. Macerating means adding sugar to the berries to draw out some of the liquid and sort of marinate in the sugar at the same time.

  • Roll out the dough: I use the frozen pie dough from Trader Joe’s and they crack 100% of the time when I unroll them. But this is no big deal! I just ball it all up together and roll it out again.

  • Spread the cheese: This tart is such a crowd pleaser because it’s a little sweet and a little savory at the same time. But on a practical level, the cheese layer helps protect the pastry, preventing the juices of the strawberries from making the crust soggy. I recommend chèvre (young goat cheese) for this, and you can even get a flavored one if you want to add another note to the galette—here I used this black truffle chèvre and it was soooo good! Other spreadable cheeses could work here too, like a well-strained ricotta or some feta. Whatever you use, you can pop it in the microwave for a few seconds first to get it to spread easily.

  • Add the fruit: Strain out the excess liquid that you don’t want to make the crust soggy, then pile the fruit in the middle.

  • Fold the crust: Galettes are meant to be rustic as far as I can tell, so don’t worry about making a perfect circle or anything. Just fold up little sections of dough all the way around.

  • Add finishing touches to the crust: You will want to eggwash the crust to get it to look golden brown but it’s not even close to the end of the world if you don’t have an egg and want to skip that. I think it is always nice to add a little something to the crust of a galette for more flavor and texture too, but it will still taste good if you choose not to add the sliced almonds and extra sugar like I did.

  • Bake: The pastry is so thin that it doesn’t take long but you will want to look out for it being golden brown on the top and crispy on the bottom.

Since the dough is meant for pies and the fruit is packed in there, don’t plan on being able to toss this gal like a frisbee, but other than that, I think it is a pretty unfussy recipe. The next time I find myself spontaneously having to cook brunch for a crowd, I know I’ll be making this again.

strawberry-galette.JPG

How to Make a Strawberry & Cheese Galette

Ingredients for the Galette

1 sheet ready-made pie dough, thawed in the fridge overnight*
1 pint strawberries, stems and leaves removed
2 tbsp granulated sugar (white or raw turbinado)
1/2 tsp flour, plus extra for dusting
5+ oz goat cheese, at room temp
1 egg, beaten

InGredients for the Optional Parts

a few sprigs of thyme, leaves picked
1/3 cup sliced almonds
1 1/2 tsp turbinado sugar
1 tbsp honey
1/2 tsp water

* If unable to plan the night before, leave the frozen crust out on the counter until malleable, about 1–2 hours

Procedure

Remove the pie dough from the fridge and allow to come to room temperature for about 30–40 minutes.

In the meantime, slice the strawberries—halve small ones and cut larger ones into slices so that everything is about equal thickness. Combine the sliced strawberries and granulated sugar in a bowl and toss gently to combine. Allow the strawberries to macerate until the sugar is completely dissolved and a noticeable amount of liquid has been released, about 30 minutes.

Preheat oven to 450°F.

Form a round disk with the pie dough. On a floured surface, roll out the dough to a 12-inch circle. Transfer the dough circle to a piece of parchment paper.

If needed, microwave the cheese in a small bowl for 10 seconds to get a spreadable consistency. Spread the cheese in the middle, leaving an empty 1-inch border all the way around. Optionally, sprinkle thyme leaves over the cheese.

Drain the excess liquid from the strawberries. Add the flour and toss to coat. Pile the strawberries in the middle of the cheese layer, leaving an empty 1-inch border of cheese all the way around (see image above).

Brush the dough border with beaten egg and fold small sections over the filling to form a galette-style crust. Brush the pleated crust thoroughly with egg, making sure to get it in all the folds and crannies.

Optional step: Combined sliced almonds with about 1 tbsp of the remaining beaten egg (or more as needed for all the almond slices to be very thinly coated in egg). Gently pat the almonds onto the crust. Then, sprinkle the turbinado sugar evenly over the crust.

Slide parchment paper onto an inverted baking tray and bake the galette on the middle rack for 20–25 minutes, rotating once halfway.

Optional step: Combine honey and water in a small bowl and microwave for 10 seconds. Stir together to make a glaze, and brush the glaze over the fruit when the galette comes out of the oven.

Allow the galette to rest for 10 minutes before cutting and serving.

Polenta Bowl with Poached Eggs and Dressed Herbs

PolentaBowl_Vertical2.JPG

Poached eggs nestled in creamy polenta and a lightly dressed salad of fresh herbs is my springtime version of a comfort bowl. Polenta is like a warm hug for your belly but it still feels a little lighter and brighter than something like jook or mashed potatoes, and I think the color looks so cheerful. The little salad that you see here was mostly foraged from my backyard garden but you can use what you have or what looks the best at your local farmers market.

This recipe has 4 components:

  • polenta: Don’t worry about looking for something labeled “potenta” at the store; polenta actually refers to the finished dish made of medium or coarse ground cornmeal. Simmering slowly with regular stirring allows the cornmeal to become tender and break down, leaving you with a light but satisfying base. (Adding crème fraîche enhances the creamy taste and texture, and delays the process of it firming up into cakes.)

  • poached eggs: The oozy yolks make little streams and pools in the polenta, and are what make this dish such a joy to eat.

  • soft herb salad: This lightly dressed little salad made of soft greens is meant to celebrate the bounty of spring produce. I foraged a medley of parsley, mint, basil, red veined sorrel, red shiso, nasturtium, pea shoots, and chive blossoms from my garden, which I then supplemented with some upland cress. Use what you have! This is also a great way to use up odds and ends of extra herbs that you’ve accumulated in your fridge from other recipes.

  • cheese shavings: Pecorino romano shavings are the most flavorsome way to add a finishing touch!

Click here to get the recipe on the Pete and Gerry’s site!

PolentaBowl_Vertical1.JPG

Thank you so much to Pete and Gerry’s for sponsoring this recipe!

Recipe: Scallion and Cheese Galette

scallion-galette.JPG

Lately I have been really into binge-watching old seasons of Guy’s Grocery Games on Hulu. The general premise is that Guy Fieri gives contestants a theme for a dish they have to create, and then some sort of challenging constraint that they have to work within (“I want you to make me a 5-star dinner, but you have to incorporate popsicles!”); they then have 30 minutes to race through “Flavortown Market”—a fantasy grocery story that seems to have everything from gas station to luxury grocery items—to grab their ingredients and make their dish for a panel of judges. I like thinking about what I would make if I were given those challenges, and I think it helps keep the culinary creativity juices flowing in my brain. In one episode, I saw a contestant make a cheat version of scallion pancakes with a frozen pastry dough, and that stuck with me as a great hack. That idea planted the seed for this scallion galette.

After my success with my Everything But the Bagel galette, I once again found myself with an extra sheet of Trader Joe’s pie crust dough in my freezer and thought about how I could turn it into something inspired by Chinese scallion pancakes. I started to think about other pastries that utilize an excess of scallions as a major flavor component too, and my thoughts drifted to those scallion and cheese buns at the Taiwanese bakeries, as well as shaobing—flatbreads encrusted with sesame seeds; at Taiwanese breakfast places I see them stuffed with scallions, pork floss, and other flavorsome delights. So, this galette is my fusion-y take on combining all those things into a fun brunch pastry.

scallion-galette-unbaked1.JPG
scallion-galette-unbaked2.JPG

The ingredient list for this is super minimal and it is so easy to put together! You will need:

  • a ready-to-go pie crust: I’m happy with the one from Trader Joe’s so that’s what I keep using. It comes pre-rolled into a nice circle that cracks and falls apart 100% of the time for me as I unroll it. But don’t worry—I squish it all together into a ball and roll it back out, and it still turns out light and flaky after baking.

  • lots of chopped scallions: I used 4 full scallions to stuff inside the galette, but sprinkled some more fresh ones on after baking as well. Feel free to go big; I think their flavor becomes quite mild after baking.

  • grated cheese: Use mozzarella if you want to call back to those Taiwanese buns from the bakery, but I used sharp white cheddar for a more complex flavor.

  • sesame seeds: Really pack them onto the crust for those shaobing vibes!

I think that this galette is simple and elegant as-is, but it can also be topped with what you would typically like to stuff inside your shaobing or other Taiwanese breakfast treats! After pulling it out of the oven, I topped mine with pork floss and some Lao Gan Ma chili crisp** before slicing up and serving.

scallion-galette-cut.JPG

How to Make a Scallion & Cheese Galette

Ingredients

1 sheet ready-made pie dough, room temp
6 oz mozzarella or white cheddar, grated
4 scallions, chopped
1 egg, beaten
~ 3 tbsp sesame seeds

Toppings (optional)

pork floss
chili crisp

Procedure

Preheat oven to 450°F. On a floured surface, roll out the pie crust to a 14-inch circle. Transfer to a piece of parchment paper.

Sprinkle the grated cheese evenly in the middle, leaving an empty 1-inch border all the way around. Top with chopped scallions.

Brush the border with beaten egg and fold small sections over the filling to form a galette-style crust. Brush the pleated crust thoroughly with egg, making sure to get it in all the folds and crannies. Generously sprinkle sesame seeds all over the crust. Slide parchment paper onto an inverted baking tray and bake for 20 minutes on the middle rack, rotating once halfway.

If desired, top with pork floss and chili crisp before serving.

Spam & Egg Fried Rice Tofu Pouches

SpamEggPouches_Vertical2.JPG

Aromatic garlic and scallion fried rice, creamy soft scrambled eggs, and savory fried Spam are stuffed inside sweet marinated aburaage pouches for a unique way to eat Spam and egg fried rice.

Spam and egg fried rice is very nostalgic to me; I even have memories of eating it on Thanksgiving. To me, it’s a comfort dish to be shared with family. Spam is one of those foods that seemed completely normal to me in my childhood and it wasn’t until I was older and had more conversations about food with Westerners that I learned that it was looked down upon. But then after that, I found out that many other Asian Americans felt that same nostalgia for it too; able to finally find our pride for those things that we were shamed for as children, I found a community that touted their love for their humble childhood foods and gratitude for what frugal immigrant parents put on the table. They all loved and grew up with Spam and eggs with rice.

So, I developed this recipe to try to change people’s perceptions about Spam and egg fried rice. To try to convince them that Chinese American food is not always the stuff that gets scooped into those 2-item combo takeout boxes. That even luncheon meat from a can is a meaningful ingredient to many. That many of the tropes that make them think of “elevated” food are just about presentation, and that any food can be presented that way and be worth appreciation. It’s Spam and egg fried rice—but made fancy.

This recipe has 4 components:

  • marinated aburaage pouches: These are deep fried tofu that have soaked up a sweet marinade. I have been able to find them at Asian supermarkets. This is the one I usually get.

  • fried rice: I kept this part really simple, seasoning with just a little soy sauce. white pepper, and salt, and adding just scallions and garlic as aromatics. I did not want to overwhelm the natural flavor of the eggs or have it be too salty when combined with the Spam.

  • fried Spam cubes: The flavor bombs of the dish. Lately I have been getting the Lite kind, but use your favorite variety.

  • soft scrambled eggs: I like to use the low and slow method, and gently push them into big curds for this recipe. I was genuinely impressed by the rich eggy flavor of Pete and Gerry’s Organic Eggs and definitely recommend their certified humane free range eggs for this recipe. These eggs will require no additional salt because they are naturally flavorsome on their own and have a nice creamy balance to the crisped salty Spam.

Click here to get the recipe on the Pete and Gerry’s site!

SpamEggPouches_Vertical1.JPG

Thank you so much to Pete and Gerry’s for sponsoring this recipe!

Recipe: Turkish Eggs with Charred Tomatoes & Sweet Peppers

LilyMorello_TurkishEggs_03.JPG

One of my favorite breakfast dishes of all time is çılbır—known in English simply as “Turkish eggs”. The first time I had this was not anywhere in Turkey, but in London, and I was in awe over how bold it was to combine three such indulgent things: creamy garlicky yogurt, runny poached eggs, spicy melted butter. I love all of those things individually, but together they were something else entirely—unapologetically, mindblowingly good.

For a while, I wasn’t sure if Turkish eggs was really a Turkish dish. My Kurdish friend who grew up in Turkey never heard of it. And, I had trouble finding it on menus when I was researching where to eat in the three different cities I visited in Turkey; (likely due to being unable to read Turkish,) the only place I was able to get it was at a super hipstery brunch place in Istanbul with major San Francisco vibes, where their riffed version came on a bed of wilted greens. But finally, I found this article by Maha Salah which talks about çılbır being considered a humble dish made from Turkish moms’ kitchen staples, and that’s why it’s not included in the flashy kahvalti spreads in the touristy areas I visited. (Although I also read that sultans of the Ottoman Empire enjoyed it for breakfast, too.)

Because çılbır is one of my favorite breakfasts, whenever I see Aleppo pepper or Halaby pepper, my mind immediately goes to the glorious spicy melted butter that spreads over the yogurt like lava in this dish. When I started working with Spice Tribe, one of the products I was most excited to receive was their Maras Chile Flakes, which are the same pepper variety but sourced right from Turkey. I knew I had to use it in some sort of riff on Turkish eggs.

To be clear, çılbır does not need riffing. Its beauty comes from its simplicity, so I love that it’s a dish born from what people always had on hand. But I wanted to show off Spice Tribe’s Maras Chile Flakes while contributing some ideas that went beyond the basic recipes that were already out there, and in a way that continued to celebrate the beauty of simple ingredients without a whole lot of effort.

LilyMorello_TurkishEggs_01.JPG
LilyMorello_TurkishEggs_05.JPG

So here’s what I added to the mix:

  • Cherry or grape tomatoes: Cooked in a hot skillet until they burst, the juices from these flavor bombs bring a little freshness, and acid to complete that holy quaternity of salt, fat, acid, heat.

  • Sweet peppers: Apparently these are mini bell peppers, but I buy them in bags that are generically labeled “sweet peppers” at Trader Joe’s; they are similar in size to a jalapeño pepper but completely different in taste. The natural sweetness of these becomes even more pronounced when they get all soft and charred, and they add another dimension of flavor indulgence when they are swimming in that yogurt and butter.

  • Wild black cumin seeds: Bloomed in the butter as it melts, Spice Tribe’s Wild Black Cumin Seeds add a fragrance of cumin to the dish and a little bit of a nutty texture. When cooked whole, I find these black cumin seeds to smell and taste like a milder version of the ground spice I use in curries.

  • Fresh herbs: I couldn’t resist garnishing with some fresh herbs—in this case, parsley and mint. But I admit the motivation was mostly aesthetic; the dish will be still delicious without them.

Served with some crusty toasts or charred flatbreads to mop everything up, this dish is a delicious paradox of humble yet indulgent ingredients. Those extra add-ons really turn it into a full meal, so I would recommend enjoying this not just for breakfast, but any time of the day.

LilyMorello_TurkishEggs_02.JPG

How to Make Turkish Eggs
with Charred Tomatoes & Sweet Peppers

Ingredients

1 cup Greek yogurt
1–2 cloves garlic, pressed*
1/6 cup extra virgin olive oil
12 ounces cherry or grape tomatoes
8 sweet peppers, stems removed, sliced into 1/4-inch pieces
1/2 tsp Kosher salt, or to taste
1/4 cup salted butter
2 tsp Spice Tribe Maras Chile Flakes
1 tsp Spice Tribe Wild Black Cumin Seeds
2 eggs, poached
Fresh herbs, such as mint and parsley (optional)
Toast or flatbread, for serving

* If raw garlic is too pungent for your taste, substitute with 2–4 cloves of garlic confit or roasted garlic, mashed well.

Procedure

Mix together yogurt and garlic. Set aside to allow flavors to incorporate.

In a large nonstick skillet, heat the olive oil on medium-high until shimmering. Carefully add the tomatoes and peppers in one layer and season with salt. Reduce the heat to medium if the oil starts to smoke, but leave the tomatoes and peppers to char on one side before flipping over. (Note: As the tomatoes start to burst, there will be some oil splatter.) Cook the tomatoes and peppers until lightly charred on two sides, about 5–7 minutes total.

Move the tomatoes and peppers gently to one side of the pan, reduce the heat to medium-low,  and add the butter to the other side. As the butter starts to bubble along the edges, add the Maras chile flakes and cumin seeds. Stir the spices into the pool of melted butter and continue to cook until the butter starts to foam. Fold all the contents of the pan together.

Swirl the yogurt mixture onto the bottom of the serving dish(s), creating channels for the melted butter to flow. Tuck the poached eggs into the yogurt, spoon on the tomatoes and peppers, then pour the spiced melted butter over everything. Garnish with fresh herbs if desired. Serve with bread to scoop everything up.

Thank you so much to Spice Tribe for sponsoring this recipe! Check them out on Instagram here or visit their website to purchase high quality spices and unique small-batch spice blends.

Everything But the Bagel Galette

everything-galette.JPG

I’ve flattered myself into believing that this is the kind of novelty family-style menu item that people would wait in line to order at a cute brunch place—you know, back when that was a thing. But look at it! Can’t you see it too, if you use your imagination to think of a time when people were gathered on cute restaurant patios on sunny Sunday mornings sipping mimosas? A light, flaky galette encrusted with everything seasoning, filled with two kinds of creamy cheese and then topped with cold smoked salmon, pickled red (purple) onions, fried capers, and fresh dill and chives.

My inspiration for this galette was this Martha Stewart recipe that takes bagel toppings and puts them on a big flatbread instead. I happened to have an extra frozen pie crust sheet from Trader Joe’s in my freezer, and thought I’d try the concept as a galette instead, and it turned out pretty dang awesome!

I find that with at least the TJ’s frozen pie crust, the dough completely falls apart when you try to unroll it, but do not be discouraged by this! I just ball the whole thing together and roll it out again and it is always still incredibly flaky and puffy when it bakes. I won’t be ditching my from-scratch galette pastry dough recipe any time soon (a galette with heavy fillings like fruit or vegetables would require something sturdier) but for light toppings like these, the storebought pie crust works in a pinch (or a bout of laziness). The result is something quite delicate and crispy—the opposite of a bagel but delicious with the smoked salmon and other bagel toppings nonetheless.

Awkwardly Vague instructions for the
Everything But the Bagel Galette

Ingredients for the base

1 sheet ready-made pie dough, room temp
5 oz Boursin cheese
4–5 slices fresh mozzarella
1 egg, beaten
everything seasoning

Ingredients for the Pickled Onions

1/4 large red onion, sliced lengthwise
~2 tbsp sugar
red wine vinegar
salt

Ingredients for the fried capers

capers
neutral oil

other toppings

lox or cold smoked salmon
chives, finely chopped
dill

Procedure

To make the pickled onions: Place onion slices in a small jar (as small as they will fit). Bring some water to a boil. Add sugar and a pinch of salt to the jar. Add boiling water to the jar until three-quarters of the height of the onions are submerged. Stir to dissolve the sugar. Add vinegar just until the onions are submerged. Stir everything together and refrigerate when cooled. Make this at least 1 hour beforehand, overnight recommended.

To make the fried capers: Drain capers and pat dry on paper towels as much as you can. Add enough oil in a small pan to match the height of the capers. Once oil it hot, carefully add the capers (they will likely splatter a bit). Fry until the capers are “bloomed” and the splattering sound is subdued, but before they turn brown. Drain on paper towels.

To make the galette base: Preheat oven to 450°F. On a floured surface, roll out the pie crust to a 14-inch circle. Transfer to a piece of parchment paper.

Spread Boursin cheese evenly in the middle, leaving an empty 1-inch border all the way around. Tear mozzarella and dot all over the filling area. Brush the border with beaten egg and fold small sections over the filling to form a galette-style crust. Brush the pleated crust thoroughly with egg, making sure to get it in all the folds and crannies. Sprinkle everything seasoning all over the crust. Slide parchment paper onto an inverted baking tray and bake for 20 minutes on the middle rack, rotating once halfway.

Slide the galette base onto your serving board and top with bagel toppings as desired.

Recipe: Easy Cheese Hash Browns

breakfastramen

The earliest job that I can remember my dad having when I was a really young child was managing the finances at a company that distributed frozen potato products. In hindsight, we did not get nearly enough free potato goodness to show for it; perhaps my parents never took advantage because making fried potato things was fairly unfamiliar to them at that time, having not lived in the States for all that long. Anyway, I am not sure if it’s because of this, but I have spent most of my life thinking that it was impossible to make hash browns at home. Despite being very experienced with cooking potatoes in a vast array of formats at this point, I always envisioned has browns as something that had to come frozen from the store. Until one day I was experimenting with making a breakfast-y ramen, and looking around the kitchen to see what I could add to build upon the breakfast theme. I had a potato that was sort of past its prime and thought, what have I got to lose? Here’s what I did.

How to Make Cheese Hash Browns

Ingredients

1 small yukon potato, refrigerated
1/4 cup cheddar, grated
potato or corn starch
oil for frying

Procedure

Grate the potato with a box grater, then toss with potato starch until very lightly coated. Combine with grated cheese.

Heat some oil in a non-stick skillet. Add a thin layer of the potato/cheese mixture in, forming the shape/size you want. Pan-fry on both sides until golden.⁣

Enjoy your hash browns however you like. To make the breakfast ramen shown here: Prepare 1 package of SamYang Hot Chicken Flavor Ramen according to the instructions, then toss noodles and sauce with grated cheese until melted. Top with slices of your pork configuration of choice (this is leftover Taiwanese-style braised pork belly, but char siu, Spam, or bacon would be great), hash brown, egg, scallions, and furikake.